





How to Build and Refresh SFMC Audience Segments with a Filter Activity
When you’re working with Salesforce Marketing Cloud, you will often have a Data Extension with a large number of customer records. But in most cases, you won’t want to use all of those records for every campaign.
For example, you may only want to target customers who are based in the UK and have opted in to receive marketing emails.
One simple way to create this type of audience is by using a Filter Activity in Automation Studio.
Let’s see how to take the data from a Data Extension, apply our audience criteria, and store the matching records in another Data Extension. We can also see how to add the Filter Activity to an automation so the audience can be refreshed automatically.
Step 1: Start with source Data Extension
The first thing we need is a Data Extension that contains the customer information we want to work with.
For this example, let’s say we have a Data Extension called:
Customer_Master
It contains fields such as:
- CustomerID
- FirstName
- Country_code
- Opt_status
- Status
Let’s say this Data Extension contains 100,000 customer records.
We don’t want to send our campaign to all 100,000 customers. Instead, we only want customers who:
- Are from the UK
- Have opted in to marketing
- Are currently active
This is where the Filter Activity comes in.
Step 2: Create a Data Extension for the audience
Before creating the filter, we need a Data Extension to store the customers who meet our criteria.
For example, Let’s call it:
UK_Active_Marketing_Audience
This Data Extension will contain only the customers who meet the conditions we set in the Filter Activity.
We don’t necessarily need to copy every field from the source Data Extension. We can include only the fields that we need for the next step, such as an email send or a Journey.
For Example:
| Field | Example |
| CustomerID | 10001 |
| FirstName | Rani |
| Rani@example.com | |
| Country_code | UK |
| Opt_status | True |
| Status | Active |
Once we have this Data Extension ready, we can move on to creating the Filter Activity that will select the customers who meet these conditions.
Step 3: Go to Automation Studio
Now that we have our source and target Data Extensions ready, let’s go to Automation Studio and create the automation.
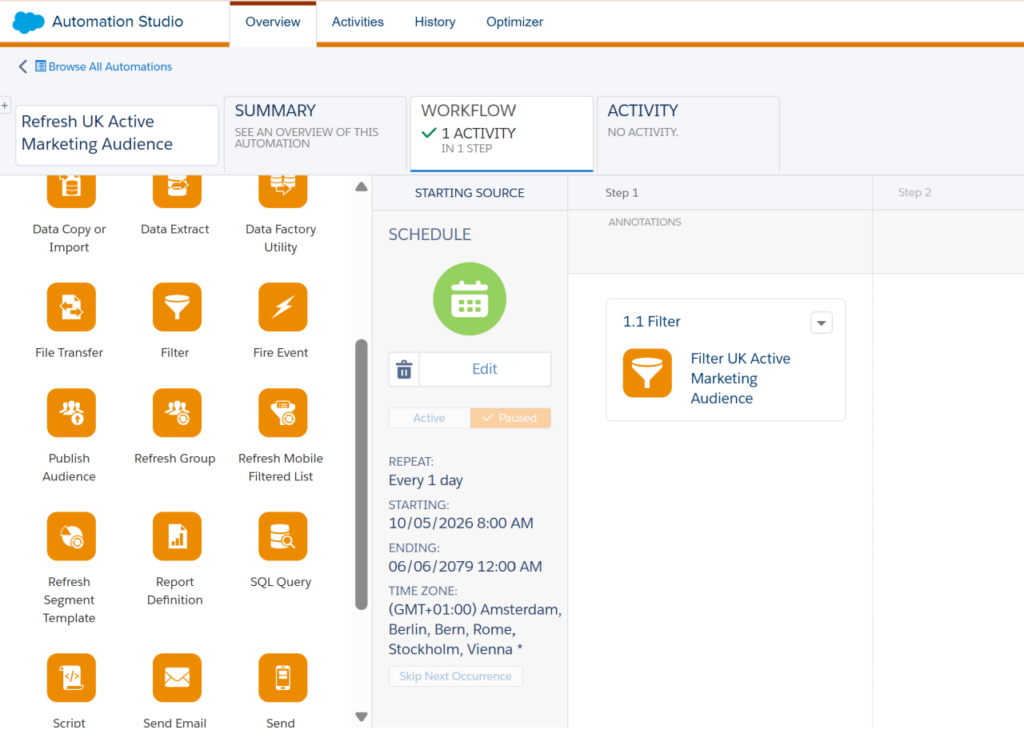
From Automation Studio, create a new automation and give it a name that makes it easy to understand what it is used for.
For example:
Refresh UK Active Marketing Audience
Using a clear name is helpful, especially when you have several automations in your account. Just by looking at the name, we should be able to understand what the automation is doing.
Step 4: Add a Filter Activity
Now that we have created the automation, the next thing we need to do is add a Filter Activity. Here we can either create a new filter activity or we can use Existing filters also
The Filter Activity is where we define which customers we want to include in our audience. It looks at the records in our source Data Extension and checks them against the conditions we set.
For example, if we only want active customers from the UK who have opted in to marketing, the Filter Activity will check each record and select the customers who meet those conditions.
Once we add the Filter Activity, we can move on to defining the conditions.
Step 5: Select the Source Data Extension
Now we need to tell the Filter Activity which Data Extension it should use.
Open the Filter Activity and select the Data Extension that contains the customer data we want to filter.
For our example, we’ll select:
Customer_Master
This is our source Data Extension, so SFMC will use the records in Customer_Master and apply the conditions we define in the next step.
Once the source Data Extension is selected, we can move on to defining the filter conditions.
Step 6: Add Your Filter Conditions
Now we can define the conditions for the audience we want to create.
For this example, let’s say we only want customers who are:
- From the UK
- Opted in to receive marketing emails
- Currently active
So, our filter conditions will be:
Country_code = UK
AND Opt_status = True
AND Status = Active

This means that a customer needs to meet all three conditions to be included in the audience.
For example, a customer from the UK who has opted in but is not active would not be included. Similarly, an active UK customer who hasn’t opted in would also be excluded.
Once we add these conditions, the Filter Activity will select the customers who meet them and add them to our target Data Extension.
Step 7: Understand AND and OR
When adding multiple conditions to a filter, you can use AND or OR depending on what you want your audience to include.
AND
Use AND when you want a customer to meet all the conditions.
For example:
Country_code = UK
AND Opt_status = True
Here, the customer must be from the UK and have opted in to marketing.
OR
Use OR when you want to include customers who meet either condition.
For example:
Country_code = UK
OR Country_code = Ireland
This will include customers from either the UK or Ireland.
So, when setting up your filter, make sure you choose AND or OR based on the audience you want to create.
Step 8: Select the Target Data Extension
Now we need to choose where we want to store the customers who meet our filter conditions.
For this example, we’ll select:
UK_Active_Marketing_Audience
This is the target Data Extension we created earlier. Once the Filter Activity runs, the customers who meet our conditions will be added to this Data Extension.
Before moving on, it’s also worth checking that the fields in the source and target Data Extensions are set up correctly. The fields we want to populate in the target should have compatible data types and lengths.
For example, if CustomerID is stored as Text in the source Data Extension, make sure the corresponding field in the target Data Extension can also accept the same type of value.
Once we’ve selected the target Data Extension and checked the fields, we can move on to deciding how we want to update the audience each time the automation runs.
Step 9: Understand How the Audience Is Refreshed
Once we’ve selected the source and target Data Extensions and added our filter conditions, the Filter Activity is ready to run.
When it runs, SFMC looks at the latest records in Customer_Master and checks which customers meet our conditions. The customers who match are then written to UK_Active_Marketing_Audience.
The useful part is that we don’t need to manually rebuild the audience every time the customer data changes. Whenever the automation runs again, the Filter Activity checks the latest source data and creates the audience again based on the same conditions.
For example, if Rani was included yesterday because he was an active UK customer who had opted in to marketing, but he unsubscribes today, he won’t meet the filter conditions the next time the automation runs. As a result, he won’t be included in the refreshed UK_Active_Marketing_Audience.
Step 10: Save the Filter Activity
Now that we have finished setting up the Filter Activity, we can save it.
Before saving, it’s worth quickly checking that everything is correct. Make sure you’ve selected the right source and target Data Extensions, the filter conditions and values are correct, and the AND/OR logic is set up as you expect.
It’s also a good idea to check the update option we selected in the previous step.
A quick check at this stage can help avoid issues when we run the automation later.
Step 11: Schedule the Automation
Now that the Filter Activity is ready, we need to decide when we want the automation to run.
This is important because the automation is what will refresh our audience using the latest data.
For example, we could set it to run every morning. When it runs, SFMC will check the latest records in Customer_Master, apply our filter conditions, and update UK_Active_Marketing_Audience.
Depending on the requirement, we could also run the automation every few hours, once a week, or at a specific time.
For this example, let’s schedule it to run every morning so the audience stays up to date.
Step 12: Run the Automation and Check the Result
Now that everything is set up, we can run the automation and see the results.
When the automation runs, the Filter Activity will check the records in Customer_Master and apply the conditions we defined earlier. The customers who meet all the conditions will then be added to UK_Active_Marketing_Audience.
Once the automation has finished, open the target Data Extension and check the records.
For example, if Customer_Master contains 100,000 customers and 25,000 of them meet all three conditions, those 25,000 customers will be included in the target audience.
Step 13: Check the Filtered Records
After the automation has finished, we can open the target Data Extension and check a few records to make sure the filter has worked as expected.
For example, if our conditions are Country = UK, MarketingOptIn = True, and CustomerStatus = Active, we should see records like these:
| Customer | Country_code | Opt_status | Status |
| Rani | UK | True | Active |
| Sarah | UK | True | Active |
| David | UK | False | Active |
Rani and Sarah meet all three conditions, so they should be in the audience. David doesn’t meet the marketing opt-in condition, so he shouldn’t be included.
Checking the audience after the automation runs helps us make sure the filter is working as expected.
How the Audience Gets Refreshed
One of the useful things about using a Filter Activity in an automation is that we don’t have to manually create the audience every time the customer data changes.
For example, let’s say Rani is currently an active UK customer and has opted in to marketing. When the automation runs, he will be included in our audience and stored in UK_Active_Marketing_Audience.
If Rani unsubscribes later, the next time the automation runs, SFMC will check his latest information. Since he no longer meets the marketing opt-in condition, he won’t be included in the refreshed audience stored in UK_Active_Marketing_Audience.
The same applies when new customers become eligible. If they meet all the conditions when the automation runs, they can be included in the target Data Extension.
So, by scheduling the automation, we can keep UK_Active_Marketing_Audience up to date based on the latest data from Customer_Master, without having to rebuild the audience manually each time.
Use the Audience in Campaigns
Once we’ve created the audience and checked that the records look correct, we can use the target Data Extension in our campaigns.
For example, if it’s set up as a sendable Data Extension, we can use it as the audience for an email send. We can also use the Data Extension as an entry source in Journey Builder, depending on how we want to build the journey.
The same audience can also be used in other Marketing Cloud features that support Data Extension audiences.
Because our automation runs on a schedule, the target Data Extension is refreshed with the latest matching customers each time the automation runs. This means that when we use this Data Extension for a campaign, we’re working with the latest audience that was created by the automation.
Common Issues When Using a Filter Activity
Once everything is set up, the Filter Activity will usually be straightforward to work with. But if the audience doesn’t look the way we expected, there are a few things we can check.
The audience is empty
If the target Data Extension doesn’t contain any customers after the automation runs, the first thing I would check is the filter conditions.
Make sure the values you’re using actually exist in the source Data Extension and that the AND/OR logic is correct.
For example, if the source contains United Kingdom but the filter is looking for UK, the customer won’t match that condition.
The audience has more or fewer customers than expected
If the audience size doesn’t look right, check the conditions again.
In particular, look at whether you’ve used AND or OR correctly. Using OR can include more customers, while using AND requires customers to meet all the conditions.
The audience isn’t showing the latest data
If the audience doesn’t seem to include recent changes, check when the source Data Extension was last updated and when the Filter Activity runs.
For example, if the source data is refreshed at 8:00 AM but the Filter Activity runs at 7:00 AM, the filter will use the previous version of the data. In this case, make sure the source Data Extension is updated before the Filter Activity runs.
The automation fails
If the automation fails, it’s worth checking the source and target Data Extensions. Make sure the fields you’re using have compatible data types and lengths, and check whether any required fields are missing. These are some of the first things I would check before looking into more complex issues.
When Would I Use a Filter Activity?
A Filter Activity is useful when we have simple audience criteria and all the data we need is already available in a Data Extension.
For example, we could use it to create an audience of:
- UK customers
- Customers who have opted in to marketing
- Active customers
- Customers with a particular status
- Customers from a specific customer type
If the audience requirement becomes more complex and we need to work with data from multiple Data Extensions, perform calculations, remove duplicates, or apply more advanced logic, then a SQL Query Activity would usually be a better option.
So, for simple filtering, a Filter Activity can be an easy way to create and refresh an audience. For more complex requirements, SQL gives us more flexibility.
If you need to work with more complex audience logic, you can also explore these SQL examples to see how SQL can be used in Salesforce Marketing Cloud.
Share With Others
 Bronze


