





How to Set Up MCP for Salesforce Marketing Cloud: A Step-by-Step Guide
MCP (Model Context Protocol) is an open standard introduced by Anthropic that allows AI applications to connect to external tools, data sources and services through a common interface. Instead of building a separate custom integration every time an AI application needs to connect to another system, MCP provides a standard way for them to communicate.
To understand how MCP works, there are three main pieces: the MCP Host, MCP Client and MCP Server.
- MCP Host — this is the AI application that you interact with, such as Claude Desktop, Cursor or another AI application that supports MCP.
- MCP Client — this manages the connection between the AI application and the MCP server. It sends requests to the server and receives the results back.
- MCP Server — this exposes the tools and capabilities that the AI application can use. For example, an MCP server could provide access to a database, an API or, in our case, Salesforce Marketing Cloud.
The client and server communicate through a transport mechanism. For local connections, MCP can use stdio, while remote connections can use HTTP-based transport.
The useful part is that once an MCP server exposes a set of capabilities, different MCP-compatible clients can connect to it without needing a completely separate custom integration for each AI application. That’s one of the main reasons MCP is becoming useful for developers.
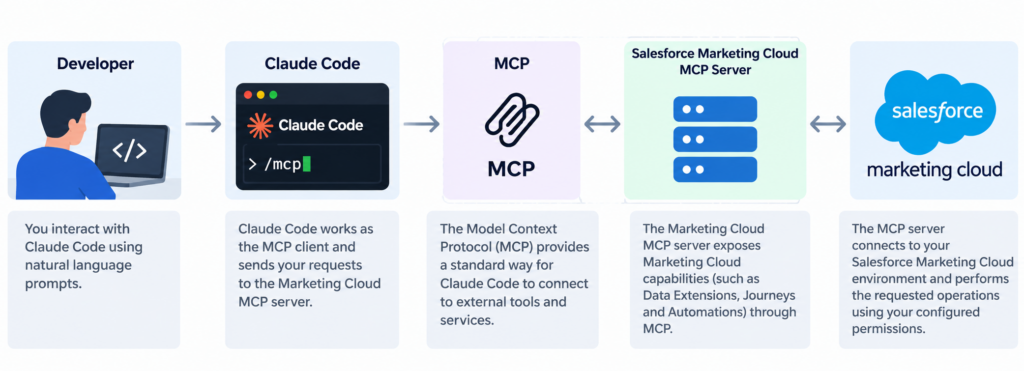
Step 1: Choose Your MCP Client
Before we start setting things up, the first thing we need to decide is which MCP-compatible AI application we’re going to use. The client is the application you interact with, and it handles the connection to the MCP server on your behalf.
There are several options available, including Claude Code, Gemini CLI, Claude Desktop and code editors such as Cursor. The exact setup can vary slightly between clients, but the basic idea is the same: the client connects to the MCP server and uses the capabilities that the server makes available.
For the setup, I’ll use Claude Code as the example. Salesforce’s current Marketing Cloud Engagement documentation also uses Claude Code as one of its setup examples.
Note: You can use another MCP-compatible client if you prefer. The Marketing Cloud configuration remains largely the same, but the steps for adding and authenticating the MCP server will depend on the client you’re using.
Step 2: Understand What the MCP Server Provides
Before we start connecting Salesforce Marketing Cloud, it helps to understand what the MCP server actually does.
Think of the MCP server as the middle layer between your AI client and the system you want the AI to work with. The server exposes specific capabilities to the AI client, and the client can then use those capabilities when you ask it to perform a task.
MCP servers can provide three main types of capabilities:
- Tools — these allow the AI to perform actions, such as searching for a Data Extension, retrieving its fields, running a query or creating an asset.
- Resources — these provide information that the AI can access, such as files, documents or other data exposed by the server.
- Prompts — these are reusable instructions or prompt templates that can help the AI perform a particular type of task.
For Salesforce Marketing Cloud, the Tools are particularly important. The Marketing Cloud Engagement MCP Server exposes tools that allow an AI client to work with supported Marketing Cloud capabilities, including Data Extensions, Journeys, Automations, Content, Email, Contacts and Tracking.
For example, you could ask your AI assistant:
“Find the Data Extension called Customer_Master and show me its fields.”
The AI can then use the appropriate tool exposed by the Marketing Cloud MCP server to retrieve that information from Marketing Cloud.
The important thing to remember is that the AI doesn’t automatically have access to everything in Marketing Cloud. What it can access or do depends on the capabilities exposed by the MCP server, the permissions configured for the connection and the permissions of the user authorising it.
Step 3: Create an Installed Package in Marketing Cloud
Now that we have chosen our MCP client and understand what the MCP server provides, we can start setting up the Salesforce side.
For the Marketing Cloud Engagement MCP Server, we don’t need to download or install a separate MCP server on our machine. Salesforce provides a hosted MCP server, and we connect to it through an API integration in Marketing Cloud.
The first thing we need to do is create an Installed Package in Marketing Cloud.
In Marketing Cloud Engagement, go to:
Setup → Apps → Installed Packages
Select New, give the package a meaningful name, and save it.
For example, you could use: Marketing Cloud MCP
If you’re working across development, testing and production environments, I’d recommend making the name a little more specific, such as: Marketing Cloud MCP – Development
This makes it easier to identify the integration later, especially when your Marketing Cloud account contains several installed packages.
Once the package has been created, we’ll add the API integration that allows the MCP connection to authenticate with Marketing Cloud.
Step 4: Add an API Integration
Now that we have created the Installed Package, the next thing we need to do is add an API Integration to it. This is what allows the MCP connection to authenticate with Marketing Cloud.
From the Installed Package you just created, select Add Component and choose API Integration. For the integration type, select Public App.
You’ll then see a Redirect URI field. Salesforce currently asks you to enter https://salesforce.com as a temporary value at this stage. Don’t worry about using this as the final URL — we’ll replace it with the actual MCP redirect URI in a later step, once we have the information we need to build it. ion
Once you’ve selected Public App and entered the temporary redirect URI, save the API Integration. Salesforce covers these initial configuration steps in its Marketing Cloud MCP setup documentation, which is also useful if you want to refer back to the official configuration details while following the setup.
Step 5: Configure the Permission Scopes
Now that we have created the API Integration, the next thing we need to decide is what the MCP connection should be allowed to do in Marketing Cloud. This is where the permission scopes come in.
Think of these scopes as the permissions we give to the MCP connection. They determine which areas of Marketing Cloud the AI assistant can work with, so we don’t want to give it access to everything by default. It’s better to start with the permissions we actually need and add more later if required.
For example, if we want to use MCP to work with Data Extensions, we need to select the relevant Data Extension permissions. If we want the AI assistant to create or modify Data Extensions, we’ll need both Data Extensions → Read and Data Extensions → Write permissions.
The same approach applies to other areas of Marketing Cloud. Depending on what we want the AI assistant to work with, we can configure permissions for capabilities such as Journeys, Automations, Content, Email, Contacts and Tracking.
For the initial setup, I would recommend starting with the minimum permissions needed for testing. This is especially important when we’re giving the connection permission to make changes. If we need additional capabilities later, we can come back to the Installed Package and add the required permissions.
Once you’ve selected the scopes you need, save the API Integration.
Step 6: Get Your Client ID and Tenant ID
Now that the API Integration and permission scopes are in place, we need two important pieces of information from the Installed Package: the Client ID and the Tenant ID.
On the Installed Package details page, you’ll find the Client ID. Salesforce identifies this as a 24-character alphanumeric value, so copy it exactly as it appears.
The Tenant ID is a little less obvious. You can find it as part of the Authentication Base URI. For example, if your Authentication Base URI looks like this:
https://mcphchq9d5b8mlzeyc2v1example.auth.marketingcloudapis.com/The Tenant ID is the 28-character value before .auth.marketingcloudapis.com, so in this example it would be:
mcphchq9d5b8mlzeyc2v1exampleSalesforce identifies the Tenant ID as a 28-character alphanumeric value.
So, at this point, we should have both values ready:
- Client ID — from the Installed Package details
- Tenant ID — from the Authentication Base URI
Step 7: Configure the MCP Redirect URI
Now that we have the Client ID and Tenant ID, we can go back to the API Integration we created earlier and replace the temporary redirect URI with the actual one for the Marketing Cloud MCP server.
Salesforce provides two hosted MCP server locations: United States and European Union. The choice mainly affects the connection latency, so you should use the server that’s closest to where your connection is based. For this setup, I’ll use the European Union server.
The EU redirect URI follows this format:
https://mai-mce-mcp-cdp1.sfdc-yzvdd4.svc.sfdcfc.net/t/{tenantId}/c/{clientId}/api/mcp/oauth/callback
Now replace {tenantId} with the Tenant ID we found in the previous step and {clientId} with your Client ID.
So, if we were using example values, it would look something like:
https://mai-mce-mcp-cdp1.sfdc-yzvdd4.svc.sfdcfc.net/t/mcphchq9d5b8mlzeyc2v1example/c/123456789012345678901234/api/mcp/oauth/callbackThe values above are only examples — use the actual Client ID and Tenant ID from your own Marketing Cloud account.
To update it, go back to Setup → Apps → Installed Packages, open the package we created earlier, and edit the API Integration. In the Redirect URIs section, replace the temporary https://salesforce.com value with your new MCP redirect URI and save the changes. Salesforce’s current setup documentation follows this same process.
One thing worth paying attention to here is the end of the URL. The redirect URI ends with:
/api/mcp/oauth/callbackOnce you’ve replaced the temporary URL with your actual MCP redirect URI, save the API Integration. Make sure the Client ID and Tenant ID are copied correctly, as even a small mistake in the URL can prevent the authentication flow from working. With the redirect URI configured, the Salesforce side of the connection is ready.
Step 8: Connect Claude Code to the Marketing Cloud MCP Server
Now that the Salesforce side is configured, we can connect Claude Code to the Marketing Cloud MCP server.
The good thing here is that we don’t need to install another server on our computer. Salesforce provides the hosted MCP server, so we just need to give Claude Code the correct server URL.
Since we’re using the European Union server, the MCP server URL follows this format:
https://mai-mce-mcp-cdp1.sfdc-yzvdd4.svc.sfdcfc.net/t/{tenantId}/c/{clientId}/api/mcpReplace {tenantId} with the Tenant ID we identified earlier and {clientId} with your Client ID.
For example:
https://mai-mce-mcp-cdp1.sfdc-yzvdd4.svc.sfdcfc.net/t/mcphchq9d5b8mlzeyc2v1example/c/123456789012345678901234/api/mcpAgain, these are only example values. You should use the actual values from your own Marketing Cloud Installed Package.
Once you have the URL ready, open Claude Code and add the Marketing Cloud MCP server using the MCP configuration command.
Salesforce’s current setup uses the following format:
claude mcp add \
  -s user \
  --transport http \
  sfmc-mcp \
  "https://mai-mce-mcp-cdp1.sfdc-yzvdd4.svc.sfdcfc.net/t/YOUR_TENANT_ID/c/YOUR_CLIENT_ID/api/mcp"
Here, sfmc-mcp is simply the name we’re giving to the connection. You can use a different name if you prefer.
In this command, --transport http tells Claude Code to connect to the remote Salesforce MCP server over HTTP. Because Salesforce is hosting the MCP server for us, we don’t need to run an MCP server locally on our machine.
The important part is the final URL. Make sure you’re using the MCP server URL ending in /api/mcp, rather than the redirect URI we configured in Step 7, which ends in /api/mcp/oauth/callback.
Once you’ve added the connection, Claude Code will have the Marketing Cloud MCP server configured and ready for authentication.
Step 9: Authenticate the MCP Connection
Now that we’ve added the Marketing Cloud MCP server to Claude Code, the next step is to authenticate the connection with Marketing Cloud.
In Claude Code, enter:
/mcpThis will show the MCP servers you’ve configured. Find the sfmc-mcp connection we added in the previous step and select it. You should then see an Authenticate option.
Select Authenticate, and Claude Code will start the OAuth authentication flow with Marketing Cloud. You’ll be asked to sign in with your Marketing Cloud account and authorise the MCP connection.
The OAuth process handles the authentication credentials behind the scenes, so you don’t need to manually copy an access token or refresh token into Claude Code.
Once authentication is completed successfully, the sfmc-mcp connection should show as authenticated in Claude Code.
Step 10: Test the MCP Connection
Now that the authentication is complete, let’s make sure the connection is actually working. The easiest way to do this is to start with a simple request that only reads information from Marketing Cloud.
In Claude Code, try something like:
Find the Data Extensions in my Marketing Cloud account and show me their names.
Claude Code should understand the request and use the appropriate tool from the Marketing Cloud MCP server to retrieve the information. Salesforce provides MCP tools for areas such as Data Extensions, Journeys, Automations, Content, Email, Contacts and Tracking, which you can see in the Marketing Cloud MCP tool reference.
You can then try something a little more specific:
Find the Data Extension called Customer_Master and show me its fields and data types.
This is a good first test because we’re only asking the AI to retrieve information. We aren’t asking it to create, update or delete anything.
If Claude Code can retrieve the requested information from your Marketing Cloud account, that’s a good indication that the MCP connection and authentication are working as expected.
You can then try a more practical development request, such as:
Show me the structure of the Customer_Master Data Extension and suggest a SQL query to find customers who have opted in.
Notice that we’re still only asking the AI to read information and provide a suggestion. We’re not asking it to execute the SQL or make changes to the Data Extension.
For the first few tests, I’d recommend keeping things read-only. Once you’re comfortable with the connection, you can move on to operations that create or modify Marketing Cloud assets. Some MCP tools can perform changes, and Salesforce identifies certain tools as destructive, so it’s worth reviewing the proposed action before allowing it to run.
If a test doesn’t work, check the authentication status, Installed Package scopes, Client ID, Tenant ID and MCP server URL first. A mismatch in any of these can prevent the connection or a particular operation from working.
Step 11: Try a Real Marketing Cloud Task
Now that we’ve confirmed the MCP connection is working, we can try something a little more useful. Instead of just asking Claude Code to list a Data Extension, let’s give it a real Marketing Cloud task.
For example, you could ask:
Find the Customer_Master Data Extension and tell me which fields I can use to identify customers who have opted in to marketing communications.
Claude Code can use the available Marketing Cloud tools to retrieve the Data Extension structure and then help you understand which fields are relevant.
You could then take it one step further:
Based on that Data Extension, create a SQL query that returns customers who have opted in and have a valid email address.
This is where MCP starts to become particularly useful for an SFMC developer. Instead of manually checking the Data Extension, copying the field names into your AI assistant and then writing the query, the assistant can work with the information exposed by the connected Marketing Cloud environment.
However, there’s an important difference between asking the AI to generate a query and asking it to execute that query. For the first few experiments, I’d keep the AI in the suggestion/review stage and validate the SQL yourself before running it against Marketing Cloud data.
You can also try similar requests with other Marketing Cloud capabilities. For example:
Find the journey called Welcome Journey and show me its current status and entry source.
Or:
Find the automation called Daily Customer Refresh and show me the activities it contains.
The available capabilities depend on the MCP tools and permissions you’ve configured. Once you’ve tested a few read-only and development tasks successfully, you can start looking at operations that create or modify Marketing Cloud assets. That’s where permissions and review become particularly important.
Step 12: Test a Write Operation Safely
Now that we’ve confirmed that we can read information from Marketing Cloud, we can try something that actually makes a change. I would recommend starting with a test Data Extension or a non-production environment, rather than using anything that contains real customer data.
For example, you could ask Claude Code:
Create a test Data Extension called
MCP_Test_DEwith the fieldsSubscriberKey,EmailAddressandSignupDate. Before creating it, show me what you plan to create.

I like this approach because we’re not immediately asking the AI to make a change. We’re first asking it to show us what it intends to do, so we can check that the Data Extension name, fields and other settings are correct. If everything looks right, you can then allow the operation to proceed and check the result directly in Marketing Cloud.
You can use the same approach when testing other write operations. For example, you could ask the AI to update a test asset, but always make sure you understand exactly what is going to change before allowing the operation to run.
This is an important difference between the earlier tests and what we’re doing now. When we were asking MCP to retrieve Data Extension information, the operation was read-only. Now we’re giving the AI permission to change something in Marketing Cloud, so we need to be more careful about what we allow it to do.
Step 13: Troubleshoot Common Issues
If everything has worked so far, great. But if the connection doesn’t work as expected, there are a few things I would check first before changing the configuration.
One of the most common problems is the redirect URI. If the URI in the Installed Package doesn’t exactly match the one expected by the MCP connection, authentication can fail. Go back to the API Integration and check that the Tenant ID and Client ID are correct and that the URL ends with:
/api/mcp/oauth/callbackIt’s also worth checking the MCP server URL in Claude Code. Make sure you’re using the correct regional endpoint and that the URL ends with:
/api/mcpAnother thing to check is the permission scopes. You might be able to authenticate successfully but still find that a particular operation doesn’t work. In that situation, check whether the Installed Package has the permission required for that operation. For example, being able to read a Data Extension doesn’t necessarily mean the connection has permission to create or update one.
It’s also possible for the MCP connection to authenticate successfully but for a particular request to fail. Authentication confirms that the client can connect to Marketing Cloud, but it doesn’t mean that every MCP operation is available. If one task works but another doesn’t, check the permissions and capabilities required for that particular operation before changing the rest of the configuration.
If authentication itself is failing, check that you’re signing in with the correct Marketing Cloud account and that the user has the access required for the operation you’re trying to perform.
Finally, check the Client ID and Tenant ID you copied in Step 6. These values are used when building both the redirect URI and the MCP server URL, so a small typo can prevent the connection from working.
I would go through these checks one at a time rather than changing several settings at once. That makes it much easier to identify what is actually causing the problem.
If the basic configuration looks correct but you’re still getting an authentication error, Salesforce also has a dedicated authentication troubleshooting guide covering common issues with hosted MCP server authentication.
Step 14: What You Can Do with Marketing Cloud MCP
Now that we’ve got the connection working and have tested both read and write operations, we can start looking at where MCP can actually help in our day-to-day Marketing Cloud work.
For example, instead of opening Marketing Cloud and manually looking for a Data Extension, we can ask the AI to find it and show us its fields. We can then use that information to help build or review an SQL query.
We can also use MCP to work with other parts of Marketing Cloud. Depending on the permissions and tools we’ve configured, we can ask the AI to work with Data Extensions, Journeys, Automations, Content, Email, Contacts and Tracking.
For example, you could ask:
Find the
Customer_MasterData Extension and show me its fields.
Or:
Find the
Welcome Journeyand show me its current status and entry source.
Or:
Find the
Daily Customer Refreshautomation and show me the activities it contains.
You can also use the AI as a development assistant. For example, you could ask it to look at the structure of a Data Extension and help you write an SQL query, explain why a query might be failing, or suggest how you could approach a particular Marketing Cloud requirement.
The important thing is that MCP doesn’t replace the way we work with Marketing Cloud. It gives the AI a way to work with the Marketing Cloud capabilities we’ve made available to it. We still need to review the results, understand what the AI is doing and make sure the action is appropriate before allowing it to affect customer data or production configuration.
We still need to review the results, understand what the AI is doing and make sure the action is appropriate before allowing it to affect customer data or production configuration.
Share With Others
 Bronze