





Bloomreach Web Personalization: How to Create Better On-Site Experiences
Bloomreach Web Personalization helps businesses create targeted on-site experiences based on visitor behaviour, customer data, and audience rules. These experiences depend on more than the visual content displayed on a website; the implementation must also provide the data and events required for targeting, personalization, and measurement.
The Bloomreach Web Personalization product page provides an overview of the supported experience capabilities, while the relevant SDK documentation should be used for version-specific installation instructions, configuration, and API syntax.
Define the Experience Before Implementing It
Before configuring the technical implementation, define what you want the visitor to experience and why. Start with a clear objective, such as helping visitors discover relevant products, encouraging them to complete a purchase, or showing content based on their interests.
Then document three key decisions:
- Who should see the experience? Define the visitors, audience, or visitor state that should qualify. The Bloomreach customer segmentation overview provides useful context on how customer data can be used to define and organise audiences.
- What should change? Define the content, recommendation, message, or other on-site experience that should be shown.
- Where and when should it appear? Define the page, placement, and conditions under which the experience should be displayed.
It is also useful to define how you will measure whether the experience is achieving its intended objective, such as engagement, conversion, or another relevant business metric.
These decisions describe the intended experience rather than prescribing a fixed set of Bloomreach objects or configuration options. The exact implementation can vary depending on the Bloomreach product, SDK, and features enabled in the organisation.
An audience rule is only useful when the data required to evaluate it is available at the right time. If an experience depends on a customer attribute, recent event, product interaction, or page context, identify where that information comes from and make sure it is available in a consistent format.
For example, if the experience targets visitors who have viewed a particular product category, the implementation needs a reliable way to capture that interaction and make the relevant category information available when the audience or campaign rule is evaluated.

Build a Clear Data Contract
Once the experience has been defined, the next step is to identify the data needed to make it work. This is where a data contract becomes useful. In simple terms, a data contract defines what information the website needs to send, how that information should be named and formatted, and what each value represents.
For example, if you want to show a personalised experience to visitors who have viewed running shoes, the implementation needs to know that a product was viewed and which category the product belongs to. If that information is missing or inconsistent, the audience or campaign rule may not work as expected.
Document the fields before configuring the experience:
| Data type | Example | Purpose |
|---|---|---|
| Customer identifier | `account_id` | Associate activity with a known visitor |
| Customer attribute | `loyalty_tier: gold` | Support profile-based condition |
| Event name | `product_view` | Identify a visitor action |
| Event property | `category: running-shoes` | Provide context about the action |
| Transaction property | `order_id` | Associate a purchase with an order |
Not every field will be required for every experience. Identify which fields are essential for the audience or campaign rule and which are optional. For example, product_id may be required to identify the product being viewed, while product_name may only be needed if it is used for content or reporting. Defining these requirements upfront helps avoid collecting unnecessary data and makes the implementation easier to maintain.
These examples are illustrative and are not required Bloomreach field names. The actual event names, properties, data types, and formats should be confirmed against the selected Bloomreach implementation and SDK documentation.
Consistency is important when defining the event structure. Use one event name for one business action. For example, if product_view represents a product-view action, use that same event name wherever the action is captured. Using variations such as product_view, productViewed, and view_product for the same action can make audience rules, reporting, and troubleshooting harder to maintain.
The same principle applies to event properties. Keep property names, data types, and value formats consistent across templates, pages, and applications. This gives the implementation a predictable data structure and makes the information easier to use when creating audience rules and personalisation conditions.
For example, an illustrative event structure could be:
event_name: product_view
properties:
 product_id: SKU-123
 category: running-shoes
This is a data-contract example, not a Bloomreach SDK call. The actual implementation should use the event and property structure supported by the selected Bloomreach SDK version and the campaign configuration.
Configure the Bloomreach JavaScript SDK Integration
Once the required data has been defined, configure the Bloomreach JavaScript SDK on the website. The SDK provides the connection between the website and Bloomreach, allowing the implementation to identify visitors and send the customer and behavioural data defined in the data contract.
Follow the relevant Bloomreach JavaScript SDK documentation for the installation and configuration steps. Avoid copying SDK code from an older implementation without checking the documentation for the version being used, as available methods, configuration options, and required parameters may change between versions.
Before implementing the SDK, confirm the main details required by the website:
- Installation and initialization: how the SDK is loaded and initialized on the website.
- Project or environment configuration: the configuration required to connect the website to the correct Bloomreach environment.
- Visitor identification: how known visitors are identified and which identifier format is expected.
- Customer attributes: how profile information defined in the data contract is sent.
- Behavioural events: how events and their properties are sent when visitors perform actions on the website.
- Consent and tracking requirements: when the SDK can initialise or collect data based on the site’s consent implementation.
Keeping these details aligned with the data contract helps prevent a common implementation problem: the campaign expects one data structure while the website sends another. The SDK configuration should therefore implement the agreed data contract rather than introduce a separate set of field names, properties or assumptions.
Send Events at the Correct Point in the Flow
Once the SDK is configured, events need to be sent at the point where the corresponding action actually happens. The timing matters because Bloomreach uses these events to understand what visitors are doing and to support audience rules, campaign conditions, and reporting.
For example, a product_view event should be sent when the visitor has actually viewed the product, with the relevant product information available. A purchase event should be sent only after the transaction has been completed successfully, rather than when the visitor simply opens the checkout page or submits the payment form.
For ecommerce implementations, use the organisation’s documented order and product fields when sending purchase information. If the website already has an authoritative purchase event, reuse that event rather than creating another event for the same transaction. Sending the same purchase more than once, or sending it before the transaction is confirmed, can result in inaccurate purchase counts, audience qualification, and reporting.
The same principle applies to customer attributes. If a campaign checks a value such as a loyalty tier, the attribute name, data type, and value format need to match what the campaign expects. For example, gold, Gold, and GOLD may be treated differently depending on how the rule is configured. Keep these values consistent across the website and applications so that the same customer data is interpreted consistently.
Handle Single-Page Applications Explicitly
A single-page application can change routes and authentication state without rerunning the full page-load sequence. Design the integration so that the relevant data update or event is triggered when the displayed product, route, or known customer changes.
For example, moving from one product to another inside a client-side application should update the product context used by the implementation. A login or logout transition should also update the identity state used by the application.
Verify the exact route, identity, and event behavior against the SDK version in use instead of assuming that the initial page load covers later state changes.
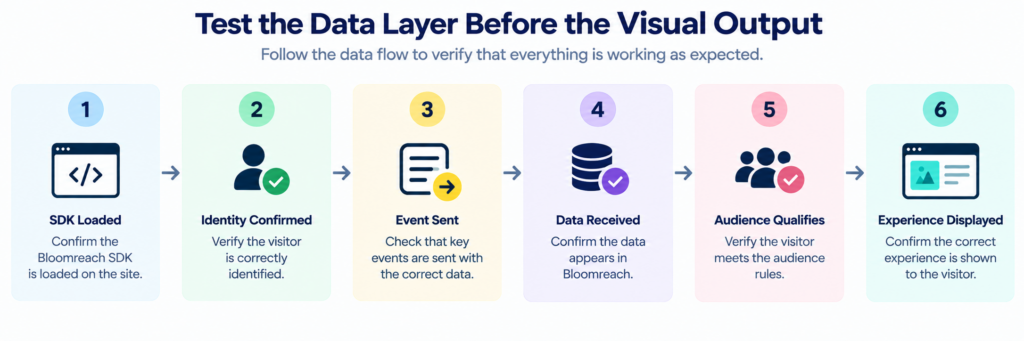
Test the Data Layer Before the Visual Output
Before checking whether the personalised experience looks correct on the page, first confirm that the underlying data is being collected and processed as expected. If the data is incorrect, changing the campaign or page configuration will not solve the problem.
Start with a controlled test visitor and verify the complete flow:
- The website is connected to the intended Bloomreach project and environment.
- The SDK is loaded and initialised on the page being tested.
- The expected visitor identifier is available when the test requires a known visitor.
- Customer attributes are sent using the expected names, data types, and values.
- The required events are generated at the correct point in the user flow.
- Each event is sent only once unless the business action is intentionally repeated.
- The audience or campaign rule evaluates the same fields and values that the website is sending.
- The experience is configured for the page, audience, and visitor state being tested.
If the experience does not appear, work backwards through the qualification flow rather than immediately changing the campaign rule. For example, confirm the visitor identity first, then check whether the required event was received with the expected properties, and finally verify that the visitor meets the audience conditions.
It is also useful to test both sides of the rule: a visitor who should qualify and a visitor who should not qualify. This helps confirm that the rule is not only capable of displaying the experience but is also excluding visitors who do not meet the conditions.
Keep test data separate from production validation. Use the project and environment intended for testing, and make sure the data you are inspecting belongs to the same configuration in which the experience was created.project and environment intended for the test, and confirm that the data being inspected belongs to the same configuration in which the experience was created.
Separate Campaign Configuration from Custom Code
Not every part of a web personalisation experience needs to be implemented in website code. Where Bloomreach provides the required configuration, use the platform rather than building a custom solution unnecessarily. Website code should focus on providing the data and application behaviour that the platform cannot handle through configuration alone.
A useful way to divide the responsibilities is:
- Campaign configuration: define supported audience, content, targeting, display, scheduling, and experiment settings within Bloomreach.
- Website integration: provide the customer, product, order, route, and authentication data required by the implementation.
- Custom frontend code: handle application behaviour or interface changes that cannot be achieved through the available Bloomreach configuration.
Installing the SDK does not automatically give Bloomreach an understanding of the website’s customer model, product catalogue, checkout process, or application routes. Those parts still need to be mapped explicitly as part of the website integration.
Before building a custom solution, check what the selected Bloomreach product and SDK already support. This can prevent unnecessary code and make the implementation easier to maintain when the website or Bloomreach configuration changes.
For example, if Bloomreach can display the required experience through its standard campaign configuration, there is no need to build a custom frontend component to achieve the same result. Custom code becomes useful when the website needs to handle something that cannot be configured directly, such as a specific application state or a dynamic change to the page.
A simple way to think about the separation is: Bloomreach configuration controls the experience, while the website integration provides the data and application behaviour needed to support it.
Limitations That Affect Results
The quality of a personalised experience depends heavily on the data available to the implementation. Missing information, outdated customer attributes, inconsistent identifiers, duplicate events, or different value formats can cause an audience or campaign rule to behave differently from what was expected.
Installing the SDK does not automatically provide all the information needed by the website. The required customer and event data still needs to be mapped correctly, and the implementation should be tested to make sure the expected data is available when the campaign evaluates it. The Bloomreach JS SDK Testing Guide provides practical checks for validating the SDK integration and confirming that the expected data is being sent correctly.
The implementation can also be affected by consent and browser behaviour. Visitors may not provide consent for certain types of tracking, while browser settings, blocked cookies, or other privacy controls can limit the data available. These cases should be considered when testing the experience rather than assuming that every visitor will provide the same data.
It is also important to treat SDK methods and behaviour as version-specific. When changing the integration, moving between environments, or upgrading an existing implementation, check the relevant Bloomreach documentation rather than relying on older code or examples.
Share With Others
 Bronze