



How to Create a Segment in Marketing Cloud Next (Step by Step)
Before we start creating a segment, let’s first understand what a segment is and why it is useful in Marketing Cloud Next. If you want to send a campaign to a specific group of customers, creating a segment is a simple way to focus your campaign on the right customers. Instead of targeting everyone, you can define an audience based on information such as their country, language, or other customer details. In Marketing Cloud Next, you can create a segment by selecting the data you want to use, adding conditions that match your audience, and excluding people who should not be included. Once everything is set up, you can review the audience, save the segment, and publish it for use in your marketing campaigns.
Creating a segment in Marketing Cloud Next involves a few straightforward steps. We’ll start by opening the Segments page and creating a manual segment. From there, we’ll choose the customer data we want to use, add the relevant filter conditions, and review the audience. Once everything looks right, we can save and publish the segment for use in our marketing campaigns. The main thing is to choose the right customer data and set the filters carefully so that the segment reaches the customers we want to target.
A Few Things to check before you start
Before creating a segment, it is worth taking a moment to check that the customer data you want to use is available and up to date. For example, if you want to create a segment based on a customer’s country, language, or marketing consent, make sure those details are available in your data. It is also important to check that you are using the right customer profile and that the contact details, such as email addresses or phone numbers, are available if your campaign needs them. If you have any rules about who should or should not receive a campaign, make sure those are clear too. These checks can help you create a segment that includes the right customers and is ready to use in your marketing campaigns.
Step 1: Open the Segments Page
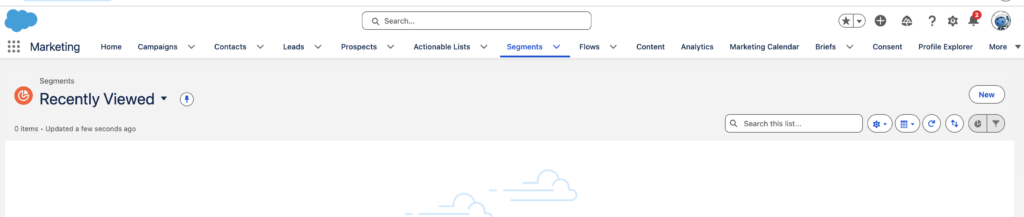
Start by opening Marketing Cloud Next in your Salesforce org. From the navigation menu, select Segments. This is where you can view existing segments and create a new one. Once you are on the Segments page, click the New button in the top-right corner to begin creating a segment.
Note: The navigation may vary slightly depending on your Salesforce setup, permissions, and the features available in your org. If you cannot see the Segments tab or the option to create a segment, you may need to check whether you have the required access.
Step 2: Create a New Manual Segment
After clicking New on the Segments page, select New Manual Segment to start building your audience.
Depending on your Salesforce setup, you may be able to access segmentation through Marketing Cloud Next or directly through Data Cloud. Marketing Cloud Next may also offer assisted or AI-supported options for creating segments. However, the manual option gives you more control over selecting the data and defining the conditions for your audience. Although the navigation may vary slightly depending on your environment, the main purpose remains the same: to create an audience based on specific criteria.
The manual segment builder allows you to choose the customer data, define filter conditions, and decide which customers to include or exclude. You can also use related data when additional information is needed to define your audience. For more information about creating a manual segment, see Salesforce’s official on Creating a segment manually
Manual segmentation is useful for creating production audiences, such as loyalty members, customers who have not purchased recently, renewal candidates, or subscribers who have opted in to marketing communications. It allows you to review the audience criteria before activating the segment for a campaign.
Step 3: Name the Segment Clearly
Choose a name that makes it easy to understand who the segment is for and what criteria it is based on. A clear and consistent name will help other users identify the segment and understand its purpose when it is reused.
Avoid using unclear names such as New Campaign List or Target Customers, especially if the segment may be used by different teams or for multiple campaigns.
For example, a segment name could follow a structure such as:
Region_Audience_Criteria
Examples include:
- UK_LoyaltyMembers
- EMEA_MarketingOptIn
- UK_RecentPurchasers_30Days
- US_ActiveCustomers
If a Description field is available, use it to provide more information about the audience and explain any important conditions or exclusions.
For example:
Customers in the UK who have opted in to marketing communications, excluding unsubscribed contacts.
Using clear names and descriptions makes it easier to understand, maintain, and reuse segments over time, particularly when several teams are working with the same audiences.
Step 4: Choose the Right Segment Target
The segment target defines what the segment is built around. Depending on your data model and org configuration, you may be able to select a customer profile, such as Individual or Unified Individual, or another object, such as Contact, Lead or Account.
Choose the target based on the type of audience you want to create. If the campaign is focused on individual customers, a unified customer profile may be the most appropriate choice because it brings customer information together across different sources.
For example, a unified profile can be useful when creating audiences for loyalty, retention, lifecycle, or cross-sell campaigns. It helps the business work with a consolidated view of the customer rather than treating each source record as a separate person.
In other situations, the campaign may need to focus on a specific record or relationship. For example, a business may want to target customers based on a particular policy, membership, booking, or subscription. In these cases, a source-level object may be more suitable.
The key is to select the target that best represents the audience you want to reach. This also helps you avoid unexpected results, such as the same person appearing multiple times because they have more than one related record.
Step 5: Add Segment Criteria
After selecting the segment target, the next step is to define the conditions that determine which individuals should be included in the segment. The criteria should be based on the purpose of the campaign. For example, you may want to target customers based on their location, engagement, purchase history, customer status, or marketing consent.
For example, if the purpose is to promote a loyalty programme, the criteria could be: Customers who live in the United Kingdom and have made a purchase within the last six months.
For a more targeted audience, additional conditions can be added: Customers who live in the United Kingdom, have made a purchase within the last six months, and have opted in to marketing communications.
Adding multiple conditions helps ensure that the segment contains customers who are both relevant to the campaign and eligible to receive the communication.
Combine Conditions Using AND
Use AND when all conditions must be met.
For example:
Country equals United Kingdom AND Last Purchase Date is within the last 180 days AND Marketing Consent equals Opted In
With this logic, only customers who meet all three conditions will be included.
Use OR for Alternative Criteria
Use OR when a customer can qualify by meeting one of several conditions.
For example:
Customer Status equals Gold OR Customer Status equals Platinum
This includes customers who have either Gold or Platinum status.
Review the Logic Carefully
When combining AND and OR, make sure the conditions reflect the audience you intend to create. Grouping related conditions can help avoid including unintended customers.
For example, if you want to target customers in the United Kingdom who are either Gold or Platinum members, the logic should be: Country equals United Kingdom AND (Customer Status equals Gold OR Customer Status equals Platinum)
This ensures that both Gold and Platinum customers must also be located in the United Kingdom.
Before moving to the next step, review the criteria carefully to confirm that the segment includes the right audience and excludes customers who should not be targeted.
Step 6: Add Related Object and Customer Activity
After defining the main segment criteria, you can make the audience more specific by using information connected to the selected target.
For example, instead of targeting customers only by country or customer type, you could use related information such as:
- Products purchased
- Recent website activity
- Email engagement
- Form submissions
- Service cases
- Loyalty membership
- Bookings or subscriptions
For example, a segment could target: Customers who purchased running shoes in the last 60 days.
This audience could be used to promote related products, share care instructions, recommend accessories, or send a follow-up offer.
Check Whether Related Records Exist
When working with related data, you may need to identify customers who have a particular record or customers who do not have one.
For example: Customers who have submitted a contact form or Customers who have not submitted a contact form.
These conditions should be used carefully. A customer may appear to have no related record because the data is incomplete, delayed, or has not yet been synchronised. Therefore, an absence condition does not always mean that the activity never happened. Before using Does Not Have criteria, make sure the related data is reliable and regularly updated.
Choose the Appropriate Date Condition
Date filters can help you build audiences based on recent or historical activity.
For example, a recurring campaign could use: Customers whose last purchase was within the last 30 days. This type of relative date filter is useful for campaigns that run regularly because the audience changes automatically over time. For a campaign based on a specific period, you could use: Customers who made a purchase between 1 June 2026 and 30 June 2026. A fixed date range is useful when the campaign is related to a particular event, promotion, or reporting period.
When selecting a date field, check what the date actually represents. For example, it may be the date an activity occurred, the date a record was created, or the date the data was received by the platform.
Using the correct related object and date conditions helps ensure that the segment reflects the intended audience and produces more accurate campaign results.
Step 7: Add Suppression and Eligibility Rules
After defining who should be included in the segment, consider which customers should be excluded. Eligibility and suppression rules help ensure that the audience is suitable for the campaign and that customers do not receive communications they should not receive.
Common exclusion criteria may include:
- Customers who have opted out of email or SMS communications
- Contacts included in a global suppression list
- Records with invalid or missing contact details
- Customers who were contacted recently
- Customers with unresolved complaints or escalations
- Employees, test records, or internal accounts
- Customers from restricted regions
- Records without the required marketing consent
For example, a campaign targeting recent purchasers could use the following logic: Customers who purchased a product within the last 30 days AND Marketing Consent equals Opted In AND Email Address is not blank AND Customer Type does not equal Test Record
These conditions help ensure that the segment contains customers who are relevant, contactable, and eligible for the campaign.
Step 8: Review the Segment Membership
After adding all the criteria, review the segment results before saving or publishing it. If a membership count is available, use it to check whether the audience size is consistent with your expectations.
If the number of members is unexpectedly high or low, review the selected target, filter conditions, consent values, date ranges, and related data. Also, check whether the underlying data has been refreshed and whether duplicate records are being handled correctly.
Where possible, validate the segment using a few known customer records. Confirm that customers who meet the criteria are included and that customers who fail the targeting, consent, or suppression rules are excluded.
This final review helps ensure that the segment contains the intended audience before it is published or used in a campaign.
This type of validation catches logic errors faster than staring at the total count.
Step 9: Save the Segment
Once you have reviewed the segment criteria and confirmed that the audience is correct, save the segment. Saving the segment stores the criteria and configuration you have created. However, saving does not always mean that the segment is immediately available for use in every campaign or activation. Depending on the features enabled in your Marketing Cloud Next environment, additional steps such as publishing, refreshing, or activating the segment may be required.
Before using the segment, check its current status and confirm whether it is:
- Saved as a draft
- Published and available for use
- Refreshed with the latest data
- Activated for a campaign or destination
If the segment is still being tested, use a clear naming convention to identify it as a draft. For example: UK_RecentPurchasers_DRAFT
Once the segment has been reviewed and approved, the draft label can be removed or the segment can be renamed according to your organisation’s naming standards. This helps prevent unfinished segments from being used accidentally in live campaigns.Remove the draft marker only after the segment has been validated.
Step 10: Publish or Activate the Segment
After the segment has been saved and reviewed, complete the publishing or activation process required by your Marketing Cloud Next setup.
This step makes the segment available for supported campaign activities, such as selecting an audience for an email, journey, or other marketing activation. The exact process may vary depending on the features and integrations enabled in the organisation.
If the segment is not available when selecting an audience, check whether:
- The segment has been published or activated.
- The segment target is supported by the selected campaign or channel.
- The correct data space or audience source is being used.
- The segment has completed its latest refresh.
- The required contact information is available.
- You have the necessary permissions to use the segment.
For example, an email campaign generally requires customers to have a valid email address. A segment may contain the correct customer profiles, but it may not be suitable for email activation if those profiles do not have an available or valid email contact point.
Before using the segment in a live campaign, confirm that it is published, up to date, and compatible with the selected activation channel.
Practical Example: Create a Gold Loyalty Segment for Email
A common real-world segment is a loyalty audience for a promotional email.
Business Requirement
Target Gold loyalty customers in the United States who can receive email and have purchased in the last year. Exclude anyone globally suppressed or recently contacted.
Segment Setup
Use a customer-level profile target, preferably the unified profile if available.
Example criteria:
Why This Works
The segment combines:
- Business targeting: Gold loyalty customers
- Regional targeting: United States
- Channel eligibility: Email marketable
- Engagement relevance: Purchased in the last year
- Compliance and pressure control: Suppression and recent-send exclusion
In practice, this is much safer than simply filtering for `Loyalty Tier equals Gold`.
Troubleshooting a Segment That Returns No Records
When a segment returns zero records, avoid changing or removing all the criteria at once. Instead, isolate the issue by testing the conditions step by step. Start with the broadest condition that should return a reasonable number of records. Then add the remaining conditions one at a time and review the membership count after each change.
For example:
- Start with a broad condition, such as Country equals United Kingdom.
- Add another condition, such as Marketing Consent equals Opted In.
- Add the next condition, such as Last Purchase Date is within the last 90 days.
- Continue adding the remaining criteria until the membership count drops unexpectedly or reaches zero.
The last condition added may help identify which rule is excluding the records. You can then review that field, value, relationship, or date filter in more detail.
Common causes of zero results include:
- The field contains a different value than expected, such as USA instead of United States.
- The required attribute is stored on a related object rather than the selected profile object.
- The date field is blank or has limited data.
- Consent information has not been populated.
- The wrong data space has been selected.
- The selected target is not the expected unified customer profile.
- The user does not have permission to access the underlying data.
Testing the criteria incrementally makes it easier to identify the cause without unnecessarily changing the entire segment definition.
Troubleshooting a Segment That Is Too Large
If a segment returns more records than expected, review the criteria and check whether the conditions have been combined correctly. Incorrectly using AND and OR can cause the segment to include a wider audience than intended.
For example, suppose you want to target Gold and Platinum customers in the United Kingdom. The following logic may return unexpected results: Country equals United Kingdom AND Customer Type equals Gold OR Customer Type equals Platinum Without proper grouping, the OR condition may allow Platinum customers from other countries to qualify. To make the intended logic clear, group the customer types together: Country equals United Kingdom AND (Customer Type equals Gold OR Customer Type equals Platinum)
This means that a customer must be located in the United Kingdom and must be either a Gold or Platinum customer. You should also check whether the required exclusion rules are included. For example, the segment may contain customers who have opted out of marketing, are on a suppression list, or do not have valid contact details.
As a result, the initial segment membership count may be higher than the final audience available for activation. Reviewing the condition grouping, targeting criteria, and exclusion rules helps ensure that the segment contains the intended audience..
Troubleshooting a Segment That Does Not Appear in a Campaign
If you have created and saved a segment but cannot find it when configuring a campaign, first check whether the segment is ready and supported for that campaign.
The following checks can help identify the issue:
- Confirm that the segment has been published or activated, if necessary.
- Check that the campaign supports the selected segment target.
- Make sure the campaign and segment are using the appropriate data space or audience source.
- Confirm that the segment has completed its refresh or publishing process.
- Check that you have the required permissions to access the segment.
- Verify that the segment includes the contact information needed for the selected channel.
For example, an email campaign needs customers with valid email contact information. An SMS campaign requires a valid mobile number and the appropriate SMS eligibility. This means that a segment can be correctly created but still not be available for a particular campaign if it does not meet the channel’s requirements. Checking the segment status, target, data source, permissions, and contact information can help resolve the issue.
Recommended Segment Build Pattern
For production segments, use a layered pattern:
1. Start With the Profile Audience
Define the base group.
2. Add Channel Eligibility
Add the conditions that make the audience reachable.
3. Add Behavioral Relevance
Add engagement, purchase, lifecycle, or event criteria.
4. Add Suppression Logic
Remove people who should not receive the campaign.
5. Validate With Known Records
Check a few records manually before trusting the count.
This pattern keeps the segment readable and makes troubleshooting easier when the count changes.
Production Checklist for Creating a Segment in Marketing Cloud Next
Before using a Marketing Cloud Next segment in a live campaign, verify:
- The correct segment target is selected.
- The segment name describes the audience clearly.
- Required consent rules are included.
- Required contact fields are available.
- Suppression logic is applied consistently.
- AND and OR groups are structured correctly.
- Date filters use the correct field and timeframe.
- Related-object filters are tested with known records.
- The membership count is reasonable.
- The segment is saved, published, or activated as required.
- The campaign channel can use the segment.
- Data refresh timing has been considered.
Practical Limitations to Expect
Marketing Cloud Next segmentation makes it easier to create and manage audiences using customer data. However, the segment builder does not replace the need for a well-structured data model or reliable data preparation.
Some requirements may be too complex to manage directly within a segment. For example advanced joins, deduplication, ranking, complex calculations, and detailed exclusion rules may need to be prepared in the data layer before the data is used for segmentation.
A common approach is to divide the work between the data layer and the segment builder:
- Data layer: Prepare, transform, combine, and organise the data.
- Segment builder: Apply business-focused criteria to define the final audience.
This approach keeps complex data preparation in the data layer while making the final segment criteria easier for marketers to understand, review, and maintain. As a result, the segment builder works best when it is supported by clean, well-organised, and reliable customer data.
Example Final Segment Definition
A final segment should clearly describe the intended audience, the conditions they must meet, and any exclusions that apply. Clear segment definitions make the audience easier to understand, review, and maintain.
Practical Example: Create a Winback Segment
Winback audiences are often more complex because the absence of activity matters.
Business Requirement
Target customers who opted into email, purchased in the past, but have not purchased in the last 180 days.
Segment Setup
Example criteria:
Email Marketable equals True
AND Total Purchase Count is greater than 0
AND Last Purchase Date is older than 180 days
AND Global Suppression equals False
If purchase history is stored in related records instead of profile-level summary fields, the logic may look more like this:
Has Purchase
AND Does not have Purchase where Purchase Date is within last 180 days
AND Email Marketable equals True
Implementation Note
The second pattern depends heavily on complete transaction data. If the purchase object is delayed or partially ingested, the segment can over-include customers who actually purchased recently but whose purchase record has not arrived yet.
For recurring winback campaigns, a calculated profile field such as `Last Purchase Date` is often easier to validate than repeated related-object absence logic.
Practical Example: Create an Event Follow-Up Segment
Event follow-up is a good example of related-object segmentation.
Business Requirement
Target people who registered for a webinar in the last 14 days but did not attend.
Segment Setup
Example criteria:
Email Marketable equals True
AND Has Event Registration where Event Name equals Product Webinar
AND Registration Date is within last 14 days
AND Attendance Status does not equal Attended
Implementation Note
Be careful with attendance data timing. If attendance data is loaded several hours after the event, the segment may temporarily include people who attended but have not yet been updated. For event campaigns, build in enough delay for attendance synchronization before sending follow-up emails.
How Marketing Cloud Next Segmentation Differs From Older SFMC Segmentation
Teams coming from Marketing Cloud Engagement often expect segmentation to behave like filtered Data Extensions, SQL Query Activities, or Automation Studio workflows. Marketing Cloud Next is different because the audience logic is more closely tied to customer data objects, profile attributes, and activation readiness.
Data Model First, Not Data Extension First
In Marketing Cloud Engagement, a marketer often starts with a sendable Data Extension and writes SQL to shape the audience.
In Marketing Cloud Next, the better starting point is the customer data model:
Who is the audience?
Which profile object represents them?
Which attributes define eligibility?
Which contact point makes them reachable?
Which activation path will use the segment?
The trade-off is flexibility. SQL can handle very specific transformations, ranking logic, and edge-case joins. Segment builders are easier to maintain and safer for business users, but they may not replace complex data preparation.
Reusable Audience Logic Matters More
Older campaign builds often create one-off audiences for a single send. Marketing Cloud Next segmentation encourages reusable definitions.
That is useful when the same audience powers multiple campaigns, but it also means mistakes can spread. If a reusable segment has weak consent logic, every campaign using it inherits the problem.
Activation Readiness Is Part of Segmentation
A segment can be logically correct but still not usable for a channel.
Example:
Segment target: Customer profile
Audience count: 50,000
Valid email contact points: 41,000
Email marketable customers: 37,000
The campaign-ready audience is not necessarily the same as the profile-level segment count. That difference is normal when contactability, consent, and suppression are applied later in the workflow.
Common Segment Builder Mistakes
Choosing the Wrong Object
The most expensive mistake is choosing the wrong segment target. If the audience should be one row per person, do not segment on a transactional object unless you intentionally want transaction-level results.
Example issue:
Target object: Purchase
Criteria: Product Category equals Shoes
This may produce multiple qualifying records for the same person if they bought shoes more than once.
Better pattern:
Target object: Unified Individual
Related condition: Has Purchase where Product Category equals Shoes
Forgetting Blank Values
Blank values are not the same as false values.
Example:
Email Opt Out equals FalseThis may not include records where opt-out is blank, depending on field behavior and rule interpretation.
A safer eligibility field is usually better:
Email Marketable equals TrueThat field can be prepared upstream to account for opt-in, opt-out, blank values, regional rules, and deliverability requirements.
Overusing OR Logic
OR logic expands audiences quickly. A segment like this may become much broader than expected:
Loyalty Tier equals Gold
OR Country equals United States
OR Last Purchase Date is within last 30 days
That includes anyone who matches any one condition. If the business actually wants Gold customers in the United States who purchased recently, the logic should be:
Loyalty Tier equals Gold
AND Country equals United States
AND Last Purchase Date is within last 30 days
Building Suppression Separately Every Time
If every segment manually repeats the same suppression logic, teams eventually implement it inconsistently.
One segment may use:
Email Opt Out equals FalseAnother may use:
Email Consent equals True
AND Global Suppression equals False
Another may forget suppression entirely.
A cleaner implementation is to create standardized eligibility attributes upstream, then use them consistently in segments.
For production segments, use a layered pattern:
1. Start With the Profile Audience
Define the base group.
Loyalty Tier equals Gold
AND Country equals United States
2. Add Channel Eligibility
Add the conditions that make the audience reachable.
Email Marketable equals True
AND Email Address is not blank
3. Add Behavioral Relevance
Add engagement, purchase, lifecycle, or event criteria.
Last Purchase Date is within last 365 days4. Add Suppression Logic
Remove people who should not receive the campaign.
Global Suppression equals False
AND Last Email Sent Date is not within last 7 days
5. Validate With Known Records
Check a few records manually before trusting the count.
This pattern keeps the segment readable and makes troubleshooting easier when the count changes.
Example Final Segment Definition
A well-structured production segment might look like this:
Segment Name:
Customers - Gold Loyalty - Email Eligible - US

Target:
Unified Individual

Criteria:
Country equals United States
AND Loyalty Tier equals Gold
AND Email Marketable equals True
AND Last Purchase Date is within last 365 days
AND Global Suppression equals False
AND Last Email Sent Date is not within last 7 days

Description:
Gold loyalty customers in the United States who are eligible for email marketing, purchased in the last year, are not globally suppressed, and have not received an email in the last 7 days.
This is the kind of segment definition that usually survives production use because it is specific, auditable, and aligned with how Marketing Cloud Next evaluates audiences for activation.
Share With Others
 Contributor