

✏️ Now anyone can publish articles, collect points, and earn badges. Get 6 months of Premium access for your first approved article. Register to start your journey.

Learn Salesforce Marketing Cloud Engagement

Platform basics

Introduction

Marcel Szimonisz
Table of contents: Platform basics

Salesforce Marketing Cloud Engagement is a platform for sending and automating customer messages through email, SMS, and mobile app notifications. It uses customer data to choose who receives a message, what it contains, and when it is sent. Businesses use it for newsletters, welcome campaigns, reminders, and messages triggered by customer actions.

The main tools and what they do

Marketing Cloud Engagement separates content, data, sending, and automation into different tools.

ToolWhat it does
Content BuilderCreates and stores emails, templates, images, and reusable content blocks.
Email StudioManages email subscribers, sends, and email tracking.
Journey BuilderBuilds message sequences with entry rules, waits, and different paths.
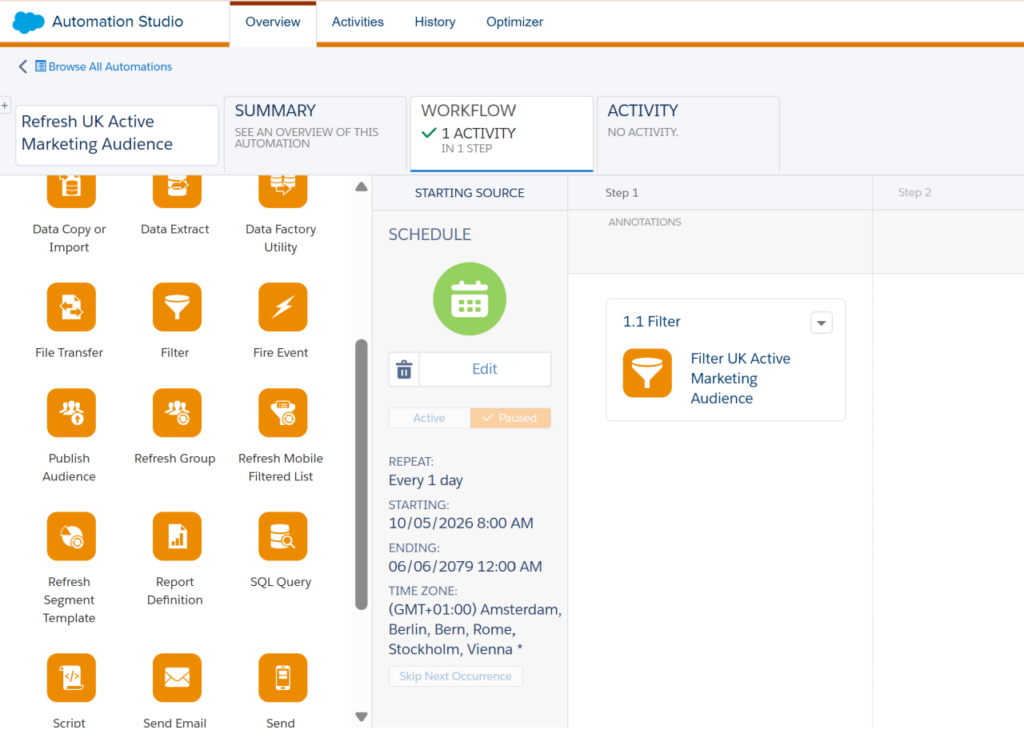
Automation StudioRuns tasks such as file imports, SQL queries, data extracts, and scheduled email sends.
Contact BuilderManages contact data and relationships between Data Extensions.
Mobile StudioHandles mobile messaging through tools such as MobileConnect and MobilePush.
CloudPagesCreates landing pages and forms, e.g. signup and preference pages.

The features available in your account depend on your purchased edition and enabled services.

How a customer journey works

Journey Builder sends messages through a sequence you define. Contacts enter through an entry source, then move through activities such as messages, waits, and decision splits.

For example, a welcome journey can:

  1. Accept a new subscriber from a signup form.
  2. Send a welcome email.
  3. Wait before the next step.
  4. Check whether the subscriber meets a condition.
  5. Send a different follow-up message based on the result.

Journey Builder uses the content and customer data prepared elsewhere in the platform. The entry settings control which contacts enter and whether they can enter again.

Automation Studio handles the data preparation behind these campaigns. It can import a customer file, run a query, and update the audience before the journey checks for new contacts.

How customer data is stored

A Data Extension is a table with rows and columns. It can hold customer details, orders, preferences, or a campaign audience.

Keep data organized around what each row represents. A customer profile table can contain one row per customer, while an orders table contains one row per order. Both can include a customer identifier to connect the records.

Contact Key identifies a contact across Marketing Cloud Engagement. In Email Studio, the same value is called Subscriber Key.

Use a stable customer ID and keep the key consistent across channels. Different keys for the same person create separate contact records, and Engagement does not automatically merge them.

SQL Query Activities select audiences and combine data from different tables. For example, a query can match customer profiles with recent orders and save the selected customers into a campaign Data Extension.

How personalization works

Personalization uses customer data to change a message. You can insert a first name, show content in the customer’s language, or choose an offer based on their purchase history.

Basic personalization uses fields and dynamic content rules. AMPscript adds lookups, conditions, and formatting when the message needs more control.

Missing data needs a fallback. For example, read the first name with AttributeValue() and use “there” when the value is empty. This produces “Hi there” instead of an incomplete greeting.

Prepare complex calculations before sending where possible. If an email needs the latest order or an assigned offer, an automation can prepare those values in a Data Extension.

Content Builder also lets you reuse headers, footers, and other blocks across emails, reducing repeated content work.

How it connects to websites, apps, and Salesforce CRM

Marketing Cloud Engagement has its own data storage. CRM records become available through a configured connection or data transfer.

Customer data can enter through file imports, APIs, or Marketing Cloud Connect, which connects Engagement with Sales Cloud and Service Cloud.

A website or app can send a transactional email through the API after a customer completes an action, e.g. placing an order.

Engagement supports REST and SOAP APIs. Choose the API based on the operation you need and the endpoints it supports.

What to configure before sending

Set up user access, sender details, customer identifiers, and subscription handling before launching campaigns.

Business Units organize marketing work across teams, brands, or regions. Plan which users can access each unit and which data or content should be shared.

Define how often customer data updates. A journey that needs a recent purchase cannot use it until that purchase reaches Marketing Cloud Engagement. Schedule imports and queries before the activities that depend on them.

Before activating a campaign, check that:

  • The audience contains the intended contacts.
  • Contact Keys match across the tables used by the campaign.
  • Subscription and exclusion rules are applied correctly.
  • Personalization works with both complete and missing data.
  • Journey entry and re-entry settings match the intended behavior.
  • Messages use the correct sender details and working links.

Business units

Marcel Szimonisz
Table of contents: Platform basics

A Business Unit (BU) in Salesforce Marketing Cloud Engagement is a logical partition inside a single Marketing Cloud account that separates teams by data access, assets, and operational setup. In practice, business units matter because they’re the line between “everyone can see and send everything” and “each brand/region runs independently without stepping on each other.” Most day-to-day SFMC admin and troubleshooting work comes down to understanding what is scoped to a BU versus what is shared across the enterprise.

Where a Business Unit fits inside Salesforce Marketing Cloud Engagement

Marketing Cloud Engagement is the execution environment for channels like email, journeys, mobile messaging, and automation, and business units are how you slice that environment into manageable operating areas. That distinction becomes important when orgs confuse product naming and assume “Engagement” is a single workspace rather than a container that can be split into multiple BUs with different rules and access patterns, as outlined in the Marketing Cloud Engagement product scope.

A common issue is treating a BU like a “folder structure.” It’s not. A BU is closer to an account boundary: it affects permissions, what appears in picklists, what your users can see, and what your automations can safely touch without cross-team collisions.

Business Unit hierarchy: enterprise account, parent/child BUs, and sharing

Business units are designed to support enterprise operating models: one top-level enterprise and multiple child BUs underneath it. In practice, what typically happens is one BU is reserved for shared governance (templates, core data, global suppression, integrations), while child BUs run brand- or region-specific execution. This hierarchy and the ability to separate or share items is built into the business unit structure and sharing model.

One limitation is that “separate” and “shared” is rarely a clean split. Teams often want shared data but separate content, or shared templates but separate sender reputations. Those choices have downstream effects on how you build data models, SQL queries, and integrations.

What actually changes when you switch business units

The practical difference between BUs shows up in three places: visibility, ownership, and risk.

  • Visibility: objects and configuration can appear or disappear depending on the BU you’re in, which is why “it’s not there” is frequently just the wrong BU context.
  • Ownership: teams can own their own assets and processes without waiting on a central team for every change.
  • Risk: the BU boundary reduces the chance that an automation, query, or send impacts another brand’s audience or content.

A common issue is that teams replicate the same “golden” configuration across BUs manually (naming conventions, folders, templates, automations) and drift sets in over time. You end up debugging behavior differences that are really configuration differences.

Access control and governance: why BUs usually exist in the first place

In real implementations, business units are often created primarily to enforce access control: who can send, who can edit, and who can view data and content. That governance angle is central to how admins are trained to set up and manage BUs, including the day-to-day realities of assigning users and controlling access through the business unit administration model.

What typically happens is that permissions are designed once, then exceptions pile up (agency users, shared services, regional admins). If you don’t document the intended governance model early, BUs can become “security theater” where access looks segmented but key shared assets are still editable by too many roles.

API and integrations: the BU (MID) is part of your technical design

If you integrate SFMC with external systems or multiple internal apps, the BU boundary becomes an integration boundary too. Many SFMC APIs execute in the context of a specific BU, identified by the BU’s unique identifier, so the same API call can behave differently depending on the BU context you target. This is why experienced teams treat “which MID am I calling?” as a first-class integration requirement, as reflected in the BU context used by SFMC APIs.

A common issue is building an integration against one BU in dev or UAT and assuming it will “just work” in prod across multiple BUs. In practice, you need a deliberate mapping of:

  • which system owns which BU’s data
  • where shared data lives (and how it’s accessed)
  • how credentials and scoped permissions differ by BU

Shared data extensions and SQL: where BU boundaries surprise people

Shared assets are powerful, but they introduce quirks that show up most painfully in SQL Query Activities. When a data extension is shared across BUs, you often have to reference it differently in queries than a local BU-owned data extension, and that difference is easy to miss during build-out or migration. The operational reality of querying shared data extensions, including the syntax expectations, is covered in how shared data extensions are referenced in SFMC queries.

What typically happens is a query works in one BU, fails in another, and the error message doesn’t clearly say “this is a shared DE reference problem.” In practice, teams avoid fragile builds by standardizing where “master” datasets live and by being consistent about which objects are shared versus duplicated.

Consent and preference management across business units

Consent is where BU design can either reduce risk or create it. If different brands or regions operate in different BUs, you still need a coherent approach to how consent is captured, stored, and enforced so customers aren’t accidentally messaged by the “wrong” BU. The practical constraints and mechanics of SFMC’s consent approach (and how teams typically implement it) are laid out in how consent management is handled in Marketing Cloud.

One limitation is that “global” consent expectations from legal or privacy teams don’t automatically align to how marketing teams want to operate. In practice, that leads to design decisions like:

  • centralizing consent signals in a shared dataset
  • enforcing suppression consistently across BUs
  • standardizing preference center behavior so BU separation doesn’t turn into compliance fragmentation

Common BU patterns (and the trade-offs teams run into)

Business unit strategy usually follows a few repeatable patterns, and the “right” one depends on operating model more than on SFMC features.

Multi-brand separation

A brand-per-BU model is common because it reduces operational collisions and lets each brand own its assets and audience strategy. The trade-off is duplication: shared templates, shared automations, and shared integrations require discipline to avoid copy-paste sprawl. This aligns with the way SFMC is positioned as a platform for multiple marketing capabilities under one roof, with teams commonly splitting operational ownership across those capabilities using the core SFMC platform structure.

Regional or business-line separation

Region-per-BU is typically driven by language, time zones, and regulatory requirements. The trade-off is audience fragmentation: global customers may exist in multiple operational contexts unless identity and consent are designed carefully.

Agency + internal team operating model

A common issue is giving an agency a BU to work in, then needing shared data and shared templates from a central BU. That’s doable, but it shifts complexity into sharing rules, permissions, and “who owns what” decisions.

Enterprise BU sprawl

A frequent real-world problem is BU sprawl: new BUs get created to solve short-term access problems, but long-term reporting and governance become harder. This comes up often in platform interviews and admin screening because BU scope affects so many daily tasks, reflected in how practitioners frame business unit definition and usage in SFMC discussions.

How to choose the right BU design in practice

The most durable BU designs are driven by operational boundaries that don’t change every quarter:

  • Separate BUs when teams need different permissions, different operating cadences, or real separation of day-to-day execution risk.
  • Share instead of splitting when the primary difference is cosmetic (branding) and the underlying data, consent rules, and reporting need to remain unified.
  • Plan for shared data early because retrofitting shared datasets later tends to break queries, automations, and assumptions across teams.

A common issue is trying to “fix” data model problems with BUs. In practice, business units help with governance and operational separation, but they don’t replace disciplined identity management, consistent consent handling, and a clear shared-data strategy.

Users, roles and access

Marcel Szimonisz
Table of contents: Platform basics

Set up Marketing Cloud Engagement access by defining the Enterprise business-unit structure, creating user accounts, assigning business-unit access, and assigning roles with the required permissions. The Marketing Cloud administration model uses business units, users, roles, and permissions to control account access.

Define the Enterprise and Business Units

An Enterprise account can contain multiple business units. Use business units to separate marketing operations that require distinct ownership, such as brands, regions, or departments within the same Enterprise account.

Define the business-unit structure before assigning access. Each business unit should have a clear operating owner so that access decisions do not become tied to temporary campaigns or individual projects.

Create Users and Assign Roles

Users are the individual accounts that access Marketing Cloud Engagement. Roles group permissions, and role assignments determine the areas and actions available to a user.

Create each user account in the account administration area, then assign the role required for that person’s responsibilities. Keep roles focused on the work users need to perform rather than assigning broad administrative access by default.

Use separate role assignments for distinct responsibilities:

  • Administrators manage account configuration and user access.
  • Marketing users receive access to the marketing functions required for their work.
  • Developers receive access required for approved development and integration work.
  • Review-only users should not receive configuration or publishing access.

Assign Business Unit Access

After creating the user, assign access to the business units where that user must work. Business-unit access should reflect the organization’s operating model, while the user’s assigned role controls the permitted actions.

For an illustrative access model, a central administrator can be assigned broader access, while a regional marketer is assigned only to the business unit that team operates. Document the required business units, users, roles, and restricted permissions before applying the assignments.

Verify Access Before Releasing Work

Test each intended role and business-unit assignment with a representative user account. Confirm that the user can work in the intended business unit and can complete the approved actions without receiving unnecessary access.

If a user can log in but cannot open a feature or complete an action, review the user’s business-unit access and role permissions before changing the implementation. Check the following:

  • The user is working in the intended business unit.
  • The user has access to that business unit.
  • The assigned role includes the permission required for the operation.
  • The account structure matches the asset or process being configured.
  • Development access is not being confused with administrator access.

Administration Sequence

  • Define the Enterprise and business-unit structure.
  • Create the required user accounts in account administration.
  • Assign each user access to the required business units.
  • Assign roles based on the user’s responsibilities.
  • Test representative administrator, marketer, developer, and review-only access.
  • Remove permissions that are not required for a role.

Contacts and data

Data model

Marcel Szimonisz
Table of contents: Contacts and data

A data model is how you organize your data and connect it to your contacts.

In Salesforce Marketing Cloud Engagement, a clear data model helps you choose the right audience, use customer details in messages, and build journeys that use the right information.

The main parts are Contact Key, Data Extensions, and Contact Builder relationships.

Contact Key identifies the contact

Contact Key is the unique value used to identify a contact. In Email Studio, the same value is called Subscriber Key.

Use a stable ID, such as a customer ID, and keep it consistent across channels. An email address is usually a poor choice because it can change.

For example, if a customer changes their email address, their customer ID can stay the same.

Marketing Cloud Engagement does not automatically merge contacts created under different keys. Using different keys for the same person can create separate contact records. Salesforce Contact Builder best practices

Data Extensions store the data

A Data Extension is a table with rows and columns. It can store customer details, orders, preferences, or an audience for a campaign.

Keep customer details and records of customer activity in separate tables.

Data ExtensionWhat each row representsExample fields
CustomerProfileOne customerContactKey, EmailAddress, FirstName, Language
OrdersOne orderOrderID, ContactKey, OrderDate, Total
CampaignAudienceOne selected customer for a campaignContactKey, EmailAddress, OfferCode

A customer can have one profile row and many order rows. The ContactKey field connects their orders to their profile.

Contact Key and primary key have different jobs

Contact Key identifies the contact. A primary key identifies a unique row in a Data Extension.

In CustomerProfile, ContactKey can be the primary key because each customer has one row.

In Orders, OrderID can be the primary key. ContactKey appears on every order, but it must allow repeated values because one customer can place several orders.

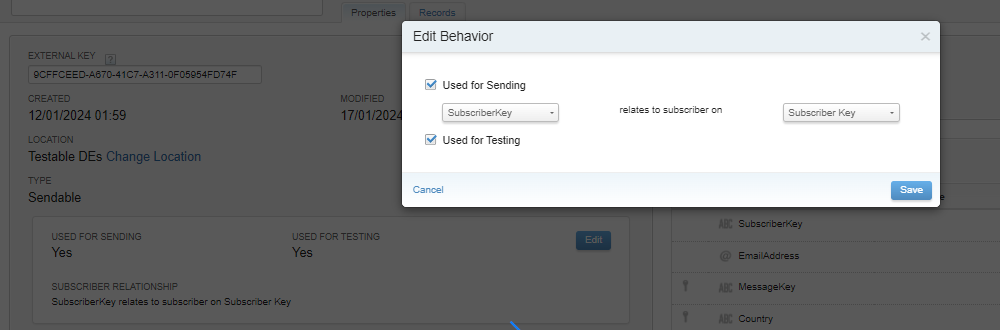
For a sendable Data Extension, also set the send relationship so the correct field maps to Subscriber Key. This is separate from choosing the table’s primary key. Salesforce Data Extension setup

Contact Builder connects related data

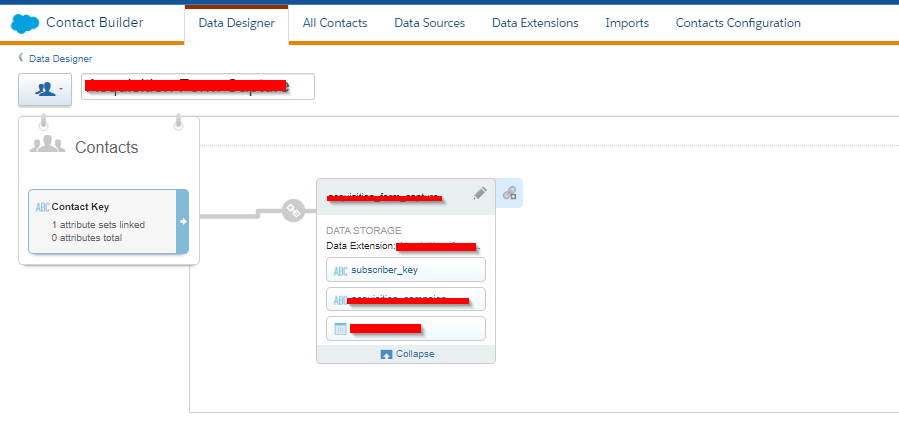
In Contact Builder’s Data Designer, you define how Data Extensions relate to a contact and to each other.

For example:

  • One contact has one customer profile.
  • One contact has many orders.

These relationships let features such as Journey Builder access related Contact Data. They do not clean up duplicate records or correct mismatched IDs. The values in the linked fields must match.

SQL builds campaign audiences

SQL Query Activities select data from Data Extensions and save the results into another Data Extension.

For example, a query can:

  1. Find customers who placed an order in the last 30 days.
  2. Match those orders to customer profiles using ContactKey.
  3. Apply the campaign’s selection and exclusion rules.
  4. Save the audience into CampaignAudience.

The SQL query defines its own joins. A relationship created in Contact Builder does not replace the join conditions in your query.

Journey Data and Contact Data serve different purposes

Journey Builder can use two types of data:

  • Journey Data keeps the values passed in when the contact entered the journey.
  • Contact Data reads the values available when the journey evaluates them.

Suppose a customer enters a journey with a loyalty tier of Silver, then becomes Gold.

Journey Data still shows Silver for that entry. Contact Data can show Gold once the related data has been updated.

Choose based on whether your rule needs the original value or the current value. Salesforce Journey and Contact Data guide

Prepare personalization data before sending

If an email needs a customer’s latest order, preferred store, and offer, prepare those values before the send where possible.

A CustomerMessaging Data Extension could hold one row per contact with those fields. The email can then read the prepared values instead of calculating everything during sending.

AMPscript is suitable for most email personalization. More complex content does not automatically require SSJS. Salesforce recommends AMPscript for many cases where each subscriber receives different content.

Always provide a fallback when a value or matching row is missing.

What to check before using the data

Before running a campaign, check that:

  • The same person uses the same Contact Key across your data sources.
  • Primary keys match what each row represents.
  • Related fields contain matching IDs.
  • Audience queries return the expected contacts and number of rows.
  • Journey rules use the right type of data.
  • Personalization handles missing values.
  • Required data updates finish before the campaign starts.

Data extension

Marcel Szimonisz
Table of contents: Contacts and data

Data Extensions are the backbone of data management in Salesforce Marketing Cloud Engagement. If you’re sending anything beyond the simplest “one list, one email” program, Data Extensions are what make personalization, segmentation, preference management, and cross-channel orchestration work reliably at scale. In practice, most real implementations treat a Data Extension as the system’s operational table layer – where contact attributes, event data, and send context are stored in a structured, queryable format designed for marketing execution, not just storage. The official platform view is straightforward: Data Extensions are tables in Marketing Cloud used to store data, and that single fact drives a lot of downstream design decisions.

Data Extension fundamentals (what it is, and what it isn’t)

A Data Extension (DE) is a relational-style table in Marketing Cloud Engagement. Each DE has fields (columns), records (rows), and a defined schema. Where Lists are contact-centric and relatively simple, DEs are built for structured datasets: purchase history, product catalogs, consent logs, registration events, support cases, loyalty points, and any custom dataset you need for targeting or content logic.

A practical way to think about it: a List is “people.” A Data Extension is “people plus context,” usually with many-to-one or many-to-many relationships.

Why Data Extensions matter operationally

Most Marketing Cloud features assume you’ll eventually land on DEs:

  • SQL Query Activities run against DEs, not Lists.
  • Most scalable personalization patterns depend on DE-backed attributes, not ad-hoc list fields.
  • Journey entry and decisioning is cleaner when event data is normalized into DEs.

That’s why hands-on data management training typically positions DEs as the central object for organizing and maintaining marketing data inside the platform, including routine imports, extracts, and segmentation work (Marketing Cloud data management module covering Data Extensions and segmentation workflows).

How Data Extensions are structured in Marketing Cloud Engagement

Fields, data types, and schema discipline

A DE’s schema is not just documentation – it directly affects query behavior, data quality, and send-time logic. Field definitions (type, length, nullable, defaults) determine what can be stored and how predictable downstream logic will be. One common issue is letting “temporary” fields creep in over time, then discovering later that multiple automations or emails now depend on them.

Primary keys, uniqueness, and what typically breaks

In practice, the biggest architectural decision is whether you enforce uniqueness with a primary key and what that key represents.

Typical patterns:

  • Contact-keyed tables (one row per subscriber/contact) for profile and preferences.
  • Event tables (many rows per contact) for behavior: orders, web events, appointments.
  • Lookup tables (no contact key required) like product catalogs or location mappings.

Where teams get burned is mixing these patterns unintentionally. If you design a “profile” DE but allow multiple rows per contact, then AMPscript lookups, SQL joins, and Journey decisions become ambiguous fast.

The platform UI and setup guidance highlights these configuration choices as part of standard DE creation and management, including field definitions and key behavior (Data Extension configuration options in Marketing Cloud Engagement setup help).

Common Data Extension types you’ll see in real implementations

Even though the UI offers multiple ways to create a DE, most production accounts end up with a few recognizable categories:

Sendable vs non-sendable Data Extensions

A sendable DE is designed to be used as an email audience. That generally means it has the right identifiers to map records to a subscriber/contact identity, plus required email addressing fields. Non-sendable DEs hold supporting data used for segmentation, enrichment, and content lookups.

A practical rule: if a DE exists primarily to support content or filtering, keep it non-sendable. It reduces risk and keeps identity logic centralized.

Standard, filtered, and test Data Extensions

A common operational pattern is:

  • Raw landing DEs for imports/API writes (minimal validation, append/update rules defined)
  • Modeled “gold” DEs for segmentation and journeys (cleaned, deduped, consistent keys)
  • Test DEs that mirror production schema for safe QA

This is also why “what is a Data Extension” explanations aimed at practitioners tend to emphasize that DEs are purpose-built containers used across sends, segmentation, and automation rather than a generic database table (practical overview of how Data Extensions are used for targeting and personalization).

Data Extensions in segmentation: SQL, joins, and performance realities

SQL Query Activities are where DE design either pays off or becomes technical debt.

How DE design impacts SQL work

What typically happens in mature accounts:

  • Segmentation queries join a profile DE to one or more event DEs.
  • Suppression logic joins to consent/unsubscribe/preferences DEs.
  • Final audiences are written into sendable “audience” DEs with strict schemas.

If keys are inconsistent (for example, mixing SubscriberKey formats across DEs), you spend more time normalizing strings than segmenting audiences.

Performance nuance: query complexity and field choices

Even without getting exotic, wide tables and sloppy data types can slow down queries and complicate joins. It’s usually better to keep event tables narrow, index your logic around stable keys, and materialize intermediate DEs in Automation Studio rather than writing one massive query that tries to do everything.

Data Extensions for personalization: AMPscript lookups and send context

DEs aren’t only for audience building. They’re also a personalization engine.

In practice, content blocks often:

  • Look up a customer’s latest order
  • Pull a dynamic offer based on segment membership
  • Resolve a store location from a postal code mapping table

That’s why schema stability matters. If your email relies on `LookupRows()` against a DE and someone renames a field or changes the expected cardinality, you can break production emails instantly.

Creating and updating Data Extensions programmatically (SSJS and automation patterns)

Manual DE creation doesn’t scale, especially when you need repeatable deployments across business units or environments. Server-Side JavaScript (SSJS) is commonly used to create DEs from code so you can standardize schemas and reduce human error. A useful implementation detail is that SSJS can define the DE and its fields in a single scripted flow rather than relying on click-ops (SSJS pattern for creating Data Extensions with fields).

Where this gets practical:

  • Spinning up temporary DEs for a campaign run
  • Rebuilding staging tables in an automation
  • Enforcing naming conventions and field definitions

One limitation is that programmatic creation still needs disciplined governance: just because you can create DEs easily doesn’t mean you should let automations generate hundreds of one-off tables no one owns.

Organizing and locating Data Extensions: folders and the “where did it go?” problem

As accounts mature, Data Extension sprawl becomes a real maintenance problem. People know the DE exists, but can’t find it quickly in Email Studio, Automation Studio, or Contact Builder.

Folder placement is not cosmetic. It affects manageability, handoffs, and the ability to troubleshoot automations under pressure. When you need to reference a DE folder programmatically or troubleshoot assets tied to a folder structure, the practical detail is that you can retrieve the folder identifier rather than guessing based on UI navigation (method to identify a Data Extension folder ID in Marketing Cloud).

Refreshing and maintaining Data Extension data (and why “freshness” is often misunderstood)

A common issue is assuming a DE automatically reflects source-of-truth changes in real time. In most setups, DEs are updated through scheduled imports, automations, or API writes. If your refresh cadence is hourly but your journey decisioning expects minute-level accuracy, you’ll see mis-targeting.

Operationally, teams implement “refresh” patterns to keep DEs aligned with upstream systems – either by truncating and reloading, updating matching keys, or rebuilding derived DEs from SQL in a controlled sequence. The important nuance is choosing a refresh strategy that matches the DE’s role (staging vs audience vs history) and avoids unintended duplication or record drift (practical approaches to refreshing Data Extension records without creating data drift).

Copying and moving Data Extensions: a real-world failure mode

Copying a DE sounds trivial until it fails in production during a deployment window. What usually happens is that the copy operation is treated like a safe UI action, but it can fail due to environmental constraints, naming collisions, or internal platform validation rules. When you hit the “Failed to initiate Data Extension copy” error, it’s a reminder that DE operations are not always atomic, and you need a fallback plan for cloning schema and preserving dependencies (troubleshooting notes for the “Failed to initiate Data Extension copy” error).

In practice, the safer pattern for repeatable deployments is to recreate schema deterministically (often via SSJS) and reload data through controlled automations, rather than relying on manual copy operations for anything mission-critical.

Where Data Extensions fit when you’re integrating other platforms (including Adobe Campaign)

Data Extensions are not a generic CRM database replacement. They’re a marketing execution datastore optimized for segmentation, journey entry, and message personalization. When integrating with other marketing platforms (including Adobe Campaign), the cleanest approach is usually:

  • Keep the source-of-truth (customer profile, consent, transactional records) upstream
  • Land only the fields you need for orchestration and messaging into DEs
  • Treat DEs as versioned, purpose-built datasets with explicit refresh rules

The teams that get the best reliability are the ones that design DEs like products: stable schema, documented keys, clear ownership, and automated refresh pipelines.

Data extension vs. lists

Marcel Szimonisz
Table of contents: Contacts and data

Keeping your data model clean in Salesforce Marketing Cloud Engagement comes down to one decision that shows up everywhere: when to use Lists (and Groups) versus Data Extensions. The difference is not just “old vs new.” It affects deliverability, segmentation speed, data governance, automations, preference management, and even how safely you can scale. In practice, most account headaches come from trying to force relational data and evolving customer profiles into a List-first setup, or from using Data Extensions without a clear key strategy and sendability rules.

To be honest in my experience I never had a project that used lists.

Lists vs Data Extensions: the practical definition that matters

What a List really is in SFMC Engagement

A List is a simple audience container tied to Email Studio, designed primarily for subscriber management and basic targeting. Lists can be organized with Groups, which are essentially a way to categorize and filter within a List rather than a full relational structure. That simplicity is the point, and it’s also the limitation. A common issue is trying to treat a List like a customer table, then struggling with duplicate records, overwrites, and awkward preference logic. How Lists work in Marketing Cloud Engagement for audience management

What a Data Extension is in real-world builds

A Data Extension (DE) is a table with defined fields, data types, and keys, meant for structured marketing data. DEs are where you model customer attributes, transactional events, consent history, and campaign facts in a way that can be queried, joined, and automated. When implementations scale, DEs become the backbone: one row per customer in a master DE, plus related event DEs for orders, browsing, support cases, and so on. How Data Extensions are structured for contact data

Data model and schema flexibility: where Lists hit the wall

Data Extensions support columns, constraints, and relationships

DEs let you define field types and lengths, pick a primary key strategy, and design the shape of your marketing database. That matters when you need consistency across imports, API loads, and automations. One limitation is that teams sometimes skip proper keying early on, then later discover they can’t reliably upsert or deduplicate without rework. Managing fields and keys inside Data Extensions

Lists are lightweight, but not built for evolving profile data

Lists are fine when you need quick, simple targeting and minimal data attributes. They’re not great for scenarios like “one contact, multiple memberships,” “one contact, many transactions,” or “one contact, consent history over time.” When those use cases show up, teams often end up creating more Lists and Groups than they can govern, then segmentation becomes brittle. Practical comparison of Lists vs Data Extensions for structuring marketing data

Segmentation and querying: SQL changes everything

Data Extensions unlock SQL joins and reusable segmentation logic

The practical power of DEs is segmentation with SQL. You can build audiences by joining profile and behavioral tables, calculating recency/frequency, and materializing “send-ready” segments into target DEs for downstream sends. What typically happens in mature stacks is that SQL Query Activities become the main segmentation layer, with Automations scheduling refreshes at predictable times. SQL patterns used to segment and transform Data Extension data

Lists and Groups are faster to start, but harder to scale cleanly

Groups make it tempting to keep everything “inside Email Studio,” but segmentation logic becomes hard to version, hard to test, and hard to reuse across channels. In practice, that shows up as inconsistent audiences across campaigns because the logic lives in too many manual filters and ad-hoc Groups. Operational differences that impact segmentation and scale

Subscriber identity, keys, and deduping: where most implementations stumble

Data Extensions force you to be explicit about identifiers

With DEs, you choose the key: SubscriberKey, ContactKey, CustomerId, etc. That’s good because it makes identity design intentional, but it also means mistakes are more visible. A common issue is letting Email Address behave like an identifier, then discovering later that email can change and the data model can’t reconcile history cleanly. Identity and scaling considerations when choosing Lists vs Data Extensions

Lists feel simpler, but can hide duplication problems

Lists are easy to import into and send from, which can mask identity issues until unsubscribes, bounces, or preference updates don’t behave as expected. In practice, teams often discover they have multiple “versions” of the same person across Lists or inconsistent subscriber state handling because the model wasn’t centralized. High-level trade-offs between Lists and Data Extensions in day-to-day use

Sending behavior: sendable Data Extensions vs List sends

Sendable Data Extensions provide controlled send context

A sendable DE is configured so SFMC knows which field maps to SubscriberKey and which maps to Email Address for sending. That design matters for keeping sends consistent while still allowing multiple audience tables. One limitation is that “sendable” is not automatic just because a DE contains an email field. You need the mapping to line up with your subscriber identity strategy. Send context and configuration options for Data Extensions

Lists are straightforward for simple blasts, but less precise for data-driven personalization

Lists are convenient for one-off sends, but personalization often depends on attribute availability and consistency. Once personalization relies on multiple data sources (profile + latest transaction + last web event), DEs become the natural “staging layer” to flatten and standardize the send audience.

Automation and personalization: SSJS and AMPscript behave differently depending on storage

Querying Data Extensions at runtime can work, but it’s not a free-for-all

SSJS and AMPscript can retrieve DE data for personalization, but you need to treat runtime lookups carefully. What typically happens is that excessive row-by-row lookups slow down rendering, complicate debugging, and create surprises when data isn’t shaped exactly as expected. Using a pre-segmented, send-ready DE often performs better than heavy runtime lookups. Techniques and constraints for querying Data Extensions via SSJS and AMPscript

Automation Studio workflows usually center on Data Extensions, not Lists

For repeatable operations like nightly refreshes, deduping, enrichment, and suppression logic, DEs fit Automation Studio patterns naturally. Lists can be part of the flow, but they’re rarely the best place to store intermediate states or complex business rules. How automation patterns support scalable personalization

Data quality and governance: controlling change and preventing silent breakage

Data Extensions make data contracts enforceable

Field names, types, and keys act like a contract between upstream systems (CRM, CDP, ecommerce) and SFMC. That reduces “silent failure” scenarios where a column changes type or a value format drifts and segmentation starts misbehaving. In practice, the more systems feeding SFMC, the more valuable that structure becomes. Why structured tables reduce long-term data management issues

Lists can be governed, but the controls are weaker

You can still manage processes around List creation and imports, but Lists don’t naturally encourage normalization, history tracking, or multi-table modeling. That’s why List-heavy accounts often accumulate “mystery Lists” no one trusts, especially when multiple teams share the same BU.

Edge cases: Groups vs Data Extensions and when a List is still the right tool

Groups are not a substitute for relational segmentation

Groups help organize subscribers inside a List, but they’re not designed for multi-table joins or event modeling. When you need “customers who purchased X in the last 30 days AND have not opened the last 5 emails,” Groups won’t give you the same maintainable path as DE + SQL. Why Groups behave differently than Data Extensions in segmentation design

When Lists still make sense

Lists are still useful when:

  • You need a quick, low-attribute audience container for a simple send
  • Your data is minimal and unlikely to evolve
  • You want a lightweight mechanism for a small, manual process

The practical rule is: if the audience definition is repeatable, data-driven, or needs to be explainable six months later, it typically belongs in a Data Extension with SQL-built segments. If it’s a one-off or operationally tiny, Lists can be fine.

Implementation patterns that reduce pain later

Use a “send-ready audience” Data Extension

A common working pattern is:

  • Source DEs store normalized data (profiles, orders, events)
  • SQL produces a flattened Send_Audience DE with one row per SubscriberKey
  • Sends happen from the Send_Audience DE so personalization fields are predictable

This avoids heavy runtime lookups and makes troubleshooting much easier when a stakeholder asks why someone did or didn’t receive an email.

Hashing identifiers for safer joins and matching

When integrating multiple systems, consistent hashing can help match records without passing raw identifiers around in every table. In practice, hashing needs to be consistent across SQL and scripting contexts to avoid mismatches that are painful to debug. Consistent MD5 hashing across SFMC SQL and AMPscript

All Subscribers

Marcel Szimonisz
Table of contents: Contacts and data

Salesforce Marketing Cloud Engagement’s All Subscribers List is the system-level roster of every subscriber your account knows about for email sending. It matters because it’s where email address, Subscriber Key, and global email status come together – and that global status can silently override what you think is happening in lists, publication lists, or even Data Extensions. In practice, most “why didn’t this contact receive?” investigations end up here, because this is the first place to validate whether someone is Active, Unsubscribed, Bounced, or Held at the account level.

What the All Subscribers List is (and what it is not)

The All Subscribers List is a single, centralized table in Marketing Cloud Engagement that stores subscribers and their overall email permission status. It’s not just another marketing list – it’s effectively the account’s “source of truth” for whether an email send is allowed to go out to that Subscriber Key at all. The platform treats it as foundational to email deliverability and compliance behavior, including how unsubscribes and bounces are enforced across sends and audiences, as described in the platform help for the All Subscribers List in Marketing Cloud Engagement.

What it is not:

  • It’s not your segmentation layer (Data Extensions and filtered audiences are for that).
  • It’s not scoped to a single campaign (it spans the whole account, and in many setups effectively spans business operations).
  • It’s not optional – even if you only “send to Data Extensions,” subscribers still resolve back to this model for status.

How the subscriber model ties Subscriber Key to global email status

Marketing Cloud’s subscriber model revolves around the Subscriber Key as the unique identifier. In real implementations, Subscriber Key is usually a CRM Contact ID, a customer ID, or another stable key that is not the email address (because email addresses change). The system still stores the email address, but the identity anchor is the key, and the subscriber status is applied at that identity level, consistent with the platform’s subscriber data model and behaviors.

A common issue is assuming “email address = person.” What typically happens is that an email address gets reused or updated, while the Subscriber Key remains stable – so the All Subscribers record is what determines whether that key can receive mail, regardless of which audience you select.

Why this becomes a troubleshooting hotspot

If a subscriber is globally Unsubscribed in All Subscribers, adding them to a list, publication list, or a sendable Data Extension will not “resubscribe” them. You can build a perfect audience and still get zero deliveries for that person because the send is blocked upstream by global status enforcement.

How subscribers get into All Subscribers (even when you “only use Data Extensions”)

Subscribers can be created or updated in multiple workflows, and not all of them are obvious when you’re moving fast in an implementation:

  • Sending to a sendable Data Extension can still result in subscriber records being created or updated as part of the send context.
  • Imports, API calls, and automations can create subscriber rows as a side effect of contact ingestion.
  • Subscriber status changes (unsubscribes, bounces) update the All Subscribers status and then propagate into how future sends behave.

Marketing Cloud’s core training material emphasizes that All Subscribers is the central layer where status and identity are managed, even when your day-to-day segmentation happens elsewhere, as covered in the Subscribers in Marketing Cloud module.

The statuses you see in All Subscribers – and how they affect sending

The All Subscribers List typically reflects statuses that are operationally important:

  • Active – eligible to be sent to (assuming other rules like publication list permissions allow it).
  • Unsubscribed – globally opted out at the account level for email.
  • Bounced – email is bouncing; repeated bounces can suppress delivery depending on bounce handling.
  • Held – sending is blocked (often related to repeated bounces or compliance-related suppression).

One limitation is that marketers often interpret these as “list membership states.” They’re not. These are delivery eligibility states that apply even if the subscriber is included in the target audience.

How the All Subscribers List interacts with Publication Lists and Suppression Lists

Publication Lists and Suppression Lists operate at the messaging preference layer, while All Subscribers operates at the global deliverability/permission layer. In practice, you use:

  • Publication Lists to manage what someone is opted into (newsletters vs product updates).
  • Suppression Lists to block sends to specific subsets (internal staff, seed lists, legal exclusions, or temporary holdouts).

A common issue is expecting a Publication List opt-in to override a global unsubscribe. It won’t – global unsubscribe wins. The practical distinction between the two list types and why suppression behaves differently from publication preferences is outlined in publication lists vs suppression lists in Marketing Cloud Engagement.

Real-world edge cases that cause “missing sends”

Subscriber Key conflicts and duplicates

If Subscriber Key strategy isn’t consistent, you can end up with:

  • One human represented by multiple Subscriber Keys (each with its own status)
  • A single Subscriber Key associated with an outdated email address

In practice, the second case is brutal: sends look “successful,” but they’re going to the wrong inbox because the All Subscribers email value is stale or overwritten. The practical implications of Subscriber Key selection and the way it shapes the whole subscriber model are laid out clearly in the Marketing Cloud subscriber model breakdown.

“Unsubscribed” is global, even when the business thinks it’s per brand

What usually happens in multi-brand or multi-region setups is that stakeholders expect unsubscribe to be scoped to a brand. Unless you’ve designed business units, publication lists, and data governance around that expectation, the All Subscribers status can become the global blocker that causes internal friction.

Unsubscribes captured in one place affect everything else

An unsubscribe captured from a footer link, preference center, or compliance process updates the central subscriber status. That’s good for compliance – but it can surprise teams who are only watching Data Extension attributes and not checking global status.

Using SQL, SSJS, and AMPscript alongside All Subscribers (practical patterns)

Marketing Cloud won’t let you treat All Subscribers like a normal Data Extension you can freely query in every context. In practice, teams do one of these:

Pattern 1: Mirror subscriber status into a Data Extension for segmentation

For segmentation and reporting, it’s common to maintain a “Subscriber Status Snapshot” Data Extension that stores Subscriber Key, Email, and a status field updated on a schedule. This makes it easy to join in SQL and avoid building sends to subscribers who are not eligible anyway.

The practical reason is simple: SQL activities and audience queries are far easier when the data is in your own schema, rather than depending on system views or UI-only checks.

Pattern 2: Block sends at send time (last-mile safety)

For transactional and semi-transactional sends, teams often implement a last-mile check:

  • AMPscript can conditionally suppress output (or render a compliance-safe message) when a subscriber should not receive content.
  • SSJS can be used in CloudPages or custom preference flows to update attributes and log decisions, then rely on the platform’s subscriber model to enforce global eligibility.

This lines up with how the platform defines Marketing Cloud Engagement as a system where sending, data, and subscriber identity are tightly coupled, as described in the overview of Salesforce Marketing Cloud Engagement and its core components.

Pattern 3: Troubleshoot with a consistent checklist

When delivery doesn’t match expectation, a reliable order of operations is:

  • Check All Subscribers status for the Subscriber Key (global eligibility).
  • Validate Publication List subscription if the send is tied to one.
  • Confirm the audience (DE/list) contains the correct Subscriber Key and intended email value.
  • Validate suppression logic (suppression lists, exclusion DEs, holdouts).
  • Only then dig into content logic (AMPscript) or automation timing.

Operational best practices that prevent All Subscribers surprises

Standardize Subscriber Key early

Pick a stable, non-email identifier and stick to it across integrations. In practice, changing Subscriber Key strategy later is painful because it can fragment history and permissions.

Decide where the “truth” of email address lives

If CRM is the system of record for email, ensure imports and API upserts don’t overwrite the All Subscribers email with stale values. A common issue is having multiple inbound pipelines competing to set the email field.

Treat All Subscribers as a compliance layer, not a marketing audience

Use Data Extensions and attributes for segmentation, but always remember the platform enforces subscriber status at the foundational layer. That mental model prevents a lot of wasted debugging time.

Contact builder

Marcel Szimonisz
Table of contents: Contacts and data

Contact Builder in Salesforce Marketing Cloud is the place where Marketing Cloud decides who a “person” is, which data belongs to that person, and how different systems and tables connect to form a usable customer profile. It matters because every real personalization, suppression rule, and cross-channel journey depends on this model being correct. In practice, most “Marketing Cloud data problems” are actually Contact Builder problems: mismatched keys, duplicate contacts, broken attribute groups, or a data design that does not match how the business identifies customers. Salesforce positions Contact Builder as the hub for defining the contact model, managing key relationships, and controlling how contact data is organized for segmentation and activation in other apps like Journey Builder and Email Studio, as shown in Salesforce’s guided overview of Contact Builder components and purpose.

What Contact Builder actually does (beyond “a data tool”)

Contact Builder is not just where you “store data extensions.” It is where you define:

  • Your Contact Key strategy (the unique identifier Marketing Cloud uses to represent a person).
  • Attribute Groups (a logical profile assembled from multiple data sources).
  • Relationships between data extensions and other sources.
  • Population and behavior of the All Contacts list (and therefore deletion and retention outcomes).

Salesforce’s contact model documentation is explicit about the central role of a unique contact identifier: Marketing Cloud uses a single contact key to unify data across channels and data sources, and that key becomes the anchor for the profile and relationship model in Contact Builder. That’s the practical takeaway from Salesforce’s explanation of how the contact model relies on a unique Contact Key and related data.

The key concept: Contact Key is the spine of everything

A common issue is treating Email Address as the identifier because it feels unique. It usually is not. People change emails, share inboxes, or create multiple accounts. When that happens, Contact Builder will happily create multiple “people” unless the Contact Key strategy prevents it.

The fastest way to see how serious this is: your Journey Builder entry events can look fine while downstream personalization breaks because the profile is fragmented across multiple contact keys. Once that happens, re-stitching history is painful.

SalesforceBen’s walkthrough of Contact Builder focuses on the practical reality that the Contact Key is the master identity used across Marketing Cloud, and your data model choices in Contact Builder determine how data extensions relate back to that identity. That’s the operational insight from a practical breakdown of how Contact Builder ties Contact Key, data extensions, and relationships together.

Contact Builder components you actually use in real implementations

H3: Data Designer (Attribute Groups and relationships)

Data Designer is where you assemble an “Attribute Group” that represents your customer profile across multiple tables. Practically, it’s a relationship diagram that tells Marketing Cloud, “These rows belong to this person.”

Trailhead’s data management module emphasizes two real-world behaviors people trip over:

  • You build an attribute group by selecting a “root” (often a contact table) and then relate other data extensions to it.
  • Relationships are only as good as your keys; if your foreign keys are messy, the profile will be messy.

That’s the applied takeaway from Salesforce’s walkthrough of Contact Builder data relationships and attribute groups.

Implementation nuance: Attribute Groups are not a magic “CDP.” They don’t clean your data. They just model it. If your purchase table is keyed by email but your master contact is keyed by CustomerID, you must resolve that mismatch upstream or create a bridge mapping table.

H3: All Contacts (and why deletion surprises happen)

All Contacts is the system-level list of contacts in Marketing Cloud. The confusing part is that people often delete a subscriber from a list and expect the person to be gone. But Contact Builder’s identity layer is separate.

What typically happens: you remove a row from a sendable data extension, but the contact still exists in All Contacts because the contact key still exists from another source or historical ingestion. Salesforce’s contact model docs explain that contacts can exist independent of any one data extension because the contact identity is maintained at the contact model level, not “per table.” That behavior is core to how Salesforce describes contact identity persisting across the model (and it’s why deletion needs to be planned, not improvised).

How Contact Builder fits into segmentation and personalization

Contact Builder determines what data is available as “profile” context, but personalization still depends on how you query and fetch that data at send time.

A practical limitation: large or highly relational data models often push you toward SQL-driven segmentation or runtime lookups, because pulling everything into one wide “profile table” is expensive and brittle.

MartechNotes’ personalization guidance highlights a real pattern in marketing automation projects: the more granular your behavioral data gets (events, products, content interactions), the less it behaves like a tidy profile and the more you need a deliberate strategy to select the right slice of data for each message. That’s the applied insight from practical notes on how personalization breaks down when data volume and complexity increase.

H3: When Attribute Groups are not enough for “heavy” personalization

Even with a clean Contact Builder model, you can hit a ceiling when the personalization logic requires multiple lookups, ranking, or conditional output based on complex datasets.

MartechNotes describes a scenario many teams run into: AMPscript is great for straightforward personalization, but heavier logic often moves into Server-Side JavaScript to handle more complex processing. The key practical point is not “use JavaScript because it’s cooler” but “use it when your personalization needs exceed what is maintainable in AMPscript.” That’s the real-world angle from an example-driven explanation of where AMPscript tends to hit limits and SSJS becomes the workaround.

Querying Contact Builder-related data for campaigns (SQL, SSJS, AMPscript)

Contact Builder defines the model. Activation usually happens through queries and extracts that produce sendable audiences.

H3: SQL for segmentation against Data Extensions

A common pattern is:

  • Store raw events (orders, browsing, app events) in non-sendable tables.
  • Use SQL Query Activities to transform and summarize into a sendable audience data extension keyed by Contact Key.
  • Send from that audience DE, and personalize with just the fields you truly need.

MartechNotes’ SQL examples are useful here because they show the kinds of transformations you end up doing constantly in Marketing Cloud: deduping, selecting latest records, and building “current state” rows for each contact. That’s the practical value drawn from field-tested SQL patterns for building usable campaign audiences from raw data extensions.

H3: SSJS and AMPscript for targeted lookups at send time

Sometimes you do not want to pre-join everything. For example, you may have a “Top 3 recommended products” table and only need to pull the rows for the current subscriber at render time.

MartechNotes shows that both SSJS and AMPscript can query data extensions, which is a practical alternative when building a pre-segmented audience is not feasible for every variant. The important operational detail is that runtime lookups trade simplicity for performance and debugging complexity, so you use them deliberately. That approach is reflected in a hands-on comparison of querying data extensions with SSJS vs AMPscript.

Here’s a realistic SSJS snippet that looks up a profile attribute by Contact Key and falls back safely:

<script runat="server">
Platform.Load("Core","1.1.1");

var contactKey = Attribute.GetValue("_subscriberkey"); // Contact Key in most setups
var de = DataExtension.Init("Customer_Profile");
var rows = de.Rows.Retrieve({Property:"ContactKey",SimpleOperator:"equals",Value:contactKey});

var tier = (rows && rows.length > 0) ? rows[0].LoyaltyTier : "Standard";
Variable.SetValue("@LoyaltyTier", tier);
</script>

%%=v(@LoyaltyTier)=%%
H3: Reusing AMPscript functions inside SSJS

Hybrid scripting is common: SSJS for data handling and AMPscript functions for certain string/date utilities that teams already trust.

MartechNotes demonstrates that you can call AMPscript from SSJS, which is a useful trick when you need consistent formatting logic across templates without rewriting everything in JavaScript. That’s the implementation insight from a practical method for invoking AMPscript functions within SSJS.

Typical Contact Builder pitfalls (and how teams avoid them)

H3: Starting without an identity decision

In the real world, teams often start by importing data and building sends, then later discover they need a stable cross-system identifier. By then, duplicates and mismatched histories are already baked in.

A Reddit thread about getting started with Marketing Cloud reflects the recurring theme from practitioners: early learning focuses on “how to send,” but successful setups quickly shift to data model fundamentals and how contacts and data extensions should be structured for long-term use. That’s the practical perspective found in peer advice emphasizing fundamentals like data structure and contact identity early.

What typically works better: decide Contact Key first (CRM ContactId, PersonAccountId, CustomerID, or a mastered ID), then model everything else around it.

H3: Overloading the contact profile with high-volume data

Contact profiles are not designed to be a dumping ground for every clickstream row. When teams force it, segmentation slows down, templates get complicated, and troubleshooting becomes guesswork.

The contact model guidance from Salesforce makes it clear that the contact model is about identifying and relating data to a contact, not turning every dataset into a “profile attribute.” That focus is central to how Salesforce frames the contact model as identity plus relationships. Practically, you keep high-volume events in separate DEs and only roll up what you need for messaging.

A practical way to think about Contact Builder when designing your data model

If you want Contact Builder to stay boring (which is the goal), design with these constraints in mind:

  • One person, one key: pick a Contact Key that survives channel changes.
  • Model relationships intentionally: attribute groups should reflect how you will segment and personalize, not every possible link.
  • Precompute when it’s repeatable: use SQL to build campaign-ready audiences and snapshots rather than doing expensive lookups in every email.
  • Use runtime lookups when they are truly dynamic: recommendations, last transaction, localized content variants.
  • Keep debugging in mind: if you cannot explain where a field comes from and how it relates to Contact Key, it will break under pressure.

Contact Builder is the part of Salesforce Marketing Cloud that determines whether your “data-driven marketing” is reliable or fragile. When it’s modeled well, segmentation gets simpler, journeys behave predictably, and personalization stops being a constant fire drill.

Attribute groups

Marcel Szimonisz
Table of contents: Contacts and data

Attribute Groups are the backbone of the Salesforce Marketing Cloud Engagement contact model. In practical terms, an Attribute Group is how Contact Builder knows which records in different Data Extensions (and other data sources) belong to the same person. If you have customer profile data in one table, preferences in another, and transactions in a third, Attribute Groups are what let Marketing Cloud treat that as one unified “contact” for segmentation, personalization, and automation. Without a clean Attribute Group design, what typically happens is messy joins, inconsistent counts between audiences, and personalization that breaks because the platform cannot reliably resolve the right row for the right subscriber.

Where Attribute Groups sit in Contact Builder (and why they matter)

Contact Builder is the area where you define your contact model: the relationships between contact records and the data you want to use for targeting and personalization. The platform is explicit about Contact Builder being the place to manage those relationships, not something that’s inferred magically at send time, which is why the modeling step matters for almost every serious implementation: Contact Builder as the workspace for defining and managing contact relationships.

An Attribute Group is the container for that model. It gathers one “root” contact relationship and connects related attributes (tables) to it through keys you define.

What an Attribute Group actually is in Salesforce Marketing Cloud Engagement

An Attribute Group is a set of attributes (typically Data Extensions) tied together by relationships so they can be used as a coherent view of a contact. The key nuance is that it is not just a visual map. It’s a ruleset that establishes how data connects to the contact record. When configured properly, it becomes the foundation for:

  • building audiences off contact-connected data
  • using related data consistently across channels
  • reducing the need for one-off SQL “flattening” just to get a usable targeting table

The platform’s own description of Attribute Groups focuses on the idea of grouping attributes and defining the relationships between them so data can be leveraged together: how Attribute Groups organize attributes and relationships in Contact Builder.

Core pieces: root, relationships, and keys

Root attribute and “the contact” in your model

In practice, the first decision is what represents the person. Most teams pick a master Data Extension that holds a stable Contact Key, and then relate everything else back to it.

A common issue is confusing SubscriberKey, Email Address, and Contact Key. If different systems populate different identifiers, relationships become fragile. Your Attribute Group will only be as reliable as the key strategy behind it.

Relationships (1-to-1 vs 1-to-many) and what breaks when you get them wrong

Attribute Groups can represent different relationship types between the root and related data (for example, a single profile record vs multiple transaction rows). The relationship choice affects how segmentation and personalization behave.

What typically happens when a 1-to-many table is treated like 1-to-1 is that users expect a single deterministic value (for example, “last purchase date”) but the system has multiple eligible rows. You then get unpredictable results unless you aggregate or precompute the “one row per contact” fields somewhere else.

How Data Extensions fit into the Attribute Group model

Most implementations use Data Extensions as attributes. The practical impact is that your Data Extension design (primary keys, uniqueness, update cadence) directly determines whether the Attribute Group behaves predictably.

A useful mental model is: Attribute Groups don’t clean the data for you – they only connect it.

How Attribute Groups are used in day-to-day work

Audience building and segmentation

Attribute Groups give you a consistent data path from the contact to attributes used for segmentation. In real builds, this reduces the number of separate “segmentation DEs” you need to maintain, because relationships are already defined at the model level.

Contact modeling concepts like linking data to the contact record and using that connected data for marketing use cases are central to the Contact Builder learning path: contact model fundamentals and linking attributes in Contact Builder.

Personalization in email and dynamic content (AMPscript and SSJS nuance)

When your data is well-modeled, you can reference related data more confidently. In practice, many teams still use AMPscript Lookups or SSJS data calls, but the quality of results depends on whether your contact-to-attribute relationships are consistent and whether the “expected cardinality” is real.

A common issue is building personalization that assumes exactly one matching row, then discovering multiple matches (or none) because a relationship key was not enforced upstream. The fix is usually not “more AMPscript” – it’s tightening the data model or pre-aggregating a deterministic row per contact.

Automation and multi-step journeys

When data is connected properly to the contact model, it’s easier to standardize entry criteria and downstream decisions without constantly rebuilding query activities to stitch data together.

Creating an Attribute Group (what you actually do in the UI)

Creating an Attribute Group is a structured process: you add attributes (often Data Extensions) and define relationships between them using selected keys. The platform guidance is explicit that you’re building a relationship map by choosing attributes and then specifying how they connect: steps for creating an Attribute Group and defining attribute relationships.

In practice, the UI steps are straightforward. The hard part is choosing the right keys and enforcing them operationally.

A simple real-world data model example (3 Data Extensions)

A common starter model is:

  • Contacts (1 row per person)
  • Preferences (0-1 row per person, or 1 row per person if enforced)
  • Orders (many rows per person)

The practical gotcha is “Orders” is 1-to-many. If you try to use it as if it were profile data, segmentation results can be surprising (duplicate contact counts, or filtering that behaves like an implicit join). The recommended approach is usually either:

  • keep Orders as 1-to-many and accept that you’re segmenting based on transactional existence/conditions, or
  • create a rollup Data Extension (one row per contact) for deterministic personalization fields (last order date, lifetime value, etc.)

This basic modeling pattern and how Attribute Group relationships are typically interpreted is discussed in a real implementation thread that highlights how the relationships work across multiple Data Extensions: example Attribute Group relationship pattern for three related Data Extensions.

Common implementation issues and trade-offs

Duplicate or unstable keys

If Contact Key values aren’t stable across imports and integrations, the Attribute Group becomes unreliable. You see symptoms like:

  • segments shrinking or growing unexpectedly after loads
  • personalization falling back to blanks
  • Journey entry conditions missing people who “should” qualify
Cardinality mismatch (the silent killer)

Teams often design a table that “should be one row per contact” but isn’t enforced. One limitation is that your segmentation and scripting will behave differently depending on whether there is truly one match. Fixing this usually means enforcing uniqueness upstream or creating an aggregated DE with a true primary key on Contact Key.

Needing SQL anyway (and when it’s the better option)

Even with Attribute Groups, SQL remains essential for:

  • rollups and aggregation (orders to contact)
  • deduplication
  • creating purpose-built sendable Data Extensions

What usually happens in mature accounts is a hybrid approach: Attribute Groups define the canonical model, and SQL creates stable, deterministic “activation tables” for sending and decisioning.

How Attribute Groups relate to the wider Marketing Cloud Engagement setup

Marketing Cloud Engagement (the product formerly branded as Email Studio plus the broader platform) relies heavily on a consistent contact model when you start connecting data, channels, and automation. The platform positioning emphasizes orchestrating engagement using unified customer data and cross-channel capabilities, which is difficult to do well without a clean contact model foundation: how Marketing Cloud Engagement is positioned around connected data and cross-channel execution.

Practical tips that make Attribute Groups behave predictably

  • Treat Contact Key design as a data governance problem, not just a Marketing Cloud config task.
  • Keep “profile-like” attributes truly 1-to-1 with the contact, or build a rollup table that is.
  • For 1-to-many tables, decide up front whether the use case is segmentation (exists/conditions) or personalization (requires deterministic selection).
  • Expect to complement the model with SQL for aggregation and for building send-ready Data Extensions.

For teams that want a more implementation-focused view of Contact Builder and modeling decisions, there’s a solid breakdown of how Contact Builder is used to structure contact data and relationships in day-to-day Marketing Cloud work: practical overview of Contact Builder and structuring data relationships.

Prevent duplicate contacts

Marcel Szimonisz
Table of contents: Contacts and data

Duplicate contacts in Salesforce Marketing Cloud Engagement (SFMC) usually do not start with one big mistake. They build up from small, repeatable patterns: a subscriber key that changes between systems, a Contact Builder model that is not enforced consistently, import automations that append instead of update, and “quick fixes” that create new rows instead of resolving identity. The cost is real: bloated Contact counts, skewed engagement reporting, suppression mistakes, and harder personalization because attributes fragment across records.

SFMC gives you enough tools to prevent duplicates, but you have to treat identity as a design constraint, not an afterthought. The practical goal is simple: one person should resolve to one Contact, and one “send identity” should be stable across every channel and every load job.

Understand where duplicates actually come from in SFMC

Subscriber Key drift is the #1 duplicate factory

In practice, duplicates show up when different entry points set different Subscriber Keys for the same person. A common issue is letting email address act like an ID in one workflow while another workflow uses CRM ContactId or a hashed ID. SFMC treats Subscriber Key as the durable identity for Email, and Contact Builder uses that identity when it ties channel addresses and attribute sets together, so inconsistency creates parallel contact records even if the email address looks identical in your file loads. Trailhead’s guidance around Contact Builder data management stresses that the data model and keys you choose drive how contact records relate across attributes and channels, so key choice is a foundational design decision, not a downstream cleanup step: how Contact Builder uses keys and relationships to organize contact data.

What to do instead

  • Pick a single enterprise identity for Subscriber Key (usually CRM ContactId/LeadId, a CDP person ID, or another stable master ID).
  • Treat email address as an attribute, not a key.
  • Enforce the same mapping in every import, API integration, Journey entry, and form capture.
Data Extensions can quietly allow duplicates unless you force uniqueness

Many teams assume “Data Extension = table = safe.” Not quite. A Data Extension can have a Primary Key, and that setting changes how inserts and updates behave. If you do not define a Primary Key (or you pick the wrong column), you can import the same person repeatedly, then later use those rows to create inconsistent send audiences. Salesforce’s documentation spells out that Data Extensions are table-like storage with configurable fields and key behavior, including Primary Keys and data retention, which are the knobs you use to prevent repeat rows at the storage layer: how Data Extension primary keys and field definitions affect storage behavior.

What typically happens

  • A nightly file drop “adds and updates” but the DE has no Primary Key, so it appends.
  • The same email appears with different Subscriber Keys across rows.
  • A Sendable DE built on EmailAddress sends to multiple “versions” of the person.

Lock down identity in Contact Builder (before you build journeys)

Make your Contact Model intentional, not default

Contact Builder is where SFMC decides what a “contact” is and how attributes relate. If your model allows multiple attribute rows per person without a clean relationship, you create ambiguity that looks like duplicates in segmentation and personalization. A practical way to keep yourself honest is to design around one “master” attribute set keyed by the same ID as Subscriber Key, then relate everything else to it.

Salesforce Ben’s walkthrough of Contact Builder highlights that Contact Builder is not just a UI for tables – it’s the place where the contact model is defined and where attribute groups are organized around a Contact Key, which is the backbone for consistent identity and cross-channel linkage: why the Contact Key and attribute groups govern how contact data is unified.

Implementation considerations

  • Ensure the Contact Key aligns with your Subscriber Key strategy.
  • Keep “master contact” attributes in one DE with a strict Primary Key.
  • Relate preference centers, transactional history, and event data through that same ID, not through email.

Prevent duplicates at ingestion time (the cheapest place to fix it)

Use upsert patterns, not append patterns

If your ingestion method cannot guarantee updates, you will eventually duplicate. The fix is to structure loads so they behave like “upserts” (update if exists, insert if missing), and to make sure your Data Extensions support that with Primary Keys.

Where this often breaks:

  • CSV imports that do not match on the correct key
  • Multiple automations loading the same domain of records
  • A “raw landing DE” feeding a “sendable DE” without dedupe logic in between

A lot of practitioners troubleshoot these ingestion edge cases in community threads, and you’ll see recurring patterns: duplicates caused by missing keys, inconsistent join logic in SQL activities, or multi-step automations that re-insert previously processed rows. Those real-world failure modes show up repeatedly in SFMC data management discussions: common SFMC data management pitfalls that lead to duplicate rows and inconsistent keys.

Normalize your incoming identifiers (trim, case, formatting)

Two records can look different to a system even if they look “the same” to a human.

  • Emails with leading/trailing spaces
  • Case differences
  • Phone formatting differences
  • Country codes missing in some rows

Normalize before you write to your master DE. At minimum, trim and lowercase email, and standardize blank handling (NULL vs empty string) so your dedupe queries behave consistently.

Add deterministic dedupe logic with SQL (and make it repeatable)

Use SQL to pick a single “winner” row per person

A common SFMC pattern is:

  • Land raw data in a staging DE (append-only).
  • Run a SQL Query Activity to produce a deduped, send-ready DE.

MartechNotes’ collection of SFMC SQL examples includes practical patterns like using `ROW_NUMBER()` with `PARTITION BY` to pick the most recent row for each key, which is exactly what you need when the source can send repeats or partial updates. That’s the workhorse approach for “keep latest record per ContactId/email” in Automation Studio: SQL patterns like ROW_NUMBER for selecting the latest row per identifier.

Example: keep the most recent row per SubscriberKey

SELECT
 SubscriberKey,
 EmailAddress,
 FirstName,
 LastName,
 UpdatedAt
FROM (
 SELECT
 SubscriberKey,
 EmailAddress,
 FirstName,
 LastName,
 UpdatedAt,
 ROW_NUMBER() OVER (
 PARTITION BY SubscriberKey
 ORDER BY UpdatedAt DESC
 ) AS rn
 FROM Staging_Contacts
 WHERE SubscriberKey IS NOT NULL
) d
WHERE d.rn = 1

Practical notes

  • Always partition on your true identity key (SubscriberKey/master ID), not email.
  • Order by a trustworthy “last updated” timestamp from the source when possible.

Use hashed identity when you do not have a stable ID (but do it consistently)

Sometimes you genuinely do not have a CRM ID. In those cases, teams often create a deterministic hash from normalized inputs (for example, lowercase trimmed email) and use that hash as Subscriber Key. The critical detail is “deterministic”: the same input must always produce the same hash across SQL and scripting, or you create duplicates that are harder to detect because they look like different IDs.

MartechNotes walks through generating consistent MD5 hashes in SFMC across SQL and AMPscript, which is useful because hashing functions and string handling differences can otherwise produce mismatches between contexts. The practical takeaway is to normalize (trim, lowercase) the input the same way everywhere before hashing so the generated key stays stable: how to normalize strings so MD5-based keys match across SQL and AMPscript.

Example: deterministic Subscriber Key from email in SQL

SELECT
 LOWER(LTRIM(RTRIM(EmailAddress))) AS NormalizedEmail,
 HASHBYTES('MD5', LOWER(LTRIM(RTRIM(EmailAddress)))) AS SubscriberKeyHash
FROM Staging_Leads
WHERE EmailAddress IS NOT NULL

Important nuance

  • Decide whether to hex-encode or base64-encode and keep it consistent.
  • Do not switch formats later without a migration plan, or you will fork your identity graph.

Reduce duplication caused by personalization and automation patterns

Personalization does not create duplicates, but it can hide them

When contact data is fragmented, personalization can still “work” for one row and fail for another, which masks the underlying identity issue until a send goes wrong. MartechNotes’ discussion of personalization with marketing automation emphasizes that automation and personalization are only reliable when the underlying data is consistent and refreshed appropriately, which is why dedupe and data hygiene belong upstream of dynamic content rules and journey branching: why personalization quality depends on consistent, automation-maintained customer attributes.

What I watch for

  • Same email address appears in multiple rows with different preference flags.
  • Journey decisions branch differently for “duplicates,” causing conflicting experiences.
Querying DEs with SSJS and AMPscript can accidentally insert duplicates

Custom CloudPages and scripted processes sometimes “look up then insert,” but they do not do it atomically. Under load, two submissions can pass the lookup check before either insert happens, creating duplicates. MartechNotes shows practical patterns for querying Data Extensions with SSJS and AMPscript; the key operational insight is that scripting often runs as separate steps (retrieve, then write), so you need to design for concurrency and enforce uniqueness at the Data Extension level with Primary Keys rather than relying on logic alone: common scripting patterns for DE lookups and why design needs to account for non-atomic operations.

Safer approach

  • Enforce a Primary Key on the DE (for example, SubscriberKey).
  • Use Update/Upsert methods where available instead of “always insert.”
  • If you must insert, write into a staging DE and dedupe with SQL.

Build a monitoring loop so duplicates do not creep back in

Create a “duplicate detector” automation

Even well-designed systems drift. A new integration goes live, a vendor file changes, or someone rebuilds an import with the wrong mapping. You want an automated check that flags duplicate risk early.

A simple daily SQL audit:

  • Count duplicates by SubscriberKey in master DE
  • Count duplicates by normalized email in staging DE
  • Track how many new Contacts were created daily vs expected acquisition

Also keep an eye on community-reported failure modes. Practitioners routinely surface duplicate-contact headaches tied to Subscriber Key strategy, Journey entry sources, and import behaviors in SFMC discussions, which is a good reminder that duplicates are usually process problems, not one-off bugs: recurring field reports of how inconsistent keys and imports create duplicate contacts in SFMC.

Example: daily duplicate count by SubscriberKey

SELECT
 SubscriberKey,
 COUNT(1) AS RowCount
FROM Master_Contacts
GROUP BY SubscriberKey
HAVING COUNT(1) > 1

Practical checklist: what actually prevents duplicate contacts

Identity and model
  • Subscriber Key is a stable, enterprise-wide ID (not email).
  • Contact Key aligns with Subscriber Key in Contact Builder.
  • Attribute Groups relate back to one master keyed table.
Storage rules
  • Primary Keys defined on master and sendable DEs.
  • Staging DEs are allowed to be messy, but they are never used for sends.
Processing rules
  • Imports and automations upsert into mastered tables.
  • SQL dedupe selects one record per identity using deterministic rules.
  • Hash-based keys (if used) are normalized and consistent across contexts.
Operational controls
  • Daily duplicate audits with thresholds and alerting.
  • Governance: one place defines the “official” Subscriber Key mapping used by every team and vendor.
If SSJS touches identity, standardize your function usage

When teams mix SSJS and AMPscript, subtle differences in how functions are called or how strings are handled can cause mismatches that cascade into duplicate keys. MartechNotes’ notes on using AMPscript functions in SSJS are useful here because they show how teams bridge scripting contexts consistently, which helps when you are normalizing and generating IDs across different execution layers: how teams keep string and function behavior consistent when mixing SSJS and AMPscript.

Consent and sending setup

Consent management

Marcel Szimonisz
Table of contents: Consent and sending setup

Even after a couple of years working with Salesforce Marketing Cloud, I am still somewhat lost on how the consent management works. I’ve decided to tackle all the uncertainties I’ve been avoiding since I first started. Let’s dive into this topic and resolve all doubts once and for all.

As you might have noticed, there are two places where you can view contact details. First, you can navigate to Email Studio and search for a specific contact to see their consent details. Email studio uses subscriber key as unique contact identifier. This means that when you need to contact the same email address but with different subscriber keys, Marketing Cloud treats them as separate contacts. Contact Builder for same a contact key, which is equal to Email Studio’s subscriber key. Are you feeling confused already? Stay with me.

A good practice is to maintain consistency with the subscriber key/contact key across all studios and builders. Identify a unique identifier that will serve as your subscriber/contact key.

In cases where your data is sourced from external systems and passed to Marketing Cloud via MC Connect (such as Sales Cloud, Service Cloud, or CDP), it is considered a best practice to use the unique ID from that system if it is available.

It seems that the unsubscribe information is not visible in Contact Builder, and I am unable to manually unsubscribe contacts from there. I’ll put this on my todo list.

From salesforce help a subscriber has the option to unsubscribe from emails at four different levels:

  1. List-Level Unsubscribe: When a subscriber unsubscribes at the list level, they will no longer receive emails sent to that specific list or publication list. It’s important to note that unsubscribing at the list level differs from removing a subscriber from the list. If you remove a subscriber, you have the option to add them again in the future through an import. However, if you unsubscribe a subscriber, their status remains ‘Unsubscribed,’ even if you later import them again.
  2. Account-Level Unsubscribe or Universal Unsubscribe: Subscribers who unsubscribe at the account level are marked as ‘Unsubscribed’ on your All Subscribers list. This status applies to all current and future lists within your account.
  3. Global Unsubscribe: When a subscriber unsubscribes at the global level, their status is recorded in a dedicated table within the Marketing Cloud database. This action effectively unsubscribes them from all present and future lists across all Salesforce Marketing Cloud accounts

In Enterprise 2.0 account admin can choose following in subscribption settings:

  • Subscribers will be unsubscribed from all business units in the Enterprise
  • Subscribers will be unsubscribed from this business unit only

Read more on salesforce help on subscription settings topic.

Enterprise 2.0: A tenant is the top-level account and all associated business units. Read more about tenant types on salesforce help.

You can retrieve the Status via SOAP API or via query studio:

SELECT AddedBy,
       AddMethod,
       ListName,
       EmailAddress,
       Status,
       ListType
FROM   _listsubscribers
WHERE  subscriberkey = 'subscriber_key' AND ListName = 'list_name'

Use ent. prefix before view _listsubscribers when you want to get data from the All subscribers list in case your account has multiple business unites

For retrieving subsciber status take a look at the salesforce marketing cloud postman SOAP library and look for Retrieve Subscriber. You will need to set up a filter to filter by subscriber key and by the list id. List id can be visible when browsing specific list parameters.

Where and how contact can unsubscribe?

In my experience, almost none of my clients have utilized the out-of-the-box (OOTB) one-click unsubscribe or the preference center offered by Salesforce Marketing Cloud. The primary reason behind this is the insufficiency of customization. Each time, the clients’ needs have exceeded what is currently provided by the marketing platform’s no-code unsubscribe solution.

Two-click unsubscribe

As we onboard subscribers to our publication lists, we follow the well-established “double opt-in” process. Additionally, to prevent accidental clicks on the opt-out link within our email communications, we often request that subscribers, upon landing on the unsubscribe page, confirm their intention to proceed with the unsubscription. This added step ensures that the unsubscribe action is deliberate and reduces the likelihood of unintended opt-outs.

Preference center

To effectively handle various subscriptions to different publication lists or collect additional user information, the solution is to create a custom preference centre landing page. This enables us to tailor the user experience and gather the necessary data in a way that suits our specific requirements.

To manage the unsubscription process in Salesforce Marketing Cloud, it is essential to design your process around the LogUnsubEvent function. This function provides a convenient and flexible approach to handling unsubscribes when constructing a custom-tailored unsubscribe process.This function enables you to execute two essential actions: unsubscribing a subscriber and recording an UnsubEvent linked to a particular email campaign (Job). This logging plays a critical role in tracking the email that triggered the subscriber’s decision to unsubscribe and allows you to monitor these results through your tracking dashboard. You have the flexibility to configure this function to unsubscribe a subscriber from a specific list, publication list, or all emails, effectively blocking them from receiving any future email communications.

%%[

set @unsubscribeAll = QueryParameter("ua")
set  @reason =  QueryParameter("reason")
set @jid = AttributeValue("jobid")
set @listId = AttributeValue("listid")
set @batchId = AttributeValue("_JobSubscriberBatchID")
set @email = AttributeValue("emailaddr")
set @subscriberKey = AttributeValue("_subscriberkey")

/* if we know the subscriber */
if not empty(@subscriberkey) then
  
  /* if unsubscribing from all, then set the job, batch and listids to blank, effectively doing a global unsub */
  if @unsubscribeAll == "1" then
   set @jid = ""
   set @listId = ""
   set @batchId = ""
  endif

  /* create a request to inject an unsub event into the LogUnsubEvent platform table */
  set @lue = CreateObject("ExecuteRequest")
  SetObjectProperty(@lue,"Name","LogUnsubEvent")

  /*
  In order to invoke the request, we need to associate the following information with it to define the subscriber context and the job context:

  1. Subscriber Key
  2. JobId associated with the email send
  3. ListID the email was sent to
  4. BatchID the email was sent to
  5. Reason for the unsub
  */

  /* 1. define and associate Subscriber Key to the request */
  set @lue_prop = CreateObject("APIProperty")
  SetObjectProperty(@lue_prop, "Name", "SubscriberKey")
  SetObjectProperty(@lue_prop, "Value", @subscriberKey)
  AddObjectArrayItem(@lue, "Parameters", @lue_prop)

  /* 2. define and associate JobID to the request */
  if not empty(@jid) then
    set @lue_prop = CreateObject("APIProperty")
    SetObjectProperty(@lue_prop, "Name", "JobID")
    SetObjectProperty(@lue_prop, "Value", @jid)
    AddObjectArrayItem(@lue, "Parameters", @lue_prop)
  endif

  /* 3. define and associate ListID to the request */
  if not empty(@listid) then
     set @lue_prop = CreateObject("APIProperty")
     SetObjectProperty(@lue_prop, "Name", "ListID")
     SetObjectProperty(@lue_prop, "Value", @listId)
     AddObjectArrayItem(@lue, "Parameters", @lue_prop)
  endif

  /* 4. define and associate BatchID to the request */
  if not empty(@batchid) then
    set @lue_prop = CreateObject("APIProperty")
    SetObjectProperty(@lue_prop, "Name", "BatchID")
    SetObjectProperty(@lue_prop, "Value", @batchId)
    AddObjectArrayItem(@lue, "Parameters", @lue_prop)
  endif

  /* 5. define and associate unsub reason to the request */
  set @lue_prop = CreateObject("APIProperty")
  SetObjectProperty(@lue_prop, "Name", "Reason")
  SetObjectProperty(@lue_prop, "Value", @reason)
  AddObjectArrayItem(@lue, "Parameters", @lue_prop)

  /* finally, you invoke the request */
  set @lue_statusCode = InvokeExecute(@lue, @overallStatus, @requestId)

  /* extract messages from the response */
  set @Response = Row(@lue_statusCode, 1)
  set @Status = Field(@Response,"StatusMessage")
  set @Error = Field(@Response,"ErrorCode")


]%%

Browse the source code

Feedback loop

A feedback loop is a mechanism where an Internet service provider (ISP) shares complaints about spam and opt-out requests from its users with the senders of the problematic messages. In cases where ISPs utilize this feedback loop to relay complaints to Marketing Cloud, the subscriber who made the complaint is automatically unsubscribed at the account level.

Reply Mail Management feature

If you’ve set up the reply mail management feature and a subscriber responds with one of the unsubscribe keywords either in the subject line or the body of the email, the system will take care of the unsubscribe process automatically, unsubscribing the subscriber at the account level.

However, if you haven’t configured reply mail management for your account, you’ll need to handle leave requests manually when you receive them.

Publication lists vs. Suppression lists

Marcel Szimonisz
Table of contents: Consent and sending setup

Publication Lists and Suppression Lists in Salesforce Marketing Cloud (SFMC) both affect who receives email, but they solve different problems. Publication Lists manage subscriber preferences (what someone wants to hear about), while Suppression Lists enforce “do not send” rules (who you must not email for compliance, risk, or internal policy). Getting the distinction right is one of the easiest ways to prevent accidental over-emailing, broken preference centers, and deliverability issues that show up later as rising unsubscribes, complaints, or blocked sends.

Publication Lists in SFMC: preference-driven opt-ins at scale

A Publication List is SFMC’s built-in way to model email categories like “Product Updates,” “Events,” or “Weekly Newsletter.” In practice, you use them when you want subscribers to stay opted in overall but still control which content streams they receive.

Salesforce frames Publication Lists as a mechanism for managing subscriptions across message categories, so a subscriber can unsubscribe from one category without globally opting out of everything. That’s the key behavior that makes them different from a blanket unsubscribe, and it’s why Publication Lists typically sit behind a preference center experience like “update my email preferences” rather than “unsubscribe from all.” You see this separation clearly in Salesforce’s explanation of how Publication Lists are used to manage different subscription types within Email Studio: managing email subscription categories with Publication Lists.

Where Publication Lists fit in a real email program

Common patterns that actually hold up over time:

  • One All Subscribers record, multiple Publication List statuses (Subscribed/Unsubscribed per category).
  • Preference center updates flip Publication List status, not global status.
  • Automations segment by Publication List membership to drive sends per stream.

A common issue is teams try to “fake” Publication Lists using Data Extensions and flags. It works until you need to respect channel-level rules consistently across multiple business units, triggered sends, or legacy journeys. Publication Lists keep the preference layer native, which reduces edge cases.

Suppression Lists in SFMC: enforcement-driven “never send” controls

Suppression Lists are about safety and governance. They are designed to exclude addresses from a send even if those subscribers are otherwise “eligible.”

Think of Suppression Lists as a guardrail for cases like:

  • Legal or compliance exclusions
  • Known complainers or high-risk addresses
  • Employees, seed addresses, competitors
  • Data quality issues (e.g., role accounts you want to block)

Trailhead’s Email Marketing module emphasizes using list-based structures and segmentation to ensure the right audiences receive the right messages, and that operational controls like exclusions are part of responsible execution. In practice, suppression is one of the simplest and most reliable exclusion mechanisms because it’s applied at send time and does not depend on complex query logic: using segmentation and exclusions to control who receives email.

Suppression Lists are not “preferences”

A suppression record is not the same as “I don’t want your newsletter.” It’s “do not mail this address,” regardless of what a preference center says. That distinction matters when you troubleshoot why someone claims they opted back in but still doesn’t receive messages.

The practical difference: preference logic vs compliance logic

Publication Lists answer: “Which content did they choose?”

They’re ideal when your business needs:

  • Granular opt-down (unsubscribe from one stream, keep another)
  • A preference center with multiple categories
  • A long-term subscription model that can evolve (add categories later)
Suppression Lists answer: “Should we block sending, period?”

They’re ideal when you need:

  • A centralized “do not contact” layer for risk management
  • Operational exclusions that should override marketing logic
  • A simple backstop against mistakes in segmentation

How these choices affect deliverability and complaint rates

Deliverability problems rarely come from a single misstep. They come from repeated mismatches between what recipients expect and what you send. SalesforceBen’s deliverability guidance emphasizes that mailbox providers watch engagement signals and negative signals (like complaints), and list hygiene and targeting are core levers you can actually control. In real programs, using Publication Lists to honor opt-down preferences reduces “I didn’t ask for this” frustration, while Suppression Lists help keep known problem addresses out of sends: how engagement and complaints influence inbox placement.

Data modeling nuance: All Subscribers vs Data Extensions vs lists

Most mature SFMC accounts send from Data Extensions (DEs), not classic Lists, but preference and suppression controls still have to align with the subscriber model.

SalesforceBen’s breakdown of Data Extensions highlights why teams prefer DEs for scalable segmentation: they support relational structures, attributes, and SQL-driven audience selection. The catch is that your audience DE can be perfect and still send to the wrong people if you don’t apply Publication List logic (preferences) and Suppression logic (blocking) consistently at send time: why Data Extensions are the foundation for scalable segmentation.

What typically happens in real accounts
  • Journeys pull from DEs.
  • Teams store preference flags in DEs.
  • Someone forgets to apply the correct suppression at send definition or email activity level.
  • A “small mistake” turns into a compliance incident.

The goal is not to avoid DE-driven logic, but to avoid treating DE flags as your only safety layer.

Implementation patterns that work (and where they break)

Pattern 1: Publication Lists for preferences, DE attributes for personalization

Use Publication Lists to decide eligibility for a category, then DE attributes to tailor content. MartechNotes makes a practical point about personalization in marketing automation: personalization is most effective when it’s tied to reliable data and consistent orchestration, not scattered per-campaign hacks. That’s why Publication Lists are a cleaner system boundary for “should they get this stream?” while DE attributes drive “what should it say?”: how personalization depends on dependable data and orchestration.

Pattern 2: A hard suppression layer that always applies

Create a centralized suppression list for:

  • Global do-not-contact
  • Internal addresses
  • Known complainers

Then ensure every send either:

  • Uses that suppression list explicitly, or
  • Uses a standardized send framework (templates, automations) that includes it by default
Pattern 3: SQL-generated audiences with explicit exclusion joins

If you’re building audiences in Automation Studio, you can exclude suppressed addresses in SQL so the DE itself is already “clean.” MartechNotes’ SQL examples reinforce a practical reality: most SFMC segmentation at scale becomes SQL-first, so it’s worth codifying exclusions directly into queries rather than relying on manual steps in the send UI: practical SQL patterns for building and filtering audiences.

Here’s a simple pattern you can adapt. It assumes:

  • `Audience_DE` contains the candidates for a newsletter send
  • `Suppression_DE` contains emails you must not send to
  • `PublicationStatus_DE` stores category-level status (if you model it outside native Publication Lists)
SELECT
 a.SubscriberKey,
 a.EmailAddress
FROM Audience_DE a
LEFT JOIN Suppression_DE s
 ON a.EmailAddress = s.EmailAddress
LEFT JOIN PublicationStatus_DE p
 ON a.SubscriberKey = p.SubscriberKey
 AND p.PublicationName = 'Weekly Newsletter'
WHERE s.EmailAddress IS NULL
 AND p.Status = 'Subscribed'

Even if you rely on native Publication Lists for the final eligibility check, this query pattern still helps reduce accidental inclusion upstream.

Tracking and debugging gotchas: why list logic can look “wrong”

AMPscript-built links and send-time rendering

Preference centers and unsubscribe experiences often use AMPscript to generate dynamic parameters, subscriber identifiers, or redirect links. MartechNotes documents a common pitfall: links that are constructed using AMPscript variables can be harder to track if you don’t structure them in a way SFMC can consistently log. When you’re diagnosing “why did this subscriber get suppressed” or “why didn’t the preference update stick,” losing link visibility makes it harder to prove what happened: how to keep click tracking working with AMPscript-generated links.

Querying DEs from server-side code for audits and checks

Sometimes you need to confirm, at send time or during investigations, what data SFMC is using for eligibility. MartechNotes shows how to query Data Extensions using SSJS and AMPscript, which is useful for building internal “eligibility audit” pages or logging checks that validate whether a subscriber is in a suppression dataset before a send proceeds: how to query Data Extensions with SSJS and AMPscript for validation.

Mixing SSJS and AMPscript safely

MartechNotes also demonstrates that you can call AMPscript functions from SSJS, which is handy when you want one server-side script to standardize things like subscriber identification, attribute lookups, or encryption routines used in preference center links. The practical benefit is consistency: fewer “this page uses different logic than that email” issues when updating Publication List preferences: how to reuse AMPscript functions inside SSJS for consistent logic.

Real-world platform sentiment: why governance matters more than people expect

If you’ve spent time in SFMC operations, you’ve probably seen frustration peak when sends behave unpredictably: someone is “subscribed” but not getting mail, or someone is “unsubscribed” and still receives something. Community discussions often circle back to the same theme: the platform is powerful, but it requires careful setup and disciplined processes to avoid sharp edges. A thread in the Salesforce subreddit captures this operational reality from practitioners, highlighting that the day-to-day experience depends heavily on how well the instance is implemented and governed: practitioner perspectives on SFMC complexity and implementation pitfalls.

That’s exactly where Publication Lists vs Suppression Lists becomes more than terminology. It’s a governance boundary:

  • Publication Lists: marketing-owned preference architecture
  • Suppression Lists: business-wide safety layer that marketing cannot accidentally override

A practical decision guide (what to use when)

Use Publication Lists when:
  • You need opt-down preferences by category
  • You’re building a preference center that should not force global unsubscribe
  • You run multiple content streams and want subscribers to tune frequency or topics
Use Suppression Lists when:
  • The address must be blocked regardless of preferences
  • You want a centralized protection layer for deliverability, legal, or brand reasons
  • You need easy, consistent exclusions across campaigns and teams
Use both when:

Most mature SFMC programs do. Publication Lists keep you aligned with subscriber intent, and Suppression Lists protect you from operational mistakes and risk. The moment you scale beyond one newsletter, separating those two concerns becomes the difference between a clean preference model and a constant cycle of exceptions.

Suppression lists

Marcel Szimonisz
Table of contents: Consent and sending setup

A suppression list in Salesforce Marketing Cloud Engagement is a send-time exclusion list that prevents specific subscribers or email addresses from receiving an email, even if they are in the target audience. It matters because it gives teams a practical way to block internal staff, legal holdouts, test records, or temporary do-not-send groups without rewriting broader subscription data.

Suppression list is not auto-suppression list in SFMCE

How a suppression list works in Salesforce Marketing Cloud Engagement

At the platform level, Salesforce Marketing Cloud Engagement treats a suppression list as a send-level exclusion control, so the system filters those recipients out during send execution rather than changing their long-term subscription status.

One useful detail is that a suppression list can contain existing subscribers as well as email addresses that are not already in your subscriber list, which makes it practical for internal mailboxes, agency contacts, competitor addresses, and other records you never want included in campaign sends.

In practice, that makes suppression lists operational rather than preference-driven. The intent is usually “do not send this message to these records” – not “update this person’s marketing consent.” A common issue is assuming those two things are the same. They are not, and that confusion tends to create messy subscription logic later.

Where suppression lists fit in the SFMC email permission model

Suppression list vs publication list

A publication list is built for subscription categories and subscriber-managed opt-downs, while a suppression list is an internal exclusion mechanism used by the sending team. That difference matters because publication lists are meant to reflect what a subscriber has chosen to receive, but suppression lists are usually invisible to the subscriber.

What typically happens is teams reach for suppression lists when they really need preference management. It works for short-term execution, but it becomes hard to maintain if the business is trying to model newsletter choices, brand-level subscriptions, or ongoing channel consent.

Suppression list vs All Subscribers

The All Subscribers list acts as the master email status layer in the account, so suppression is only one part of the final send decision. A record can be Active in All Subscribers and still be blocked by a suppression list for a particular email.

The reverse is just as important in real-world troubleshooting. Removing someone from a suppression list does not automatically make them sendable again if their status in All Subscribers is still blocking delivery. A common issue is checking the audience data extension and assuming that is the only place eligibility is decided.

Why send classification still matters

This gets more nuanced once you factor in send classification and its link to commercial subscription handling, because subscription rules in SFMC are not controlled by suppression lists alone. Send classification affects how the send relates to subscriber permissions, especially for commercial messaging.

In practice, suppression lists sit beside that framework, not above it. They add another layer of exclusion, but they do not replace send classification, publication lists, or account-level subscriber status. That is why suppression works well for execution control but poorly as the main system for permissions.

Common real-world uses for suppression lists

For exclusions that need to be applied consistently, teams often move from ad hoc send-level blocking to auto-suppression patterns that reduce the chance of forgetting the same exclusion on every send. That becomes especially important when the same records should always stay out of promotional mail.

In practice, suppression lists are most useful when the exclusion is operational and possibly temporary. Common examples include employee addresses that would distort campaign metrics, seed or QA addresses that should not receive production mail, partner or reseller records that should not receive end-customer offers, and short-term blackout groups during legal or brand reviews.

One limitation is that suppression lists are easy to overuse. Once every campaign has its own special exclusion logic, troubleshooting becomes slower and ownership becomes unclear. What typically happens is that old lists remain attached to sends long after the original business reason has disappeared.

How teams maintain suppression lists

Manual send-level maintenance

Manual suppression works best when the excluded audience is small, stable, and tied to a specific campaign. It is simple for one-off launches, internal tests, or short-lived restrictions.

A common issue is process drift. One team remembers to apply the suppression list during testing, another team clones the send later, and the exclusion is missed or duplicated. Manual maintenance is workable, but only when naming, ownership, and review steps are clear.

Automated and API-driven maintenance

When suppression data lives outside SFMC, the platform supports programmatic suppression list management through the SuppressionList API object, which is the more reliable option for scheduled refreshes and system-to-system syncing.

In practice, automation becomes necessary when exclusion logic changes frequently or when missing an exclusion would create legal, reputational, or reporting problems. It also helps when the real source of truth sits in CRM, a compliance workflow, or another data store and SFMC is only the execution layer.

Why suppression lists are not a consent management solution

If the business needs durable permission tracking, it usually ends up using a broader consent model than native list controls provide on their own. That is where many implementations draw the line: consent is modeled in custom data structures or connected systems, and suppression lists are generated from that logic when it is time to send.

That distinction is important because a suppression list tells the platform who not to email, but it does not automatically explain why the person is excluded, which permission state applies across brands or channels, or how that status should appear in a subscriber-facing preference experience. A common issue is using suppression as a shortcut for consent governance and then discovering there is no clean audit path behind it.

What typically breaks when suppression logic is unclear

The most common failure point is using suppression to solve several different problems at once. One list starts as an internal employee exclusion, then it gets reused for legal holdouts, then someone treats it like a brand preference list. At that point, the list still works technically, but nobody can easily explain what being on it actually means.

Another common issue is inconsistent ownership. If marketing operations owns one suppression list, compliance owns another, and individual campaign builders create their own local versions, the same subscriber can be excluded for multiple unrelated reasons. That usually shows up as “missing” recipients and long debugging sessions rather than obvious errors.

Troubleshooting a missing recipient of a delivery in Salesforce Marketing Cloud Engagement

When someone should have received an email but did not, start by confirming the record was actually in the target audience. Then check whether a suppression list excluded the record, whether publication-list rules prevented the send, and whether All Subscribers status blocked the address at the account level.

Auto-supression lists

Marcel Szimonisz
Table of contents: Consent and sending setup

An Auto-Suppression List in Salesforce Marketing Cloud Engagement is a send-time filtering mechanism used to automatically exclude specific contacts from receiving an email.

Unlike unsubscribe functionality, auto-suppression lists do not remove contacts from the platform or change their subscription status. Instead, Salesforce Marketing Cloud checks these lists during send preparation and removes matching recipients before the email is delivered.

This functionality is commonly used in enterprise environments where different Business Units, brands, or automated campaigns require additional exclusion logic beyond standard unsubscribe management.

Auto-suppression lists are lists where you can configure additional attributes, but in most cases the default prepopulated fields used to suppress records are already sufficient.

Auto-suppression additional attributes

Auto-suppression lists can be accessed similarly to Data Extensions in SQL activities. The difference is that records cannot be populated directly using Query Activities. Instead, records are usually maintained through Import Activities, API integrations, or Automation Studio workflows using data extension exports and imports.

Apart from own attributes you can also assign sender profiles and classification types to define how the suppression logic behaves.

  • One or more sender profiles – Defines which sender profiles the auto-suppression list applies to. Sender profiles contain the From name and email address used for sends, allowing the suppression list to affect only specific brands, departments, or sending identities instead of all sends across the Business Unit.
  •  CAN-SPAM Classification Type – Determines whether the suppression list applies to Commercial sends, Transactional sends, or both. Commercial emails are marketing or promotional messages, while Transactional emails are operational messages such as password resets, order confirmations, or account notifications.
Assignment for auto-suppression

Where to Find Auto-Suppression Lists in Salesforce Marketing Cloud Engagement

In Salesforce Marketing Cloud Engagement, suppression lists can be configured in:

Email Studio ->  Admin -> Send Management -> Auto-suppression Configuration

In enterprise setups, suppression can also come from the parent Business Unit, meaning a contact may be excluded even if the suppression record is not visible directly inside the current BU. Because of this, troubleshooting suppression issues often requires checking multiple Data Extensions, send configurations, and inherited enterprise-level settings.

How Auto-Suppression Lists Work

When an email send starts, Salesforce Marketing Cloud Engagement validates recipients against all configured suppression sources before delivery.

The process usually works like this:

  1. Audience is prepared
  2. Send definition is evaluated
  3. Auto-suppression lists are checked
  4. Matching recipients are excluded
  5. Remaining contacts receive the email

Because the suppression happens during send preparation, contacts may still exist inside the audience Data Extension or Journey entry source while being silently removed before delivery.

Troubleshooting a missing recipient of a delivery in Salesforce Marketing Cloud Engagement

In practice, a Business Unit usually does not operate with a single suppression list. Enterprise Marketing Cloud Engagement setups often use multiple suppression lists across automated campaigns, sometimes with different priorities and logic.

Contacts may be suppressed by multiple lists simultaneously, including suppression lists configured at the parent Business Unit level, not only those directly configured within the current BU.

Inside the journey, when you click on View Contact Details -> View Details, you may see certain records with the status Hard Error and the detail “Contact is on suppression list.”

Delivery activity details in Salesforce Marketing Cloud Engagement


To identify which suppression list the contact belongs to, you can cross-check all your suppression lists using queries. If you cannot find the contact in any of them, raise a ticket with Salesforce Support, as they can directly see the suppression list name behind the journey records.

Send classifications

Marcel Szimonisz
Table of contents: Consent and sending setup

Send Classification in Salesforce Marketing Cloud Engagement (SFMC) is the control point that decides two things that directly affect deliverability and compliance: which sender identity goes on the email (From name, From email, reply handling) and which CAN-SPAM footer and physical address gets stamped into the message. In practice, it is the difference between a send that passes internal governance checks and one that quietly ships with the wrong brand, wrong reply mailbox, or the wrong unsubscribe and address block. Salesforce positions Send Classification as the required pairing of a Sender Profile and a Delivery Profile, applied at send time so Email Studio knows how to construct the outbound message correctly using the right sender and footer rules for that send context, not just the email content itself: how Marketing Cloud pairs sender identity with delivery and CAN-SPAM handling.

Where Send Classification sits in the SFMC email send workflow

If you are thinking about SFMC Email Studio as a pipeline, Send Classification is part of the “packaging” step, not the “content” step.

  • Content: HTML, text, dynamic blocks, AMPscript, images.
  • Audience: Data Extension, list, filtered Data Extension.
  • Send setup: suppression, tracking, send throttling.
  • Identity and compliance wrapper: Send Classification.

A common implementation issue is assuming the “From” name and footer are properties of the email template alone. In SFMC, those items are controlled centrally and reused across sends, which is why Send Classification matters operationally in multi-brand or multi-region business units. Email Studio is designed for repeatable, scalable sending operations like segmentation, personalization, and performance tracking, so central objects like profiles are used to reduce one-off configuration errors across campaigns: how Email Studio structures email creation and sending with reusable configuration.

What a Send Classification is made of (and what it is not)

Sender Profile: the visible brand identity (mostly)

Sender Profile typically governs:

  • From Name
  • From Email Address

What typically happens in real accounts: teams create “Brand A Sender,” “Brand B Sender,” and sometimes “Transactional Sender” profiles, then reuse them across sends.

Delivery Profile: the delivery behavior and compliance layer

Delivery Profile typically governs:

  • Reply Mail Management behavior (how replies and bounces are handled)
  • CAN-SPAM classification and footer behavior, including the physical mailing address that’s inserted

This is where Send Classification gets more than cosmetic. Getting the compliance footer wrong is not just a branding mistake. It can mean the wrong business entity is represented in the message footer or unsubscribe context.

Salesforce’s own definition makes this explicit: Send Classification is the object that binds sender identity to delivery and CAN-SPAM configuration, rather than leaving those settings scattered across templates or send definitions: the required linkage between Sender Profile and Delivery Profile.

What Send Classification is not

It is not:

  • Your segmentation logic
  • Your dynamic content rules
  • Your tracking setup (though it influences how the message is processed)
  • Your IP warmup plan

Those sit elsewhere. The Send Classification is more like the “envelope and legal insert” around the email.

Commercial vs Transactional: why classification type changes expectations

In SFMC, “Commercial” and “Transactional” classification is not just a label you set and forget. It shapes how teams should think about permissioning, frequency, and compliance handling in the platform.

Trailhead’s email marketing module reinforces that Marketing Cloud email programs are built around permission-based marketing and compliance fundamentals (unsubscribe handling, subscriber management, and responsible sending). That’s the same mental model you should apply when choosing classification: transactional is not a loophole to skip governance, it’s a different intent with different operational controls: how SFMC email marketing emphasizes permission and compliance building blocks.

A common issue is misclassifying lifecycle or “account updates” that contain promotional content as transactional. Even if the email is triggered by an event, mixing marketing content into a message meant to be operational can create internal compliance disputes and customer trust problems.

Real-world governance patterns: how teams actually use Send Classification

Pattern 1: One BU, multiple brands

You create a set of Sender Profiles per brand and a smaller set of Delivery Profiles that standardize compliance rules. Then you assemble Send Classifications like:

  • Brand A – Commercial
  • Brand A – Transactional
  • Brand B – Commercial
  • Brand B – Transactional

This prevents a marketer from accidentally sending Brand A content with Brand B identity.

Pattern 2: Multiple BUs, centralized deliverability rules

Some orgs centralize Delivery Profiles (or at least enforce standards) so Reply Mail Management and CAN-SPAM handling remain consistent. Marketers can vary sender identity, but the compliance layer stays governed.

Pattern 3: “Do not let the content team touch deliverability”

In practice, this is where Send Classification shines. You can allow content teams to edit templates and content blocks while locking down sender identity and compliance requirements as controlled configuration objects.

Debugging Send Classification problems you will actually see

Wrong “From” name or address on a send

This is almost always one of:

  • The wrong Send Classification selected in the send
  • A Sender Profile updated recently, impacting many sends at once

Email Studio encourages reuse. That’s good for governance, but it also means profile changes have wide blast radius.

Replies going nowhere, or going to the wrong mailbox

When Reply Mail Management is not set as expected, response handling breaks. That behavior lives in Delivery Profile, which is pulled in via Send Classification, not inside the email content itself: where reply and bounce handling is controlled through delivery settings.

Inconsistent CAN-SPAM footer or physical address

If your footer appears different across sends, the first place to check is whether different Send Classifications are being used, because that’s where SFMC applies the CAN-SPAM configuration.

What practitioners ask when this breaks

If you browse common Email Studio troubleshooting threads, a recurring theme is diagnosing “why did this send behave differently than expected?” and the answer often comes back to configuration choices in the send definition, not the email HTML. This aligns with the kind of operational issues practitioners raise in community Q&A around Email Studio objects and send behavior: real-world debugging discussions around Email Studio send configuration.

Send Classification and personalization: keep the wrapper stable while content changes

Personalization is where teams can accidentally overcomplicate things. The best pattern is:

  • Keep identity/compliance stable via Send Classification
  • Let content vary via AMPscript and data-driven logic

MartechNotes’ personalization guidance reflects a practical truth: marketing automation personalization works best when data and rules are explicitly designed, rather than improvised inside a template at the last minute. That same discipline applies here: don’t treat sender identity as “just another variable” unless you have a tight governance model for it: how data-driven personalization depends on disciplined rules and reliable data.

Practical example: dynamic content without changing sender identity

You can personalize subject lines, preheaders, and body content while keeping the Send Classification consistent.

%%[
VAR @tier
SET @tier = AttributeValue("LoyaltyTier")

IF @tier == "Gold" THEN
 SET @headline = "Gold member early access"
ELSE
 SET @headline = "New arrivals this week"
ENDIF
]%%

This approach reduces risk. You are not trying to dynamically swap From addresses or compliance wrappers on the fly.

When engineering gets involved: SSJS, data lookups, and why it still should not drive sender identity

Some teams try to select sender identity dynamically based on data (region, product line, franchise owner). That’s where things get fragile fast.

MartechNotes shows how SSJS can call AMPscript functions, which is powerful for building flexible content logic and data retrieval patterns, but it also increases the risk of hiding business rules inside scripts that marketers cannot easily audit. Use that power for content and decisioning, not for compliance-critical identity rules: how SSJS can invoke AMPscript functions for more flexible logic.

If you truly must branch content using data extensions at send time, MartechNotes also demonstrates practical patterns for querying Data Extensions with SSJS and AMPscript. That is a safer place to apply dynamic logic than trying to “fake” sender governance in code: practical methods for retrieving Data Extension values in send-time logic.

Operational checklist: how to set up Send Classifications that scale

Create fewer Delivery Profiles than you think you need

Most orgs need only a small set aligned to policy:

  • Commercial standard
  • Transactional standard
  • Special case for specific reply/bounce handling (rare)

Then vary Sender Profiles by brand or region.

Name Send Classifications so the marketer cannot misclick

Good naming is defensive engineering:

  • `Brand – Purpose – Region (if needed)`
  • `Brand A – Commercial – US`
  • `Brand A – Transactional – US`
Build segmentation and targeting outside the classification layer

Segmentation belongs in SQL queries, filtered DEs, and automation steps, not in identity configuration. MartechNotes’ library of SFMC SQL examples reflects how commonly teams use SQL-based segmentation to build targeted audiences in Data Extensions, leaving the send wrapper to do one job cleanly: how SFMC teams use SQL queries to create targeted Data Extension audiences.

Common interview-level gotchas that show up in real projects

Send Classification is a frequent checkpoint in SFMC hiring screens because it exposes whether someone understands the difference between content and send governance. MartechNotes’ interview question set reflects that experienced practitioners are expected to know core Email Studio components and how they fit together operationally, including the configuration objects that can break a send even when the email looks fine: the types of SFMC operational knowledge teams test for in interviews.

What practitioners complain about (and why it matters)

If you scan practitioner discussions about send classification, a consistent theme is confusion when a send “mysteriously” uses an unexpected From name or footer, especially in shared environments. That complaint is usually a symptom of weak naming conventions, too many overlapping profiles, or unclear governance ownership for who can edit Sender and Delivery Profiles: practitioner discussions highlighting confusion around send classification behavior.

Authentication and deliverability

Marcel Szimonisz
Table of contents: Consent and sending setup

Sender authentication package (SAP), private-domain setup, and IP warming address different parts of Marketing Cloud deliverability. Private-domain and authentication setup establish a recognizable sending identity, while IP warming introduces sending volume gradually for a new dedicated IP. Salesforce’s deliverability setup guidance treats authenticated sending, permission-based sending practices, and reputation management as connected deliverability work.

Sender Authentication Package

The Sender Authentication Package (SAP) in Salesforce Marketing Cloud Engagement combines email authentication with account branding. It includes an authenticated private domain, branded links and image URLs, a dedicated IP address, and Reply Mail Management (RMM).

Some of these components can be purchased separately, but link and image wrapping is available only through SAP. This makes SAP particularly useful for keeping your brand visible across your email content, links, and images.

SAP is activated by raising a case it can take week or two to fully process

Private domains

Email authentication helps mailbox providers verify that your messages come from an authorized sender. Private Domain is a paid product in Salesforce Marketing Cloud Engagement that supports SPF, DKIM, and DMARC authentication for your sending domain.

Sender Policy Framework (SPF) identifies which servers are authorized to send email on behalf of your domain through a record published in DNS.

DomainKeys Identified Mail (DKIM) adds a cryptographic signature to your messages. Receiving servers use this signature to verify the signing domain and confirm that the signed content has not been altered in transit.

Domain-based Message Authentication, Reporting & Conformance (DMARC) builds on SPF and DKIM by checking whether the domain authenticated by either method aligns with the domain in the visible From address. Your DMARC policy tells receiving servers how you want messages that fail these checks handled, such as placing them in spam or rejecting them. The receiving server ultimately decides how to process each message.

Salesforce support will provide you with DNS records that have to be added on your domain settings

How Do Email Sending IP Addresses Affect Deliverability?

IP addresses influence email deliverability because mailbox providers use their sending history to assess sender reputation.

Shared vs. dedicated IPs

Shared IPs suit senders with low or irregular volumes, combining traffic from multiple customers to maintain a consistent sending history. Dedicated IPs give you control over your own IP reputation and are better suited to higher, consistent volumes. Very high volumes may require multiple IPs to avoid delivery delays.

Starting with a new IP

A new IP has no established sending reputation, so mailbox providers may initially limit how much email they accept. Build trust through IP warming: start with small sends to your most engaged subscribers and gradually increase volume while monitoring performance.

Build Audiences From Permission-Based Subscribers

Send marketing email only to subscribers who have given permission to receive it. The signup experience should identify the organization sending the email, the type of content the subscriber will receive, and how to unsubscribe.

Use consent and preference information when selecting an audience. For a new sending identity or dedicated IP, begin with subscribers who have recently engaged with email rather than mailing an unverified historical audience.

Warm a New Dedicated IP

IP warming is the controlled increase of sending volume on a new dedicated IP. It is a sending practice, not a replacement for private-domain configuration or sender authentication.

Use a staged sending plan:

  • Start with engaged, permission-based subscribers.
  • Send an initial, limited volume.
  • Increase volume progressively as delivery performance remains stable.
  • Review delivery results before expanding to the next audience group.

Do not introduce a new dedicated IP by sending immediately to the full database. Large sends to inactive or unverified addresses create poor early reputation signals and make it harder to identify whether an issue is caused by the audience, the content, or the sending setup.

Monitor Delivery Signals in One Place

Review campaign results throughout the warm-up period and after major audience or volume changes. Track:

  • Delivery and bounce results
  • Spam complaints
  • Unsubscribes
  • Opens and clicks
  • Engagement by audience segment

Use these results to adjust audience selection, frequency, and volume. When bounces or complaints rise unexpectedly, stop expanding the affected audience and review the acquisition source, permission status, and sender identity before sending again.

Pre-Send Configuration Checklist

Before launching a new or expanded program, verify that:

  • A private domain and sender-authentication setup are in place.
  • The From name and address are recognizable.
  • The audience has permission to receive the relevant email.
  • Unsubscribe handling is available.
  • A new dedicated IP follows a staged warm-up plan.
  • Delivery, complaints, unsubscribes, and engagement are being reviewed.

Content Builder and Email Studio

Build your first email

Marcel Szimonisz
Table of contents: Content Builder and Email Studio

Build your first email in Content Builder by creating an email, selecting a starting design, adding content, and saving the finished message. Salesforce’s Content Builder email creation workflow covers the platform process.

Create the Email

Open Content Builder and create a new email. Give the email a clear name, then choose a template or blank layout as the starting point.

Use a template when its existing structure suits the message. Use a blank layout when you need to create the structure yourself.

Add Content to the Layout

Add content to the available areas of the email layout. Keep each area focused on a single purpose, such as a heading, message copy, image, or call to action. This makes the email easier to review and update before sending.

For example, a two-column design can place an image in one column and supporting copy in the other.

Edit the Email Content

Select content in the email editor and make the required changes. Review the copy, images, links, and call-to-action labels before saving the email.

Creating and editing content in Content Builder covers editing content in the workspace.

Review Before Saving

Check the completed email before saving it:

  • Confirm that each layout area contains the intended content.
  • Check that links point to the correct destination.
  • Confirm that images and call-to-action labels are correct.
  • Remove placeholder copy or assets.
  • Confirm that the selected layout matches the intended email design.

Save the email after completing the review.

Test multiple email variants

Marcel Szimonisz
Table of contents: Content Builder and Email Studio

When working with dynamic email templates that can generate multiple unique variants of the email, you are most probably tasked to proof all the variants to your stakeholder for review.

Create data extension

When proofing email templates, traditionally, we select subscribers from production or testing data extensions used in the actual send. This process involves proofing each template individually, changing the subject line for distinction based on language, country, or other segmenting fields altering the email copy.

Here’s a more efficient approach:

Firstly, set up a testable, sendable data extension to store proofing records. Create a CSV file with the required column names, and add data; typically, it mirrors the structure of the data extension used as the target population for the email campaign in which the template is utilized.

Salesforce Marketing Cloud - Testable and sendable data extension settings

A good practice is to store these testable data extensions in a defined folder, simplifying proofing and ensuring centralization for easy access by any future campaign manager.

Sending proofs in one batch streamlines the process, removing the burden of searching for correct records in production or UAT data extensions suitable for a specific delivery template variant.

Add personalization AMPScript

%%[
  IF _IsTestSend THEN
      SET @sl = Concat(  Uppercase(@Country), " ", Uppercase(@Language), " ",  Uppercase(@Segment), " ", Uppercase(@Audience), " ",  "]:", @subjectline)
  ENDIF
]%%

This AMPscript snippet is used in the context of an email send and is checking if the email is a test send (_IsTestSend is a system variable or rather called personalization string by salesforce, that is true if the send is a test).

If the condition is true (meaning it’s a test send), the AMPscript sets a variable @subjectline using the Concat function. This variable is a concatenation of various values, including:

  • Uppercase(@Country): The uppercase version of the @Country variable.
  • Uppercase(@Language): The uppercase version of the @Language variable.
  • Uppercase(@Segment): The uppercase version of the @Segment variable.
  • Uppercase(@Audience): The uppercase version of the @Audience variable.
  • “]:”: A string that separates the concatenated values.
  • @subjectline: The value of the @subjectline variable.

So, it’s essentially creating a string that combines these variables and strings, and the resulting string is assigned to the @subjectline variable. This kind of dynamic subject line modification is often used in test sends for easier identification and tracking during testing phases.

Variable @subjectline contains templates subject line set dynamically depending on the segment or language. Subject line is displayed by following snippet set to email template properties.

%%=v(@subjectline)=%%

Proofing the template

Now, let’s proceed to proof our multivariant template. Open the template and go to the Preview and Test section.

In the Test send tab, choose Test data extensions and select the data extension created for this email template in the previous step.

Salesforce Marketing Cloud - Preview and Test email using test data extension

Set the subject prefix to the email template name or a descriptor understandable to your stakeholders. Our AMPScript will dynamically incorporate segment codes and language during the send process.

Salesforce Marketing Cloud - Adding subject line prefix to test email

If you use Adobe Campaign or are just curious, you can read the same article for guidance on proofing multiple variants of an email template and add variant to subject line of such proof email.

Automation Studio and segmentation

Introduction to Automation Studio

Marcel Szimonisz
Table of contents: Automation Studio and segmentation

Automation Studio in Salesforce Marketing Cloud Engagement is the platform’s workhorse for running repeatable, scheduled marketing operations: importing files, updating Data Extensions, executing SQL transformations, triggering sends, and chaining all of that into dependable workflows. If you manage campaign data at scale, Automation Studio is where “marketing automation” stops being a buzzword and becomes a set of auditable, time-based jobs. In practice, it’s also where many teams discover the real constraints of data latency, query performance, and “why did this run but not update anything?”

What Automation Studio is (and what it is not)

Automation Studio is a workflow engine inside Marketing Cloud Engagement that lets you build automations out of activities like imports, SQL queries, filters, scripts, and sends, then run them on schedules or triggers. Trailhead’s module on how activities are orchestrated into a scheduled automation frames it as a way to chain marketing operations into a repeatable process, rather than executing tasks manually in Email Studio or Contact Builder.

A common misconception is that Automation Studio replaces Journey Builder. It doesn’t. Journey Builder is optimized for event-driven, customer-level orchestration. Automation Studio is optimized for batch operations and data prep. The best implementations use both: Automation Studio curates the data and audiences; Journey Builder personalizes and sequences the experience.

The core building blocks: automations, activities, and schedules

Automations: the container for a multi-step job

An automation is the container that sequences steps and controls when they run. When you see a mature SFMC account, you’ll typically find automations named like “Nightly Audience Refresh” or “Hourly Suppression Update” because they function more like production jobs than campaign assets.

SalesforceBen’s walkthrough of how marketers use Automation Studio to schedule and execute repeatable tasks highlights the practical center of gravity here: teams rely on automations to eliminate manual data handling and to ensure audience logic executes consistently before sends.

Activities: where the real work happens

Activities are the steps inside the automation. The most common ones you’ll run into:

  • Import File and File Transfer (moving data in and out)
  • SQL Query (transforming and segmenting)
  • Filter (simple segmentation)
  • Data Extract (exporting data for downstream systems)
  • Script (SSJS) for custom logic
  • Send Email (batch sends tied to lists or Data Extensions)

What typically happens is that teams start with Import + SQL Query + Send. Then, as requirements grow (deduping, suppression rules, multi-source joins), SQL and Script activities become the backbone.

Schedules and triggers: time-based reliability

Automation Studio supports scheduled runs (hourly, daily, weekly) and triggered patterns. The key advantage is operational reliability: an audience refresh can run at 5:00 AM every day whether someone remembered to click “Run” or not. That sounds basic, but it’s the difference between consistent deliverability windows and “we missed the send because the file wasn’t loaded.”

Why Automation Studio matters in real implementations

It solves the “data prep gap” between systems and sends

Marketing Cloud is rarely the system of record. Data typically originates in CRM, ecommerce, POS, or CDP systems, then lands in Marketing Cloud. Automation Studio is the bridge: it imports, reshapes, and validates data into sendable structures.

Salesforce’s developer documentation on how Marketing Cloud stores data in Data Extensions and related data models makes an important operational point: you are working with a database-like layer (Data Extensions) and must design around keys, field types, and relationships. In practice, that means automations often exist primarily to keep those Data Extensions accurate and in the right shape for segmentation and personalization.

It reduces manual risk, but can amplify hidden issues

Automations reduce human error (wrong file, wrong audience, wrong time). But they can also amplify quiet failures: a query that suddenly returns zero rows, a file import that maps incorrectly, or a script that runs but writes malformed data. That’s why naming conventions, logging, and “guardrails” are not optional at scale.

The activities that drive most production use cases

SQL Query Activity: segmentation, joins, deduping, and suppression

SQL Query Activity is where most real-world audience logic lives because it’s deterministic and versionable. MartechNotes’ collection of SQL patterns commonly used to update and segment Data Extensions is useful for the day-to-day reality: you repeatedly build queries to dedupe, keep “latest record per subscriber,” create suppression sets, or roll up transactional behavior into send-ready attributes.

A common issue is “it worked yesterday, now it times out.” The fix is usually not mystical. It’s query design: limiting row scans, filtering early, avoiding unnecessary SELECT *, and ensuring your keys and audience approach don’t force huge full-table operations.

Example: build a deduped audience with “latest record wins”

SELECT
 s.SubscriberKey,
 s.EmailAddress,
 s.FirstName,
 s.LastUpdated
FROM SourceDE s
JOIN (
 SELECT SubscriberKey, MAX(LastUpdated) AS MaxUpdated
 FROM SourceDE
 GROUP BY SubscriberKey
) x
 ON s.SubscriberKey = x.SubscriberKey
 AND s.LastUpdated = x.MaxUpdated
Script Activity (SSJS): when SQL is not enough

SSJS shines when you need conditional branching, API calls, dynamic row handling, or multi-step logic that is awkward in pure SQL. MartechNotes’ guide on practical ways to read and filter Data Extension rows using SSJS and AMPscript reinforces a real implementation pattern: instead of forcing everything into SQL, you can retrieve targeted rows and apply logic at runtime, especially for smaller datasets or operational tasks (like checking for anomalies before a send).

Example: SSJS check for missing emails and log a count

<script runat="server">
Platform.Load("Core","1");

var de = DataExtension.Init("AudienceDE");
var rows = de.Rows.Retrieve({Property:"EmailAddress",SimpleOperator:"isNull",Value:""});

var logDE = DataExtension.Init("AutomationLogDE");
logDE.Rows.Add({
 AutomationName: "Nightly Audience Refresh",
 Issue: "Missing EmailAddress",
 Count: rows.length,
 LoggedAt: Platform.Function.Now()
});
</script>
Hashing for consistent IDs and match keys

Sometimes you need a stable match key for downstream integrations, privacy-safe identifiers, or cross-table joins when raw IDs differ. MartechNotes’ note on getting consistent MD5 outputs across SQL and AMPscript speaks to an easy-to-miss detail: hashing consistency can break when inputs are formatted differently (case, whitespace), so you normalize before hashing or your joins silently fail.

Example: normalize then hash in SQL

SELECT
 EmailAddress,
 LOWER(LTRIM(RTRIM(EmailAddress))) AS NormalizedEmail,
 MD5(LOWER(LTRIM(RTRIM(EmailAddress)))) AS EmailMD5
FROM AudienceDE
WHERE EmailAddress IS NOT NULL
Using AMPscript functions inside SSJS (pragmatic interoperability)

There’s a practical trick many SFMC teams use: calling AMPscript functions from SSJS to reuse what already works, rather than rewriting logic. MartechNotes’ breakdown of invoking AMPscript from server-side JavaScript supports that pattern. In real builds, it’s especially handy for formatting, lookups, and behaviors teams already validated in emails and CloudPages.

How Automation Studio fits into personalization and cross-channel delivery

Automation Studio is not a personalization engine by itself, but it makes personalization possible by ensuring attributes and audiences are always current before orchestration. MartechNotes’ perspective on operational personalization depending on data readiness and automation timing maps to what you see in production: personalization fails less often because of “bad AMPscript” and more often because the Data Extension didn’t refresh, the join logic changed, or a suppression update ran after the send.

In practice, teams set up “data readiness” automations that finish before Journey Builder entry events or before scheduled sends. That way, personalization tokens have something accurate to render.

Common pitfalls, straight from the trenches (and how teams handle them)

Silent failures and confusing run results

Automation Studio can show “Success” even when the business outcome is wrong (for example, a query ran successfully but returned zero rows). The fastest way to catch that is to log row counts and validate thresholds. Another good practice is to write query outputs to staging Data Extensions first, then swap or overwrite the final audience only if the staging count is within expected bounds.

Monitoring and troubleshooting in the real world

When something breaks, teams rarely start in official docs. They look for edge cases: query activity behavior, file transfer quirks, or how scheduling interacts with other jobs. The community troubleshooting threads focused on Automation Studio behavior are full of these patterns: developers comparing what they expected with what the platform actually executed, especially around SQL activities, data extension updates, and automation scheduling nuances.

You also see the same reality in operator-to-operator discussions. Searching field notes from practitioners who’ve run Automation Studio jobs at scale surfaces recurring pain points: timeouts on large queries, schedule overlaps, and the operational overhead of maintaining many automations.

Implementation patterns that hold up under scale

Pattern 1: Staging-first, then publish

Instead of writing directly to the audience Data Extension used by sends, write to a staging DE first. Then:

  • validate row counts
  • validate key fields are populated
  • publish by overwriting the final DE

This avoids “half-updated” audiences when upstream files arrive late or when a query unexpectedly changes its output.

Pattern 2: Treat automations like production jobs

Operational hygiene makes or breaks Automation Studio:

  • consistent names (prefix by domain: AUD-, SUP-, ETL-, SEND-)
  • owned schedules (avoid overlapping jobs competing for resources)
  • minimal dependencies (or make them explicit)
  • change control for SQL and scripts

SalesforceBen’s overview of why teams rely on Automation Studio for repeatability and scheduling aligns with this production mindset: the value is not just automation, it’s consistency.

Pattern 3: Design around Marketing Cloud’s data layer, not against it

Marketing Cloud behaves like a marketing database, but it’s not your enterprise data warehouse. Salesforce’s guidance on structuring Data Extensions and keys for predictable data operations matters day-to-day because your automation performance and correctness depend on field choices, primary keys, and how you model relationships. A common issue is building audience logic that requires constant full-table scans because keys and update strategies weren’t planned early.

A practical example: nightly audience build + suppression + send readiness

Here’s what a dependable “nightly batch” often looks like:

  • File Transfer / Import: load yesterday’s CRM extract into `CRM_Contacts_Raw`
  • SQL Query (normalize + dedupe): write to `Contacts_Staging`
  • SQL Query (suppression): build `Global_Suppression` (unsubscribes, bounces, policy exclusions)
  • SQL Query (final audience): produce `Audience_Final` by joining staging minus suppression
  • Script Activity logging: write row counts and sanity checks into `AutomationLogDE`
  • Downstream trigger: Journey entry event or scheduled send uses `Audience_Final`

The difference between a fragile setup and a robust one is steps 2-5. That’s where most operational issues are caught before they hit customers.

Automation Studio is where those steps live, and where well-run Marketing Cloud Engagement programs quietly earn their reliability.

Create Automation

Marcel Szimonisz
Table of contents: Automation Studio and segmentation

Building reliable Automation Studio workflows in Salesforce Marketing Cloud (SFMC) is less about clicking through a canvas and more about designing a repeatable data and execution pattern: ingest data, normalize it, segment it, then trigger sends or downstream updates on a schedule you can trust. Automation Studio is where those moving parts get orchestrated, so the difference between “it ran” and “it ran correctly” usually comes down to how you structure activities, how you manage Data Extensions, and how you handle edge cases like late-arriving files or duplicate records.

Below is a practical, implementation-focused approach to planning and building Automation Studio automations that hold up in production.

Understand what Automation Studio is actually orchestrating

Automation Studio runs automations made up of discrete activities (imports, SQL queries, scripts, filters, sends, etc.) that execute in a defined order. The platform treats an automation like an operations pipeline: each step should have a clear input, a deterministic transformation, and an output that the next step can safely consume. That “pipeline thinking” matters because Automation Studio supports multiple automation types and execution patterns, including scheduled and file drop scenarios, which Salesforce positions as the foundation for repeatable, hands-off marketing ops in how Automation Studio activities are combined into recurring workflows.

In practice, the biggest wins come from designing around data readiness: if step 3 assumes a segment exists but step 2 occasionally produces zero rows (or produces duplicates), the send step can behave in ways that look random unless you’ve built guardrails.

Start with a workflow blueprint (before you build anything)

Define the job in four boxes: source, transform, target, trigger

A common issue is jumping straight into “Create Automation” and discovering later that you don’t have consistent keys or a stable place to write results. I typically draft:

  • Source: SFTP file, synchronized data, API writes, or existing Data Extensions
  • Transform: SQL, SSJS, data hygiene rules, dedupe logic
  • Target: one or more Data Extensions (staging, normalized, sendable, logging)
  • Trigger: schedule, file drop, or manual run for backfills

That blueprint should also name the “contract” for each output: expected row count range, primary key, update behavior (append vs overwrite), and what “success” means.

Choose an automation type based on how data arrives

If data arrival time is not guaranteed, build around a trigger that matches reality. Many teams lean on file drop automations when upstream systems are inconsistent because the automation only fires when a file lands. That’s a practical fit for the operational patterns described in how marketers use scheduled vs triggered automations for repeatable processing, especially when you want to avoid scheduling a job that runs before data is present.

Get Data Extensions right first (or everything downstream stays fragile)

Automation Studio workflows are only as stable as the tables they read and write. SFMC Data Extensions have rules that matter for automation design: field types, primary keys, nullability, and retention policies all influence whether a query activity behaves predictably.

Treat staging vs production Data Extensions as separate concerns

A pattern that holds up:

  • Staging DE: raw import structure (often mirrors the file)
  • Normalized DE: cleaned data aligned to your contact model
  • Sendable DE: the audience-ready table with the attributes your email needs
  • Log DE: run logs, row counts, error notes, or hash values for dedupe

This lines up with the platform’s emphasis on defining Data Extensions with the right schema and constraints so they can be safely reused by multiple processes, as outlined in how Data Extension structure, keys, and properties affect downstream usage.

Don’t skip governance basics (naming, ownership, retention)

Marketing Cloud data gets messy fast when teams create “temporary” tables that become permanent. Salesforce’s guidance on data management highlights why lifecycle decisions like retention and organization matter to keep the account maintainable at scale in how to manage Marketing Cloud data assets with long-term hygiene in mind.

Build the automation step-by-step (a proven activity sequence)

Step 1: Import or ingest data (File Transfer + Import Activity)

For file-driven processes, the usual sequence is:

  • File Transfer: move from Safehouse to Enhanced FTP, rename, or relocate
  • Import Activity: map columns into a staging Data Extension

Two implementation details that prevent reprocessing:

  • Use a consistent file naming convention with timestamps.
  • Move processed files into an archive folder as part of the automation so a “same filename” resend doesn’t trigger duplicate loads.
Step 2: Normalize and segment with SQL Query Activities

Most production automations use SQL Query Activities as the backbone. The trick is to make each query single-purpose and easy to validate.

Common patterns:

  • Upsert-like rebuild: overwrite a target DE each run for deterministic output.
  • Incremental append: append only new records, but only if you have stable keys and a dedupe mechanism.

If you need a library of working SFMC SQL patterns, practical examples like joins, deduping with ROW_NUMBER, date filtering, and suppression logic are demonstrated in real-world SFMC SQL query patterns for segmentation and cleanup. In day-to-day builds, those patterns save time because SFMC SQL has quirks (for example, you often design around “rebuild this audience cleanly every run” rather than attempting complex transactional updates).

Example: dedupe to the most recent record per subscriber

SELECT
 x.SubscriberKey,
 x.EmailAddress,
 x.LastPurchaseDate,
 x.SourceSystem
FROM (
 SELECT
 SubscriberKey,
 EmailAddress,
 LastPurchaseDate,
 SourceSystem,
 ROW_NUMBER() OVER (PARTITION BY SubscriberKey ORDER BY LastPurchaseDate DESC) AS rn
 FROM Staging_Purchases
) x
WHERE x.rn = 1

Operational note: if `LastPurchaseDate` can be null, explicitly handle it or you will “randomly” keep older rows depending on data.

Step 3: Use Script Activities when SQL can’t do the job cleanly (SSJS + AMPscript helpers)

SQL Query Activities are great for set-based transformations, but you’ll eventually need procedural logic: calling APIs, looping through rows, writing logs, or implementing custom retry behavior.

A useful nuance is that SSJS can leverage AMPscript functions in some implementations to reuse SFMC-native formatting or lookup behavior, which is shown in how SSJS can call AMPscript functions to reuse platform utilities. In practice, this helps when you need consistent formatting or lookups across email and automation logic without rewriting everything.

Example: SSJS logging skeleton (write run metadata into a DE)

<script runat="server">
Platform.Load("Core","1.1.1");

var logDE = DataExtension.Init("Automation_Run_Log");
var runId = Platform.Function.GUID();
var now = new Date();

logDE.Rows.Add({
 RunId: runId,
 AutomationName: "Nightly Audience Build",
 RunTimestamp: now.toISOString(),
 Status: "STARTED"
});
</script>

That kind of lightweight logging becomes invaluable when someone asks, “Did it run?” and you need more than a green checkmark.

Step 4: Query data via SSJS or AMPscript when you need row-by-row decisions

Sometimes you need to evaluate rows individually: apply conditional business rules, build payloads, or drive custom integrations. MartechNotes shows practical approaches for pulling Data Extension rows using SSJS and AMPscript, including patterns that are often easier than trying to force everything into a single SQL statement in ways to retrieve Data Extension data in SSJS and AMPscript for procedural logic.

In practice, this is where you enforce “if this then that” rules that would otherwise become unreadable in SQL.

Step 5: Add guardrails (stop sends when the audience looks wrong)

Automation Studio won’t automatically protect you from a broken upstream feed. Common guardrails:

  • Row count checks: if audience drops 90% vs yesterday, abort or alert.
  • File freshness checks: verify today’s file arrived (or contains today’s date).
  • Null key checks: ensure SubscriberKey is populated before sending.

A practical way to implement these is a Script Activity that calculates counts and writes pass/fail to a log DE, then branches the automation accordingly (or at least prevents the send activity from running).

Troubleshooting workflows: what typically breaks and how to debug it fast

SQL Query Activity runs but output is empty

This is often:

  • A join mismatch (SubscriberKey vs ContactKey vs EmailAddress).
  • A date filter using server time assumptions.
  • An overwrite target DE that you expected to append.

When you hit platform-specific behavior or confusing error messages, it helps to review the real failure modes engineers and practitioners run into in common troubleshooting threads on Marketing Cloud automation and query behavior. In real builds, those threads often surface the “gotchas” that aren’t obvious until you hit them under production constraints.

Automations “succeed” but data is stale

A common issue is that the automation technically ran, but it processed yesterday’s file or old rows because nothing in the workflow asserts freshness. That’s why file archival, timestamp fields, and run logging matter just as much as the segmentation logic.

Advanced personalization workflows: when Automation Studio becomes the engine

Heavy personalization often moves beyond email-only AMPscript

If you’re generating large personalization payloads, building product recommendations, or doing complex per-subscriber logic, you can offload the heavy lifting into an automation that precomputes personalized attributes into a DE, then keep the email template simple.

MartechNotes highlights that AMPscript can hit practical limits for complex personalization and that JavaScript-based approaches can handle more intensive logic when you need it in why JavaScript is sometimes a better fit than AMPscript for heavy personalization. In practice, that usually translates to: precompute nightly (Automation Studio), store results, then render quickly at send time.

Automation-driven personalization is usually a data architecture problem

Personalization fails more often from data quality than from templating. If your “golden” preference table is overwritten by a bad import or your segmentation table keeps duplicates, the email can be perfectly coded and still wrong.

The broader point shows up in MartechNotes’ practical framing of automation-led personalization: consistent inputs, clean joins, and repeatable audience logic matter more than clever template tricks in how marketing automation personalization depends on dependable data workflows.

A practical workflow template you can reuse

Here’s a reliable baseline automation pattern that works for many SFMC teams:

  • File Transfer: Move inbound file to processing folder and rename with timestamp
  • Import Activity: Load into `Staging_` DE (overwrite)
  • SQL Query: Validate keys, remove obvious bad rows into `Rejects_` DE (overwrite)
  • SQL Query: Normalize and dedupe into `Normalized_` DE (overwrite)
  • SQL Query: Build `Audience_` DE (overwrite)
  • Script Activity: Log row counts + sanity checks to `Automation_Run_Log`
  • Send (or Journey entry update): only if guardrails pass
  • Script Activity: Mark run complete and archive file metadata

This structure keeps each step testable. When something breaks, you can pinpoint which table deviated from expectations without guessing.

Implementation nuances that save hours later

Use overwrite strategically

Overwrite is underrated in SFMC because it produces deterministic tables. For many audience builds, overwrite is safer than append because it prevents “ghost rows” from previous runs. Append is best reserved for logs, history tables, or true event streams where you intentionally accumulate records.

Design for re-runs

Someone will re-run your automation during an incident. Make it safe:

  • Overwrite staging and audience tables.
  • Archive inputs.
  • Log run IDs and timestamps.
  • Avoid non-idempotent “append forever” logic unless you also dedupe.
Keep activities small and readable

One huge SQL query that does everything is harder to debug than three smaller queries with explicit intermediate outputs. The intermediate DEs also become your audit trail.

If you build Automation Studio workflows like operational pipelines – with clear inputs/outputs, sane Data Extension design, deterministic SQL, and basic guardrails – you end up with automations that are easier to monitor, easier to change, and much harder to accidentally break.

File locations

Marcel Szimonisz
Table of contents: Automation Studio and segmentation

A File Location tells Salesforce Marketing Cloud Engagement where to find or send files. It is used when importing data, exporting data, or transferring files in Automation Studio.

For example, if a partner uploads a customer file to an SFTP server, the File Location tells Marketing Cloud which location to use. The import activity then defines the file name, format, and where to save the data.

File Locations and folders

A File Location is different from a Content Builder folder or a Data Extension folder:

  • File Locations point to file storage, such as Enhanced FTP, an external SFTP server, or Safehouse.
  • Content Builder folders organize emails, images, and content blocks.
  • Data Extension folders organize Data Extensions, which store rows of data.

Use a File Location when an activity needs to access a file.

What a File Location stores

Depending on its type, a File Location can include:

  • The type of storage.
  • The folder path.
  • Connection and login details for an external server.

Other settings belong to the activity that uses the File Location. For an import, these include the file name, file format, target Data Extension, and how to add or update records.

Where File Locations are used

Import activities

An import activity reads a file and loads its data into Marketing Cloud.

The File Location points to the file’s storage location. The import settings tell Marketing Cloud which file to read and how to process it.

An import can fail if the file is missing, its name does not match, or its format is wrong.

File Transfer activities

File Transfer activities handle file transfers and tasks such as encryption or decryption, depending on the activity setup.

File Locations help define where files are retrieved or delivered.

Automation Studio

File Locations support workflows such as:

  1. A partner uploads a file.
  2. An import loads it into a Data Extension.
  3. A SQL query processes the data.
  4. An extract creates a file.
  5. A File Transfer activity sends the file to the required location.

The file must be available before the step that reads it begins.

How to keep file processing reliable

Use clear file names

Choose names that show what the file contains and when it was created:

  • customers_20261001.csv
  • unsubscribes_20261001_0900.csv

A name such as export.csv makes it harder to tell files apart and can lead to older files being overwritten.

Keep different feeds separate

Use separate folders or File Locations for partner uploads and internal exports. This makes files easier to find and reduces the chance of processing the wrong one.

Plan what happens after processing

Decide whether processed files should be kept, archived, or removed, and set up a process to handle that.

Leaving old files in the pickup folder can cause them to be imported again if they match the activity’s file name settings.

What to check when a step fails

Start with these checks:

  • Is the file in the correct folder?
  • Does its name match what the activity expects?
  • Did it arrive before the activity started?
  • Can Marketing Cloud access the location?
  • Do the import settings match the file’s format?
  • Could an older file match the same name or pattern?

Check the automation run history for errors. After a successful import, check the imported data too. A successful run shows that the activity completed, but you still need to confirm it processed the file you intended.

Automation activities

SQL Query activity

Marcel Szimonisz
Table of contents: Automation activities

The main difference between a Query Activity and simply “running SQL” in Marketing Cloud Engagement is that a Query Activity is a saved, repeatable automation step that turns SQL into an operational data process. In practice, it matters because most scalable segmentation, suppression, and data prep work in Marketing Cloud relies on reliably reshaping Data Extension data on a schedule, not one-off queries.

Query Activity definition (and what it actually does)

A Query Activity is an Automation Studio activity that runs a SQL SELECT statement against Marketing Cloud data sources and writes the result set into a target Data Extension using a defined data action such as overwrite, append, or update behavior. That “write the results somewhere” aspect is what makes it production-friendly compared with ad-hoc querying, and it’s central to how the platform expects you to build durable audiences and downstream-ready tables using the built-in Query Activity configuration and data actions.

What typically happens in real accounts is that Query Activities become the backbone of “audience factories”: a chain of queries that standardize raw customer data into clean, indexed, channel-ready Data Extensions.

Where Query Activities live: Automation Studio in real builds

Query Activities run inside Automation Studio automations, alongside other activities such as imports, extracts, filters, scripts, and sends. The practical benefit is orchestration: you can run the same query nightly, after an import finishes, or before a send starts, without relying on someone to manually execute anything. That overall workflow model is part of how Automation Studio structures activities into scheduled automations.

One limitation is that teams often treat Automation Studio like a “scheduler” only. In practice, it’s closer to a lightweight ETL layer inside Marketing Cloud, and Query Activity is the piece that does most of the transformation work in that layer, as described in how Automation Studio is used to operationalize repeatable marketing data processes.

Query Activity vs Query Studio: why the difference matters

Query Studio is typically where SQL gets drafted, tested, and debugged. Query Activity is what you promote into an automation once it’s stable and you’ve decided the target Data Extension design and refresh pattern.

Query studio in Salesforce Marketing Cloud Engagement

A common issue is assuming Query Studio behavior is the same as a scheduled Query Activity. In practice, the query text might be identical, but operational concerns change: target Data Extension keys, update rules, and downstream dependencies start to matter more than “does it return the right rows right now.” The most reliable workflow is to validate logic and row counts in practical Query Studio testing patterns and then translate that into a Query Activity with explicit data actions and a purpose-built target table.

Query studio is a free App from AppExchange. It is not even native feature. Query Studio is heavily used by many to perform investigations or draft segmentation queries.

How Query Activity writes data: target Data Extension design and data actions

The target Data Extension isn’t an afterthought. It’s part of the contract of the Query Activity:

  • Column names and data types need to match what your SELECT returns.
  • Key strategy affects update behavior and deduplication.
  • Refresh strategy (overwrite vs append vs update-style behavior) determines whether the table is treated like a snapshot, a log, or a slowly changing dimension.

In real-world implementations, the query is often less “hard” than the table design decisions around it. If the target is a sendable audience, overwrite-style snapshots are common. If the target is an event log (clicks, form submits, transactions), append is common. If the target is a “current state” table keyed by ContactKey or SubscriberKey, update behavior becomes central.

For platform-specific behavior and implementation details, Marketing Cloud’s developer documentation focuses on how Query Activities are defined and executed as a first-class automation object, including how they’re represented and managed in the platform’s tooling through the Query Activity object model and execution behavior.

Practical SQL patterns that work well in Query Activities

Most Query Activities in production fall into a few repeatable patterns:

Audience selection (segmentation tables)

Build a target DE that is sendable (or at least keyed to a contact identifier), then SELECT only the fields needed for personalization and compliance checks.

Suppression and eligibility logic

Create “eligible” and “ineligible” tables and join them in later steps. This keeps email send filters simpler and more transparent.

Aggregations for personalization

Pre-aggregate metrics (last purchase date, total orders, preferred store) into a compact profile DE that can be joined into send audiences quickly.

When you need concrete starting points, having a library of common Marketing Cloud SQL constructs helps, especially because the platform’s SQL dialect and marketing data models lead to very specific query shapes. That’s why curated collections of Salesforce Marketing Cloud SQL query examples for segmentation and transformation tend to map closely to what actually shows up in working automations.

Common limitations and trade-offs that affect Query Activity reliability
Trade-off: “all-in-SFMC” transformation vs upstream data prep

Query Activity is convenient because it keeps transformation close to activation. The trade-off is that you’re doing data engineering inside a marketing platform, with constraints that are different from a full database or warehouse.

What typically happens is teams start with everything in Query Activities, then gradually move heavier transformations upstream (CDP, warehouse, iPaaS) once query runtimes, debugging overhead, or data governance gets painful.

Common issue: mismatched columns, null handling, and silent logic drift

Query Activities are sensitive to schema alignment. Minor changes to source Data Extensions (added columns, renamed fields, changed lengths) can break queries or, worse, change results subtly. In practice, the risk isn’t just query failures – it’s quiet audience drift.

A disciplined approach is to standardize SQL conventions (explicit column lists, consistent casting and aliasing, stable join keys) and follow platform-specific best practices and “gotchas” that come up repeatedly in Marketing Cloud work, like the ones captured in field-tested Marketing Cloud SQL tips that reduce query breakage.

Trade-off: overwrite snapshots vs append logs
  • Overwrite snapshots are easier to reason about but can erase history if you later realize you need auditability.
  • Append logs preserve history but can grow quickly and complicate deduplication.

In practice, many teams use a hybrid: append raw events into a log DE, then create an overwrite “current state” DE via a second Query Activity for activation.

Real-world scenarios where Query Activities become essential

Marketing Cloud Engagement is often used as the execution layer for cross-channel campaigns (email and more), where data needs to be shaped into the exact structure the channel tools expect. That’s why Query Activities become the “last-mile transformation” step between raw customer data and activation-ready audiences, especially in environments that lean heavily on Data Extensions as the operational store described in how Marketing Cloud supports data-driven digital marketing execution.

Typical scenarios where Query Activities do the heavy lifting:

Building a daily send audience from multiple sources

Example: join a customer master DE, a preferences DE, and a recent engagement DE, then output a sendable audience DE with only eligible customers.

Maintaining suppression lists that change constantly

Example: create a suppression DE that unions opt-outs, bounces, complaint flags, and internal exclusions, then reference that table in later audience queries.

Creating “ready for journey” entry tables

Example: reshape transactional events into one row per contact per trigger condition, so Journey Builder entries are controlled and deduplicated.

Implementation details that improve stability over time
Treat each Query Activity as a data product, not just a query

In practice, the query text is only half the work. The maintainable part is the contract around it:

  • Clear naming for source and target Data Extensions
  • A target schema designed for the specific downstream consumer (send, journey entry, reporting)
  • A refresh strategy that matches the business meaning of the data
Design automations so failures are obvious and isolated

When Query Activities are chained, a failure upstream often creates misleading “success” downstream if later steps still run against old target data. The most robust builds isolate stages (import -> normalize -> segment -> activate) and avoid reusing the same target DE for multiple logical purposes, aligning with how Automation Studio typically organizes repeatable activity sequences in day-to-day automation usage patterns.

Keep Query Studio for experimentation, Query Activities for production

A common operational split that works well:

  • Query Studio: quick checks, join validation, row count inspection
  • Query Activities: versioned, scheduled, dependency-aware processing

That separation reduces the chance of “someone tested it once” logic getting mistaken for production-ready processing.

Query studio tips

I’m going to share a few tips that are often overlooked by

🔒 Premium Subscriber Content

Please log in to preview content. Log in or Register

You must log in and have a Premium Subscriber account to preview the content.

When upgrading, please use the same email address as your WordPress account so we can correctly link your Premium membership.

Please allow us a little time to process and upgrade your account after the purchase. If you need faster access or encounter any issues, feel free to contact us at info@martechnotes.com or through any other available channel.

To join the Discord community, please also provide your Discord username after subscribing, or reach out to us directly for access.

You can subscribe even before creating a WordPress account — your subscription will be linked to the email address used during checkout.

Premium Subscriber

29,99 € / Year

  • Free e-book with all revisions - 101 Adobe Campaign Classic (SFMC 101 in progress)
  • All Premium Subscriber Benefits - Exclusive blog content, weekly insights, and Discord community access
  • Lock in Your Price for a Full Year - Avoid future price increases
  • Limited Seats at This Price - Lock in early before it goes up
  • Monthly 15-Minute Call - Discuss any topic directly

Filter activity

Mounika
Table of contents: Automation activities

When you’re working with Salesforce Marketing Cloud, you will often have a Data Extension with a large number of customer records. But in most cases, you won’t want to use all of those records for every campaign.

For example, you may only want to target customers who are based in the UK and have opted in to receive marketing emails.

One simple way to create this type of audience is by using a Filter Activity in Automation Studio.

Let’s see how to take the data from a Data Extension, apply our audience criteria, and store the matching records in another Data Extension. We can also see how to add the Filter Activity to an automation so the audience can be refreshed automatically.

Step 1: Start with source Data Extension

The first thing we need is a Data Extension that contains the customer information we want to work with.

For this example, let’s say we have a Data Extension called:

Customer_Master

It contains fields such as:

  • CustomerID
  • FirstName
  • Email
  • Country_code
  • Opt_status
  • Status

Let’s say this Data Extension contains 100,000 customer records.

We don’t want to send our campaign to all 100,000 customers. Instead, we only want customers who:

  • Are from the UK
  • Have opted in to marketing
  • Are currently active

This is where the Filter Activity comes in.

Step 2: Create a Data Extension for the audience

Before creating the filter, we need a Data Extension to store the customers who meet our criteria.

For example, Let’s call it:

UK_Active_Marketing_Audience

This Data Extension will contain only the customers who meet the conditions we set in the Filter Activity.

We don’t necessarily need to copy every field from the source Data Extension. We can include only the fields that we need for the next step, such as an email send or a Journey.

For Example:

FieldExample
CustomerID10001
FirstNameRani
EmailRani@example.com
Country_codeUK
Opt_statusTrue
StatusActive

Once we have this Data Extension ready, we can move on to creating the Filter Activity that will select the customers who meet these conditions.

Step 3: Go to Automation Studio

Now that we have our source and target Data Extensions ready, let’s go to Automation Studio and create the automation.

Adding a Filter Activity to the automation in Automation Studio.

From Automation Studio, create a new automation and give it a name that makes it easy to understand what it is used for.

For example:

Refresh UK Active Marketing Audience

Using a clear name is helpful, especially when you have several automations in your account. Just by looking at the name, we should be able to understand what the automation is doing.

Step 4: Add a Filter Activity

Now that we have created the automation, the next thing we need to do is add a Filter Activity. Here we can either create a new filter activity or we can use Existing filters also

The Filter Activity is where we define which customers we want to include in our audience. It looks at the records in our source Data Extension and checks them against the conditions we set.

For example, if we only want active customers from the UK who have opted in to marketing, the Filter Activity will check each record and select the customers who meet those conditions.

Once we add the Filter Activity, we can move on to defining the conditions.

Step 5: Select the Source Data Extension

Now we need to tell the Filter Activity which Data Extension it should use.

Open the Filter Activity and select the Data Extension that contains the customer data we want to filter.

For our example, we’ll select:

Customer_Master

This is our source Data Extension, so SFMC will use the records in Customer_Master and apply the conditions we define in the next step.

Once the source Data Extension is selected, we can move on to defining the filter conditions.

Step 6: Add Your Filter Conditions

Now we can define the conditions for the audience we want to create.

For this example, let’s say we only want customers who are:

  • From the UK
  • Opted in to receive marketing emails
  • Currently active

So, our filter conditions will be:

Country_code = UK
AND Opt_status = True
AND Status = Active

Defining the conditions for the target audience.

This means that a customer needs to meet all three conditions to be included in the audience.

For example, a customer from the UK who has opted in but is not active would not be included. Similarly, an active UK customer who hasn’t opted in would also be excluded.

Once we add these conditions, the Filter Activity will select the customers who meet them and add them to our target Data Extension.

Step 7: Understand AND and OR

When adding multiple conditions to a filter, you can use AND or OR depending on what you want your audience to include.

AND

Use AND when you want a customer to meet all the conditions.

For example:

Country_code = UK
AND Opt_status = True

Here, the customer must be from the UK and have opted in to marketing.

OR

Use OR when you want to include customers who meet either condition.

For example:

Country_code = UK
OR Country_code = Ireland

This will include customers from either the UK or Ireland.

So, when setting up your filter, make sure you choose AND or OR based on the audience you want to create.

Step 8: Select the Target Data Extension

Now we need to choose where we want to store the customers who meet our filter conditions.

For this example, we’ll select:

UK_Active_Marketing_Audience

This is the target Data Extension we created earlier. Once the Filter Activity runs, the customers who meet our conditions will be added to this Data Extension.

Before moving on, it’s also worth checking that the fields in the source and target Data Extensions are set up correctly. The fields we want to populate in the target should have compatible data types and lengths.

For example, if CustomerID is stored as Text in the source Data Extension, make sure the corresponding field in the target Data Extension can also accept the same type of value.

Once we’ve selected the target Data Extension and checked the fields, we can move on to deciding how we want to update the audience each time the automation runs.

Step 9: Understand How the Audience Is Refreshed

Once we’ve selected the source and target Data Extensions and added our filter conditions, the Filter Activity is ready to run.

When it runs, SFMC looks at the latest records in Customer_Master and checks which customers meet our conditions. The customers who match are then written to UK_Active_Marketing_Audience.

The useful part is that we don’t need to manually rebuild the audience every time the customer data changes. Whenever the automation runs again, the Filter Activity checks the latest source data and creates the audience again based on the same conditions.

For example, if Rani was included yesterday because he was an active UK customer who had opted in to marketing, but he unsubscribes today, he won’t meet the filter conditions the next time the automation runs. As a result, he won’t be included in the refreshed UK_Active_Marketing_Audience.

Step 10: Save the Filter Activity

Now that we have finished setting up the Filter Activity, we can save it.

Before saving, it’s worth quickly checking that everything is correct. Make sure you’ve selected the right source and target Data Extensions, the filter conditions and values are correct, and the AND/OR logic is set up as you expect.

It’s also a good idea to check the update option we selected in the previous step.

A quick check at this stage can help avoid issues when we run the automation later.

Step 11: Schedule the Automation

Now that the Filter Activity is ready, we need to decide when we want the automation to run.

This is important because the automation is what will refresh our audience using the latest data.

For example, we could set it to run every morning. When it runs, SFMC will check the latest records in Customer_Master, apply our filter conditions, and update UK_Active_Marketing_Audience.

Depending on the requirement, we could also run the automation every few hours, once a week, or at a specific time.

For this example, let’s schedule it to run every morning so the audience stays up to date.

Step 12: Run the Automation and Check the Result

Now that everything is set up, we can run the automation and see the results.

When the automation runs, the Filter Activity will check the records in Customer_Master and apply the conditions we defined earlier. The customers who meet all the conditions will then be added to UK_Active_Marketing_Audience.

Once the automation has finished, open the target Data Extension and check the records.

For example, if Customer_Master contains 100,000 customers and 25,000 of them meet all three conditions, those 25,000 customers will be included in the target audience.

Step 13: Check the Filtered Records

After the automation has finished, we can open the target Data Extension and check a few records to make sure the filter has worked as expected.

For example, if our conditions are Country = UK, MarketingOptIn = True, and CustomerStatus = Active, we should see records like these:

CustomerCountry_codeOpt_statusStatus
RaniUKTrueActive
SarahUKTrueActive
DavidUKFalseActive

Rani and Sarah meet all three conditions, so they should be in the audience. David doesn’t meet the marketing opt-in condition, so he shouldn’t be included.

Checking the audience after the automation runs helps us make sure the filter is working as expected.

How the Audience Gets Refreshed

One of the useful things about using a Filter Activity in an automation is that we don’t have to manually create the audience every time the customer data changes.

For example, let’s say Rani is currently an active UK customer and has opted in to marketing. When the automation runs, he will be included in our audience and stored in UK_Active_Marketing_Audience.

If Rani unsubscribes later, the next time the automation runs, SFMC will check his latest information. Since he no longer meets the marketing opt-in condition, he won’t be included in the refreshed audience stored in UK_Active_Marketing_Audience.

The same applies when new customers become eligible. If they meet all the conditions when the automation runs, they can be included in the target Data Extension.

So, by scheduling the automation, we can keep UK_Active_Marketing_Audience up to date based on the latest data from Customer_Master, without having to rebuild the audience manually each time.

Use the Audience in Campaigns

Once we’ve created the audience and checked that the records look correct, we can use the target Data Extension in our campaigns.

For example, if it’s set up as a sendable Data Extension, we can use it as the audience for an email send. We can also use the Data Extension as an entry source in Journey Builder, depending on how we want to build the journey.

The same audience can also be used in other Marketing Cloud features that support Data Extension audiences.

Because our automation runs on a schedule, the target Data Extension is refreshed with the latest matching customers each time the automation runs. This means that when we use this Data Extension for a campaign, we’re working with the latest audience that was created by the automation.

Common Issues When Using a Filter Activity

Once everything is set up, the Filter Activity will usually be straightforward to work with. But if the audience doesn’t look the way we expected, there are a few things we can check.

The audience is empty

If the target Data Extension doesn’t contain any customers after the automation runs, the first thing I would check is the filter conditions.

Make sure the values you’re using actually exist in the source Data Extension and that the AND/OR logic is correct.

For example, if the source contains United Kingdom but the filter is looking for UK, the customer won’t match that condition.

The audience has more or fewer customers than expected

If the audience size doesn’t look right, check the conditions again.

In particular, look at whether you’ve used AND or OR correctly. Using OR can include more customers, while using AND requires customers to meet all the conditions.

The audience isn’t showing the latest data

If the audience doesn’t seem to include recent changes, check when the source Data Extension was last updated and when the Filter Activity runs.

For example, if the source data is refreshed at 8:00 AM but the Filter Activity runs at 7:00 AM, the filter will use the previous version of the data. In this case, make sure the source Data Extension is updated before the Filter Activity runs.

The automation fails

If the automation fails, it’s worth checking the source and target Data Extensions. Make sure the fields you’re using have compatible data types and lengths, and check whether any required fields are missing. These are some of the first things I would check before looking into more complex issues.

When Would I Use a Filter Activity?

A Filter Activity is useful when we have simple audience criteria and all the data we need is already available in a Data Extension.

For example, we could use it to create an audience of:

  • UK customers
  • Customers who have opted in to marketing
  • Active customers
  • Customers with a particular status
  • Customers from a specific customer type

If the audience requirement becomes more complex and we need to work with data from multiple Data Extensions, perform calculations, remove duplicates, or apply more advanced logic, then a SQL Query Activity would usually be a better option.

So, for simple filtering, a Filter Activity can be an easy way to create and refresh an audience. For more complex requirements, SQL gives us more flexibility.

If you need to work with more complex audience logic, you can also explore these SQL examples to see how SQL can be used in Salesforce Marketing Cloud.

File Transfer activity

Marcel Szimonisz
Table of contents: Automation activities

A file transfer activity in Salesforce Marketing Cloud Engagement is an Automation Studio step that handles the file itself – moving it between locations, applying encryption or decryption, and working with compressed files – instead of importing rows or generating new datasets. It matters because many automations fail before the data step ever starts: the file is in the wrong place, still encrypted, still zipped, or not accessible to the next activity. In practice, file transfer is the control point that turns a raw file handoff into a usable automation flow through Safehouse and FTP-based file handling.

What a file transfer activity actually does

Salesforce separates file handling from data handling. That means a file transfer activity is not the same as an import activity, a data extract, or a SQL query. It exists to prepare or publish files around those steps, which is why Automation Studio treats file management as its own activity type.

The simplest way to think about it

If an automation needs to answer “Where is the file, and in what state is it?” file transfer is usually the activity involved.

Typical examples include:

  • Preparing an inbound file before an import
  • Moving an outbound file after an extract
  • Decrypting a partner-delivered file
  • Encrypting a file before another system retrieves it
  • Handling zipped or unzipped delivery steps

What typically happens is that the data logic and the file logic are split across separate activities. That adds one more step to configure, but it also makes the flow more predictable when external systems are involved.

What it does not do

A file transfer activity does not map columns, validate row-level data, deduplicate records, or write data into a data extension. Those jobs belong to import activities, queries, scripts, or extract steps.

A common issue is assuming that because a file transfer step succeeded, the data is ready to use. It only means the file reached the expected location and format for the next step. The contents can still be wrong.

Where file transfer fits in real Automation Studio workflows

File transfer usually appears at the edges of an automation – right before data enters Marketing Cloud or right after data leaves it.

Inbound workflow: partner file to import-ready file

In practice, inbound flows often start when another system drops a file onto Enhanced FTP. That file may arrive encrypted or compressed. The file transfer activity prepares it first, and the import activity runs after that.

A simple sequence looks like this:

  • External system delivers a file
  • File transfer decrypts or unpacks it
  • Import activity loads it into a data extension
  • Downstream automation uses the imported data

This pattern is common because the import step is designed to load data, not to manage delivery mechanics.

Outbound workflow: extract to deliverable file

Outbound flows work the other way around. A query, filter, or tracking extract creates the output file, and then file transfer handles delivery. What typically happens is the extract produces a file in secure internal storage, and a file transfer step moves it into an FTP location where another system can pick it up.

That separation is one of the most important platform behaviors to understand. If the extract ran successfully but no downstream system can find the file, the problem is often not the extract itself – it is the missing handoff between storage locations.

Safehouse, Enhanced FTP, and file locations

One limitation is that Salesforce Marketing Cloud Engagement does not treat every file location the same way. A file location is not just a folder name; it affects how the platform reads from or writes to storage. The difference between an FTP directory and Safehouse becomes much clearer once you look at how file locations are used inside Marketing Cloud activities.

Why Safehouse causes confusion

Safehouse is typically part of secure internal processing. Enhanced FTP is where external systems usually drop or retrieve files. Those are not interchangeable.

A common issue is expecting a file in Safehouse to behave like a normal exported file sitting in a visible FTP folder. It does not. If a previous step writes to a secure internal location and the next consumer expects the export folder, the automation can appear partially successful while the actual business process still fails.

Why the file location setting matters so much

In practice, many file transfer errors are configuration problems rather than system problems:

  • The file exists, but in the wrong location
  • The activity is looking in the wrong root folder
  • The automation expects a Safehouse output, but the next step reads from FTP
  • The naming pattern does not match the delivered file

These issues are easy to miss because the automation logic can look correct at a high level while the storage path is wrong at the activity level.

How file transfer activities are usually designed in reliable automations

The best file transfer setups are usually boring. They make each step obvious, isolate dependencies, and avoid doing too much in one run.

Sequence the automation around the file lifecycle

A reliable workflow usually follows the order in which the file changes state. The practical patterns behind well-built Automation Studio workflows reflect that approach.

For inbound processes, that usually means:

  • Receive the file
  • Decrypt or unpack it
  • Import it
  • Run SQL or segmentation against the loaded data

For outbound processes, it usually means:

  • Prepare the dataset
  • Extract the file
  • Transfer it to the correct delivery location
  • Let the downstream system retrieve it

What typically happens in failing automations is that teams design around the business outcome instead of the file state. The result is an import looking for a file that has not been prepared yet, or a partner waiting for a file that never left secure storage.

Keep the transfer step separate when debugging matters

One trade-off is that splitting file handling into its own activity creates more steps. The benefit is better fault isolation.

If a query succeeds but a file never reaches the export folder, you know the failure is in the delivery layer. If the transfer completes but the import still fails, the issue is more likely the file structure or mapping. In practice, that separation makes root-cause analysis much faster.

Scheduled vs file-drop automations

A file transfer activity can sit inside either a scheduled automation or a file-drop automation. The right choice depends less on Salesforce and more on how predictable the upstream system is. The operating patterns described in scheduled and file-drop automation setups are a good reflection of how teams actually use Automation Studio.

When scheduled automations work better

Scheduled runs are better when:

  • A partner delivers at roughly the same time every day
  • You want processing windows that align with other batch jobs
  • You need easier operational visibility
  • A small delay is acceptable

Scheduled automations are simpler to reason about because every step runs in a known window.

When file-drop automations work better

File-drop setups are useful when the file arrival time is unpredictable and processing should start as soon as the file appears.

The trade-off is tighter dependency on naming, folder placement, and delivery discipline. A common issue is assuming “file arrived on FTP” is enough. In reality, it has to land in the exact monitored location and match the expected pattern, or nothing starts.

The configuration side: why FileTransferActivity is its own object

At the implementation level, file transfer is not just a checkbox inside another activity. Salesforce exposes it as a dedicated FileTransferActivity object, which reflects how the platform thinks about the step: a separate operation with its own file specification, transfer behavior, and security-related settings.

Why that matters in practice

That separation explains a lot of real-world behavior:

  • A transfer can fail while the rest of the automation logic is fine
  • A cloned automation may still need transfer-specific validation
  • File naming and key settings matter independently of the import or extract step
  • Deployment teams need to review the transfer activity as a standalone dependency

In practice, that is why file transfer problems often show up late in testing. The SQL is correct, the target data extension is correct, but the file-handling configuration is still off.

Common file transfer activity issues in Salesforce Marketing Cloud Engagement

Most file transfer failures are not mysterious. They usually come from path mismatches, timing, or assumptions about what the previous step produced. The recurring patterns in Automation Studio troubleshooting work line up with what teams see most often in production.

The file is not where the automation expects it

This is the classic problem. The file exists, but not in the configured location or not with the expected name.

What typically happens:

  • A partner drops the file into the wrong FTP folder
  • The naming pattern changes without notice
  • The previous activity writes to Safehouse, but the next step reads from FTP
  • The automation starts before the upstream file is fully available
The activity succeeds, but the downstream step still fails

This usually means the file transfer did its job, but the business expectation was broader than the activity’s scope.

Examples:

  • The file was moved successfully, but the import definition expects different columns
  • The file was decrypted, but the delimiter is wrong
  • The file was unzipped, but the inner filename does not match the import expectation

A common issue is treating file transfer as data validation. It is not.

The failure is really a workflow design problem

When multiple activities depend on each other, small sequencing mistakes can create intermittent errors. If a transfer step runs before the file exists, or an import starts before the transfer output is ready, the automation may fail unpredictably even though each component works on its own.

File encoding is a separate concern

One of the easiest misunderstandings is assuming that file transfer will fix encoding. It will not. If an outbound file must be UTF-8, that needs to be set at the extract stage before the transfer happens. The practical fix is setting the extract output to UTF-8 before handing the file to the transfer step.

Why this matters for downstream systems

A file can be transferred perfectly and still be rejected by the receiving platform because the encoding is wrong. That is especially common when special characters, accented names, or multilingual data are involved.

In practice, this creates a misleading symptom: the automation looks healthy in Automation Studio because the transfer completed, but the partner system still cannot process the file.

When a file transfer activity is the wrong tool

Use a file transfer activity when the problem is movement, packaging, encryption, decryption, or access location. Do not use it when the real problem is data structure.

It is the wrong tool if you need to:

  • Reformat columns
  • Change delimiters through data logic
  • Validate row quality
  • Merge multiple datasets
  • Standardize values inside the file
  • Repair malformed exports
A practical rule for deciding

If the question is “What needs to happen to the file?” a file transfer activity is probably part of the answer.

If the question is “What needs to happen to the records inside the file?” the answer is usually somewhere else in Automation Studio. That distinction is what keeps Salesforce Marketing Cloud Engagement automations maintainable, especially when inbound and outbound file handling starts to involve Safehouse, Enhanced FTP, encryption, and multiple downstream systems.

SQL examples

Marcel Szimonisz
Table of contents: Automation Studio and segmentation

Salesforce Marketing Cloud Engagement’s SQL is one of the most important skills for anyone working not only with Automation Studio but to get basic insights from your marketing platform using query studio. Query Activities allow marketers and developers to segment audiences, deduplicate subscribers, calculate engagement metrics, and prepare data for campaigns.

In this guide you will find 50 practical SQL query examples for Salesforce Marketing Cloud that you can use in Automation Studio Query Activities or quick runs in the query studio. We will be using data views or common tables used by marketing teams all around the world.

Before you run these: a few SFMC SQL realities that affect every query

  • You are writing T-SQL style queries for Automation Studio. Some SQL Server features people expect are restricted or behave differently in Marketing Cloud, so always sanity-check against the platform’s supported syntax and functions in the Salesforce Marketing Cloud SQL reference.
  • Query Activities write into a target Data Extension. Many teams forget that “overwrite” vs “update” behavior changes the outcome as much as the SQL does and how long it will take.
  • Treat Data Extensions like tables, but design for segmentation. Indexing is limited, so you win with clean keys, fewer columns, tight WHERE clauses, and pre-aggregating when needed.

Salesforce Marketing Cloud SQL Best Practices

While Salesforce Marketing Cloud supports a large subset of SQL Server syntax, the environment is optimized for segmentation and automation workflows rather than heavy analytical processing. Following a few best practices can help your queries run faster, produce predictable results, and prevent unexpected failures in Automation Studio.

SQL Query Examples

Select soft bounced subscribers
SELECT
   cm.SubsriberKey,
   b.BounceCategory
FROM _bounce b
JOIN Customer_Master_DE cm ON cm.SubscriberKey=b.SubsriberKey
WHERE b.BounceCategory in ('Block bounce','Soft bounce')

Hard bounced contacts can be selected by using Hard bounce as bounce category.

Sent events with email name
SELECT
    j.JobID,
    j.EmailName,
    s.EventDate,
    s.SubscriberKey
FROM _Sent s
JOIN _Job j 
    ON s.JobID = j.JobID
Sent emails for a specific email name
SELECT
    s.SubscriberKey,
    j.EmailName,
    s.EventDate
FROM _Sent s
JOIN _Job j
    ON s.JobID = j.JobID
WHERE j.EmailName = 'Welcome Email'
Clickers per email
SELECT
    j.EmailName,
    COUNT(DISTINCT c.SubscriberKey) AS Clickers
FROM _Click c
JOIN _Job j
    ON c.JobID = j.JobID
GROUP BY j.EmailName
Clicked specific url
SELECT DISTINCT 
   c.EventDate
   c.SubscriberKey, 
   j.emailname
FROM _Click c
JOIN _Job j ON c.JobID = j.JobID
WHERE LinkContent LIKE '%pricing%'
Unique clicks for email
SELECT 
    COUNT(*) AS totalUniqueClicks,
    j.EmailName
FROM _Click c
JOIN _Job j 
    ON c.JobID = j.JobID
WHERE c.IsUnique = 1
AND j.EmailName = 'Welcome campaign'
GROUP BY j.EmailName
Find duplicate email addresses
SELECT
EmailAddress,
COUNT(*) AS Count
FROM Customers_DE
GROUP BY EmailAddress
HAVING COUNT(*) > 1
Unique email sends on particular day
SELECT 
    COUNT(*) AS campaigns
FROM (
    SELECT jobid
    FROM _Sent s
    JOIN _Job j ON j.JobId = s.JobId
    WHERE s.EventDate >= '2026-03-08'
      AND s.EventDate < '2026-03-09'
    GROUP BY j.EmailName
) x
Select records in particular time zone

Salesforce Marketing Cloud dates are stored in the database using the CST timezone, regardless of where your Business Unit is located. If you need to select dates and times in your local timezone, you should use AT TIME ZONE.

SELECT
    j.EmailName,
    COUNT(*) AS Sends
FROM _Sent s
JOIN _Job j 
    ON s.JobID = j.JobID
WHERE
    s.EventDate AT TIME ZONE 'Central America Standard Time' AT TIME ZONE 'UTC'
    BETWEEN '2026-03-15 00:00:00' AND '2026-03-15 23:59:59'
GROUP BY j.EmailName
SELECT
    j.EmailName,
    s.EventDate AT TIME ZONE 'Central America Standard Time' AT TIME ZONE 'UTC' as EventDateUTC
FROM _Sent s
JOIN _Job j 
    ON s.JobID = j.JobID
WHERE
     s.EventDate AT TIME ZONE 'Central America Standard Time' AT TIME ZONE 'UTC' BETWEEN '2026-03-15 00:00:00' AND '2026-03-15 23:59:59'
Top 20 emails sent per domain

This query analyzes the distribution of email domains in your subscriber database and ranks them by how frequently they appear. Understanding which email providers dominate your audience can help identify deliverability patterns, monitor ISP exposure, and better understand the makeup of your database.

The script extracts the domain portion of each email address by locating the @ symbol and returning everything that follows it. The result is converted to lowercase to ensure consistent grouping, so domains such as Gmail.com and gmail.com are treated as the same value.

Once the domain is extracted, the query groups records by domain and counts how many subscribers belong to each one. The ROW_NUMBER() window function is then used to rank the domains from the most common to the least common based on their subscriber counts.

The final output provides a ranked list of email domains along with the number of subscribers associated with each domain, making it easier to quickly identify the most common email providers in your dataset.

Version to be run on query strudio

SELECT
    rn AS Rank_Position,
    Email_Domain,
    Domain_Count
FROM (
    SELECT TOP 100 PERCENT
        Email_Domain,
        COUNT(*) AS Domain_Count,
        ROW_NUMBER() OVER (ORDER BY COUNT(*) DESC) AS rn
    FROM (
        SELECT
            LOWER(
                SUBSTRING(
                    EmailAddress,
                    CHARINDEX('@', EmailAddress) + 1,
                    LEN(EmailAddress)
                )
            ) AS Email_Domain
        FROM Master_DE
        WHERE EmailAddress IS NOT NULL
          AND CHARINDEX('@', EmailAddress) > 0
    ) src
    GROUP BY Email_Domain
) ranked
WHERE rn <= 20

Version to be run on query definition activity within automation.

SELECT
    ROW_NUMBER() OVER (ORDER BY COUNT(*) DESC) AS Rank_Position,
    LOWER(
        SUBSTRING(
            EmailAddress,
            CHARINDEX('@', EmailAddress) + 1,
            LEN(EmailAddress)
        )
    ) AS Email_Domain,
    COUNT(*) AS Domain_Count
FROM Master_DE
WHERE EmailAddress IS NOT NULL
AND CHARINDEX('@', EmailAddress) > 0
GROUP BY
    LOWER(
        SUBSTRING(
            EmailAddress,
            CHARINDEX('@', EmailAddress) + 1,
            LEN(EmailAddress)
        )
    )
Identify the most clicked link per email

his query determines the most frequently clicked link within each email campaign. Click data is retrieved from the _Click data view and joined with the _Job data view to associate each click event with the corresponding email.

The query groups click events by both EmailName and URL and counts the number of clicks for each link. This produces a dataset showing how many times each link was clicked within each email.

To identify the most popular link, a window function is applied using ROW_NUMBER() partitioned by EmailName. Links are ordered by their click count in descending order, and only the top-ranked link for each email is returned.

The result provides a concise view of which link generated the most engagement within every campaign, making it useful for analyzing content performance and optimizing email design.

SELECT
    EmailName,
    URL,
    Click_Count
FROM (
    SELECT
        j.EmailName,
        c.URL,
        COUNT(*) AS Click_Count,
        ROW_NUMBER() OVER (
            PARTITION BY j.EmailName
            ORDER BY COUNT(*) DESC
        ) AS rn
    FROM _Click c
    JOIN _Job j
        ON c.JobID = j.JobID
    GROUP BY j.EmailName, c.URL
) ranked
WHERE rn = 1
Get the most recent record per email address

This situation commonly occurs in implementations where the SubscriberKey is not based on the email address but instead uses a unique identifier from a source system such as Salesforce Contact ID or Account ID. In these setups, duplicate email addresses may appear in Salesforce Marketing Cloud because multiple records in the source system share the same email address.

This is especially common in service-based businesses such as telecom, television, or mobile providers. In these environments, a single email address can be associated with multiple customer accounts, subscriptions, or contracts. For example, a household might manage several mobile lines or services under different account IDs but use the same email address for communication.

Because of this structure, the SubscriberKey must represent the source system identifier rather than the email address itself. This preserves the relationship between the Marketing Cloud subscriber record and the original system record. As a result, duplicate email addresses in the database are not always data quality issues but can reflect legitimate business relationships.

SELECT
    t.SubscriberKey,
    t.EmailAddress,
    t.Status,
    t.DateJoined
FROM (
    SELECT
        SubscriberKey,
        EmailAddress,
        Status,
        DateJoined,
        ROW_NUMBER() OVER (
            PARTITION BY LOWER(TRIM(EmailAddress))
            ORDER BY DateJoined DESC
        ) AS rn
    FROM _Subscribers
    WHERE EmailAddress IS NOT NULL
) t
WHERE t.rn = 1

Majority of the SFMC projects using some sort of Master_DE in that case the createdDate is captured in external system.

SELECT
    t.SubscriberKey,
    t.EmailAddress,
    t.createdAT 
FROM (
    SELECT
        SubscriberKey,
        EmailAddress,
        createdAT,
        ROW_NUMBER() OVER (
            PARTITION BY LOWER(TRIM(EmailAddress))
            ORDER BY createdAT DESC
        ) AS rn
    FROM Master_DE
    WHERE EmailAddress IS NOT NULL
) t
WHERE t.rn = 1
Deduplicate by EmailAddress but keep the “Active” subscribers status
SELECT
   t.EmailAddress,
   t.SubscriberKey,
   t.Status
FROM (
SELECT
   EmailAddress,
   SubscriberKey,
   Status,
   ROW_NUMBER() OVER (
   PARTITION BY EmailAddress
     ORDER BY CASE WHEN Status = 'Active' THEN 1 ELSE 2 END
   ) AS rn
 FROM _Subscribers
) t
WHERE t.rn = 1
Detect conflicting duplicates (same email, different SubscriberKey)
SELECT
   EmailAddress,
   COUNT(DISTINCT SubscriberKey) AS DistinctKeys
   FROM Master_DE
GROUP BY EmailAddress
HAVING COUNT(DISTINCT SubscriberKey) > 1
Build a “suppression” list of duplicates (only the extra rows)
SELECT
  d.SubscriberKey,
  d.EmailAddress
FROM (
  SELECT
    SubscriberKey,
    EmailAddress,
    ROW_NUMBER() OVER (PARTITION BY EmailAddress ORDER BY CreatedDate DESC) AS rn
      FROM Master_DE
) d
WHERE d.rn > 1
Get latest record from transactional data extension

I often use this when trying to proof or preview changes to a transactional template. Instead of searching for records within the preview in Email Studio, I first look up the SubscriberKey in the Data Extension used for the send.

Normally you would write something like below query and run it in query studio.

SELECT TOP 10
    SubscriberKey,
    CreatedAT
FROM TXN_DE
WHERE Country = 'sk'
ORDER BY CreatedAT DESC

The problem I noticed is that it does not work as expected. Instead of giving me 10 records sorted by the CreatedAT date, it gives me 10 random records and then sorts them.

ou can fix this in two ways.

The first option is to rewrite the query using ROW_NUMBER() with PARTITION BY, which ensures correct ordering before limiting the results.

The second option is to set the TOP value higher than the total number of rows in the Data Extension. For example, if your Data Extension contains 1,000 records, you can use TOP 1001 to force proper sorting and get accurate results.

However, this approach is not practical for large datasets with millions of records. In such cases, using ROW_NUMBER() with PARTITION BY is the recommended and scalable solution.

SELECT
    SubscriberKey,
    Country,
    CreatedAT
FROM (
    SELECT
        SubscriberKey,
        Country,
        CreatedAT,
        ROW_NUMBER() OVER (
            PARTITION BY Country
            ORDER BY CreatedAT DESC
        ) AS rn
    FROM TXN_DE
) t
WHERE rn <= 10
Prefer non-null values when deduping (simple coalesce approach)
SELECT
SubscriberKey,
MAX(EmailAddress) AS EmailAddress
FROM Customers_DE
GROUP BY SubscriberKey
Surface duplicates created in the last 7 days
SELECT
SubscriberKey,
COUNT(1) AS Cnt
FROM Master_DE
WHERE CreatedDate >= DATEADD(day, -7, GETDATE())
GROUP BY SubscriberKey
HAVING COUNT(1) > 1
Created in the last 24 hours
SELECT
SubscriberKey,
EmailAddress,
CreatedDate
FROM Master_DE
WHERE CreatedDate >= DATEADD(day, -1, GETDATE())
Created in the last 30 days
SELECT
SubscriberKey,
EmailAddress
FROM Master_DE
WHERE CreatedDate >= DATEADD(day, -30, GETDATE())
Created this month (month-to-date)
SELECT
SubscriberKey,
EmailAddress
FROM Master_DE
WHERE CreatedDate >= DATEFROMPARTS(YEAR(GETDATE()), MONTH(GETDATE()), 1)
Not updated in 90 days (stale records)
SELECT
SubscriberKey,
EmailAddress,
LastModifiedDate
FROM Master_DE
WHERE LastModifiedDate < DATEADD(day, -90, GETDATE())
Birthday campaigns (month/day match)
SELECT
SubscriberKey,
EmailAddress,
BirthDate
FROM Master_DE
WHERE MONTH(BirthDate) = MONTH(GETDATE())
AND DAY(BirthDate) = DAY(GETDATE())
Last email sent to subscriber

his query retrieves the most recent email send event for each subscriber using the _Sent and _Job data views. It can be useful when you want to understand the latest communication a subscriber received and enrich your audience datasets with send history.

To build a reliable historical view, this query is typically used inside a daily Automation Studio workflow that stores the results in a Data Extension. Running the query daily allows you to maintain a continuously updated picture of subscriber activity over time. You can create data extension called Subscriber_LastActivity_DE

FieldTypeDescription
SubscriberKeyTextUnique subscriber identifier
EmailAddressEmailSubscriber email
LastEmailNameText
LastEmailDateDateLast send date
LastEngagementDateDate
Last click/open date
LastEngagementTypeText
Click or Open

For the initial run, you should extend the time window to capture historical data. For example:

  • DATEADD(DAY,-30,GETDATE())
  • DATEADD(DAY,-90,GETDATE())
  • Remove the WHERE to get last 180 days (data views retention is 180 days)

This ensures you populate the dataset with enough past activity to be meaningful.

After the initial load, the automation can run daily with a shorter window, such as:

  • DATEADD(DAY,-1,GETDATE())
SELECT
    SubscriberKey,
    LastEmailSent,
    EmailName,
    EmailAddress
FROM (
    SELECT
        s.SubscriberKey,
        s.EventDate AS LastEmailSent,
        j.EmailName,
        sub.EmailAddress,
        ROW_NUMBER() OVER (
            PARTITION BY s.SubscriberKey
            ORDER BY s.EventDate DESC
        ) AS rn
    FROM _Sent s
    JOIN _Job j
        ON s.JobID = j.JobID
    LEFT JOIN _Subscribers sub
        ON s.SubscriberKey = sub.SubscriberKey
    WHERE s.EventDate >= DATEADD(DAY,-1,GETDATE())
) ranked
WHERE rn = 1
AND EmailAddress IS NOT NULL
Last engaged time of subscriber

In Salesforce Marketing Cloud, engagement data is stored across multiple system data views such as _Click and _Open. However, simply using those tables directly has two challenges.

First, many corporate email security systems automatically scan links in incoming emails. These scanners may click every link in the message immediately after delivery, generating click events that do not represent real user activity.

Second, Apple Mail Privacy Protection automatically loads tracking pixels, which can produce open events even when the user has not actually viewed the email.

Because of this, engagement queries should include some basic filtering logic to reduce false signals.

The query below builds a LastEngaged table, which stores the most recent interaction for each subscriber. It combines click and open events, filters out likely bot clicks, and keeps only the latest activity per subscriber.

This table can then be refreshed daily through Automation Studio and used as a reliable engagement reference across segmentation workflows.

SELECT
    SubscriberKey,
    ActivityDate AS LastEngagedDate,
    ActivityType
FROM (
    SELECT
        SubscriberKey,
        ActivityDate,
        ActivityType,
        ROW_NUMBER() OVER (
            PARTITION BY SubscriberKey
            ORDER BY ActivityDate DESC
        ) AS rn
    FROM (

        /* Filtered Click Events */
        SELECT
            c.SubscriberKey,
            c.EventDate AS ActivityDate,
            'Click' AS ActivityType
        FROM (
            SELECT
                c.*,
                COUNT(*) OVER (
                    PARTITION BY c.SubscriberKey, c.JobID, c.EventDate
                ) AS clicks_same_time
            FROM _Click c
        ) c
        JOIN _Sent s
            ON c.SubscriberKey = s.SubscriberKey
            AND c.JobID = s.JobID
        WHERE
            clicks_same_time <= 3
            AND DATEDIFF(second, s.EventDate, c.EventDate) > 10

        UNION ALL

        /* Open Events */
        SELECT
            SubscriberKey,
            EventDate,
            'Open'
        FROM _Open

    ) activity
) ranked
WHERE rn = 1
  • Combine click and open activity: The query first merges engagement data from the _Click and _Open data views. Clicks are generally considered the strongest engagement signal, while opens are weaker but still useful when no clicks exist. Both event types are combined into a single dataset using UNION ALL.
  • Filter suspicious click activity: Corporate email security gateways often scan links automatically, which can generate multiple click events within milliseconds after delivery. These clicks typically target every link in the email. To reduce this noise, the query filters out clicks where multiple links were clicked at the exact same timestamp or where the click occurred only a few seconds after the email was sent, which usually indicates automated scanning rather than real user interaction.
  • Rank engagement events per subscriber: After collecting all engagement events, the query ranks them for each subscriber using ROW_NUMBER() OVER (PARTITION BY SubscriberKey ORDER BY ActivityDate DESC). This assigns a ranking where the most recent engagement receives rank 1.
  • Keep the latest engagement event:Finally, the outer query keeps only the most recent event for each subscriber using WHERE rn = 1. The result is a table where each subscriber has exactly one record representing their last known engagement activity.
Segment by recency buckets
SELECT
SubscriberKey,
EmailAddress,
CASE
WHEN LastEngagedDate >= DATEADD(day, -7, GETDATE()) THEN '0-7 days'
WHEN LastEngagedDate >= DATEADD(day, -30, GETDATE()) THEN '8-30 days'
WHEN LastEngagedDate >= DATEADD(day, -90, GETDATE()) THEN '31-90 days'
ELSE '90+ days'
END AS RecencyBucket
FROM LastEngaged_DE
Use DATEDIFF for a numeric “days since” last engaged
SELECT
SubscriberKey,
EmailAddress,
DATEDIFF(day, LastEngagedDate, GETDATE()) AS DaysSinceEngaged
FROM LastEngaged_DE
Exclude today’s records (handy for late-arriving feeds)
SELECT
SubscriberKey,
EmailAddress
FROM Master_DE
WHERE CAST(CreatedDate AS date) < CAST(GETDATE() AS date)
Identify records with invalid or missing dates
SELECT
SubscriberKey,
EmailAddress
FROM Master_DE
WHERE BirthDate IS NULL
OR BirthDate > GETDATE()
Inner join customers to orders (only buyers)
SELECT
c.SubscriberKey,
c.EmailAddress,
o.OrderId,
o.OrderDate
FROM Master_DE c
INNER JOIN Orders_DE o
ON c.SubscriberKey = o.SubscriberKey
Left join to find non-buyers
SELECT
c.SubscriberKey,
c.EmailAddress
FROM Master_DE c
LEFT JOIN Orders_DE o
ON c.SubscriberKey = o.SubscriberKey
WHERE o.SubscriberKey IS NULL
Join to preferences for opt-in segmentation
SELECT
c.SubscriberKey,
c.EmailAddress,
p.EmailOptIn
FROM Master_DE c
INNER JOIN Preferences_DE p
ON c.SubscriberKey = p.SubscriberKey
WHERE p.EmailOptIn = 1
Multi-table join (customers + orders + order items)
SELECT
c.SubscriberKey,
c.EmailAddress,
o.OrderId,
oi.Sku,
oi.Quantity
FROM Master_DE c
INNER JOIN Orders_DE o
ON c.SubscriberKey = o.SubscriberKey
INNER JOIN OrderItems_DE oi
ON o.OrderId = oi.OrderId
Join on email address (use carefully)
SELECT
c.SubscriberKey,
c.EmailAddress,
l.Source
FROM Master_DE c
INNER JOIN Leads_DE l
ON c.EmailAddress = l.EmailAddress
Retrieve Subscriber Suppression Information

In many Salesforce Marketing Cloud implementations, suppression lists are stored across multiple Data Extensions. These lists can represent different sources such as legal opt-outs, invalid email addresses, regional privacy requirements, or automatically generated suppression imports. When troubleshooting deliverability or understanding why a subscriber was excluded from a campaign, it is often necessary to consolidate these sources into a single view.

The query below gathers suppression records from several Data Extensions and combines them into one dataset. Each source is labeled with a suppression reason so it is clear which list the subscriber belongs to. The results are then aggregated by email address so that all suppression sources for the same subscriber appear in a single record.

SELECT 
    EmailAddress, 
    STRING_AGG(supression, ', ') AS exclusion_reason
FROM (
    SELECT DISTINCT 
        [Email Address] AS EmailAddress,
        supression
    FROM (
        SELECT [Email Address], 'supression_1' AS supression
        FROM supression_1
        UNION
      SELECT [Email Address], 'supression_2' AS supression
        FROM supression_2
    ) src
) combined
GROUP BY EmailAddress

The script works in two main steps. First, it unions multiple suppression tables into one temporary dataset and assigns a readable suppression label to each record. Second, it groups the results by email address and uses STRING_AGG to combine all suppression sources into a single exclusion_reason field. This produces a concise summary that shows exactly why a subscriber is suppressed.

The resulting table can be used for troubleshooting, auditing suppression logic, or enriching exclusion reporting when analyzing campaign results.

Suppress a global suppression DE
SELECT
c.SubscriberKey,
c.EmailAddress
FROM Customers_DE c
LEFT JOIN GlobalSuppression_DE s
ON c.SubscriberKey = s.SubscriberKey
WHERE s.SubscriberKey IS NULL
Build a reactivation list (inactive + not suppressed)

When building re-engagement or win-back campaigns, it is common to target subscribers who have not interacted with emails for a certain period of time. At the same time, it is important to ensure that contacts who are part of suppression lists are excluded from the audience to avoid sending messages to users who have opted out or should not be contacted.

The query below selects subscribers from a master Data Extension who have not engaged with emails in the last 90 days or who have never engaged at all. It then checks multiple suppression lists and removes any subscriber whose email address appears in those tables. This ensures that the resulting audience only contains inactive subscribers who are still eligible to receive communications.

SELECT
    c.SubscriberKey,
    c.EmailAddress
FROM Master_DE c
WHERE 
    (c.LastEngagedDate < DATEADD(day,-90,GETDATE()) 
    OR c.LastEngagedDate IS NULL)

AND NOT EXISTS (
    SELECT 1 
    FROM supression_1_DE s 
    WHERE s.EmailAddress = c.EmailAddress
)

AND NOT EXISTS (
    SELECT 1 
    FROM supression_2_DE s 
    WHERE s.EmailAddress = c.EmailAddress
)

You could also write this using NOT IN, but it has some downsides, that you might reconsider when using NOT IN

Identify orphaned orders (no matching customer)
SELECT
o.SubscriberKey,
o.OrderId
FROM Orders_DE o
LEFT JOIN Customers_DE c
ON o.SubscriberKey = c.SubscriberKey
WHERE c.SubscriberKey IS NULL
Join to a product catalog for enriched personalization fields
SELECT
oi.OrderId,
oi.Sku,
p.ProductName,
p.Category
FROM OrderItems_DE oi
INNER JOIN ProductCatalog_DE p
ON oi.Sku = p.Sku
Identify the most engaged domain per campaign

This query analyzes engagement by email domain and identifies which domain generated the most clicks for each campaign.

The domain portion of each email address is extracted using the SUBSTRING() and CHARINDEX() functions. The result is converted to lowercase to ensure consistent grouping, preventing domains such as Gmail.com and gmail.com from being treated as separate values.

Click events from the _Click data view are joined with _Sent to access subscriber email addresses and _Job to retrieve the campaign name. The query then groups engagement events by campaign and email domain and counts the number of clicks generated by each domain.

A ROW_NUMBER() window function is applied to rank domains within each campaign based on the number of clicks they produced. Finally, the query returns only the top-ranked domain per campaign.

This analysis can help identify which email providers generate the most engagement for each campaign, which can be useful for deliverability monitoring, audience analysis, and campaign optimization.

SELECT
    EmailName,
    Email_Domain,
    Engagement_Count
FROM (
    SELECT
        j.EmailName,
        LOWER(
            SUBSTRING(
                s.EmailAddress,
                CHARINDEX('@', s.EmailAddress) + 1,
                LEN(s.EmailAddress)
            )
        ) AS Email_Domain,
        COUNT(*) AS Engagement_Count,
        ROW_NUMBER() OVER (
            PARTITION BY j.EmailName
            ORDER BY COUNT(*) DESC
        ) AS rn
    FROM _Click c
    JOIN _Sent s
        ON c.SubscriberKey = s.SubscriberKey
        AND c.JobID = s.JobID
    JOIN _Job j
        ON c.JobID = j.JobID
    WHERE s.EmailAddress IS NOT NULL
      AND CHARINDEX('@', s.EmailAddress) > 0
    GROUP BY
        j.EmailName,
        LOWER(
            SUBSTRING(
                s.EmailAddress,
                CHARINDEX('@', s.EmailAddress) + 1,
                LEN(s.EmailAddress)
            )
        )
) ranked
WHERE rn = 1
Count orders per subscriber
SELECT
SubscriberKey,
COUNT(1) AS OrderCount
FROM Orders_DE
GROUP BY SubscriberKey
Total revenue per subscriber
SELECT
SubscriberKey,
SUM(OrderTotal) AS Revenue
FROM Orders_DE
WHERE orderStatus = 'fullfilled'
GROUP BY SubscriberKey
Average order value (AOV) per subscriber
SELECT
SubscriberKey,
AVG(OrderTotal) AS AvgOrderValue
FROM Orders_DE
GROUP BY SubscriberKey
Last purchase date per subscriber
SELECT
SubscriberKey,
MAX(OrderDate) AS LastOrderDate
FROM Orders_DE
GROUP BY SubscriberKey
First purchase date per subscriber
SELECT
SubscriberKey,
MIN(OrderDate) AS FirstOrderDate
FROM Orders_DE
GROUP BY SubscriberKey
RFM-style scoring (simple example: recency and frequency)

When working with order data, you usually start with a table where each row represents a single transaction. That structure is fine for storage, but it’s not usable for targeting. Marketing activities need a customer-level view, not a list of individual orders.

RFM stands for:

  • Recency – how recently a customer made a purchase
  • Frequency – how often they purchase
  • Monetary – how much they spend

It’s one of the simplest and most effective ways to turn raw transaction data into something you can actually segment on.

SELECT
    o.SubscriberKey,
    MIN(o.OrderDate) AS FirstOrderDate,
    MAX(o.OrderDate) AS LastOrderDate,
    DATEDIFF(day, MAX(o.OrderDate), GETDATE()) AS RecencyDays,
    COUNT(1) AS FrequencyOrders,
    SUM(o.OrderAmount) AS TotalRevenue,
    AVG(o.OrderAmount) AS AvgBasketValue
FROM Orders_DE o
WHERE o.OrderStatus = 'Fulfilled'
GROUP BY o.SubscriberKey
High-value customers (threshold example)
SELECT
SubscriberKey,
SUM(OrderTotal) AS Revenue
FROM Orders_DE
GROUP BY SubscriberKey
HAVING SUM(OrderTotal) >= 500
Category affinity (top category by quantity per subscriber)
SELECT
t.SubscriberKey,
t.Category,
t.Qty
FROM (
SELECT
o.SubscriberKey,
p.Category,
SUM(oi.Quantity) AS Qty,
ROW_NUMBER() OVER (
PARTITION BY o.SubscriberKey
ORDER BY SUM(oi.Quantity) DESC
) AS rn
FROM Orders_DE o
INNER JOIN OrderItems_DE oi
ON o.OrderId = oi.OrderId
INNER JOIN ProductCatalog_DE p
ON oi.Sku = p.Sku
GROUP BY o.SubscriberKey, p.Category
) t
WHERE t.rn = 1
Identify one-time buyers (exactly one order)
SELECT
SubscriberKey
FROM Orders_DE
GROUP BY SubscriberKey
HAVING COUNT(1) = 1
ON o.OrderId = oi.OrderId
INNER JOIN ProductCatalog_DE p
ON oi.Sku = p.Sku
GROUP BY o.SubscriberKey, p.Category
) t
WHERE t.rn = 1
Find subscribers eligible for a winback (one-time buyer + 180 days since purchase)
SELECT
o.SubscriberKey
FROM Orders_DE o
GROUP BY o.SubscriberKey
HAVING COUNT(1) = 1
AND DATEDIFF(day, MAX(o.OrderDate), GETDATE()) >= 180

Journey builder

Introduction to Journey Builder

Marcel Szimonisz
Table of contents: Journey builder

It wasn’t my first time working with marketing campaign builders that go beyond simple actions and conditions, so Journey Builder didn’t feel like some shiny new thing I had never seen before. I had already worked extensively with Adobe Campaign, so the concept itself was familiar.

But there were definitely areas where it stood out. Some activities, like Send Time Optimization (STO), are something Adobe Campaign can only dream of. Salesforce positions Journey Builder as a way to “build and manage journeys across email, mobile, advertising, and the web”, with event-driven automation and personalization baked in from the start, not bolted on later. And that orchestration across channels from a single journey canvas is where it really starts to show its strength.

At a practical level, Journey Builder is the orchestration layer in Salesforce Marketing Cloud Engagement. It decides who gets in, when they move forward, what message they receive next, and when they should stop. Email Studio, Mobile Studio, Advertising, and your CRM integrations are the execution pieces.

How Journey Builder actually works (beyond the marketing diagram)

Journey Builder has three parts that matter in real implementations: entry, decisioning, and activities.

Entry sources: how people get into a journey

In day-to-day work, I typically see teams start with one of three entry patterns:

  • Data Extension entry for scheduled batch journeys (daily lead nurtures, onboarding, renewals).
  • API event entry for real-time triggers (purchase confirmation, password reset follow-up).
  • Salesforce Data entry when Sales or Service actions should trigger marketing touchpoints.

Those options map closely to the “entry source + flow” model emphasized in Salesforce’s own training, where a journey begins with a defined audience and then moves through message and decision activities how entry sources and activities form the backbone of a journey.

Decisioning: the logic that makes it feel personalized

This is where Journey Builder earns its keep. You can branch based on engagement (opened/clicked), attributes, or custom logic.

One common gotcha I’ve solved: teams expect decisions to reflect “right now” data, but their Data Extensions refresh on a schedule or via nightly imports. That mismatch creates weird outcomes like “customers who already purchased still get cart abandonment.” Fixing it usually means tightening your data update path or moving the trigger to an event-based entry.

Activities: what the journey does

Activities include email sends, waits, SMS, push, updating a record, invoking an API, and more. The SalesforceBen overview does a good job highlighting that Journey Builder is not just “send email,” it’s a visual workflow tool with branching and multi-step automation that can combine channels and data actions in one flow how journeys combine messaging and logic into automated paths.

Journeys you can ship quickly (and what tends to break in production)

H3: Welcome and onboarding (works best with a clean entry rule)

Practical pattern:

  • Entry from a “New Customers” Data Extension (or API event).
  • Wait 1 day.
  • Email with setup steps.
  • Decision split: if they activated, move to education; if not, send a reminder.
  • Exit after conversion or after N days.

What breaks:

  • Duplicate entries (same contact enters multiple times).
  • Bad suppression logic (unsubscribed contacts still qualify via old data).
H3: Cart abandonment (works best event-driven)

If you can, use an event entry so the journey starts at the moment of abandonment. Batch journeys often feel late.

What breaks:

  • Data lag between commerce platform and SFMC.
  • Missing product detail fields needed for content.
H3: Lead nurture tied to Sales (works best with clear ownership rules)

When SFMC is connected to Salesforce CRM, a lead status change can trigger a journey and a later step can hand the lead back based on scoring or engagement.

What breaks:

  • No shared definition of lifecycle stages, so messaging conflicts with what sales reps are saying.

The data model reality: Contact Builder, Data Extensions, and why journeys misfire

Most Journey Builder “mystery bugs” are really data issues. People enter when they should not, or they take the wrong branch, because the attributes Journey Builder sees are not what you think they are.

If you’re using Data Extensions for segmentation, SQL queries become the workhorse. I’ve leaned on query patterns like deduping rows, choosing the latest event per subscriber, and building exclusion sets to keep journeys clean. The SQL examples collected in MartechNotes are especially useful for operational segmentation patterns (like filtering by most recent activity or building anti-join suppressions) that translate directly into “who should enter this journey today” SQL patterns for deduping and building clean segment Data Extensions.

A practical segmentation snippet (typical “latest event wins” pattern):

SFMC’s SQL dialect can be quirky depending on the feature set available in your account, so I usually validate the query behavior with a small sample DE before wiring it into a journey entry.

Personalization inside Journey Builder: AMPscript limits and the real workaround

Journeys are only as good as what your messages can adapt to. SFMC’s email personalization often starts with AMPscript, and it’s great until you need heavier logic, complex catalog lookups, or dynamic content that depends on more than a few subscriber attributes.

A pattern I’ve used: keep “simple personalization” in AMPscript, but shift heavier runtime logic to JavaScript when necessary, especially when you need more flexible processing than AMPscript comfortably supports. MartechNotes describes this breaking point clearly: AMPscript is not always the right tool for heavy personalization, and server-side JavaScript can be used to handle more complex logic paths and output generation when the email needs deeper computation why SSJS becomes the practical option for complex runtime personalization.

Example: generating a consistent identifier for content lookups or suppression logic. I’ve used MD5 hashes to align identifiers across systems (for example, when a partner feed uses hashed emails). The MartechNotes approach emphasizes consistent hashing across SQL and AMPscript so the same input yields the same hash regardless of where you compute it in SFMC consistent MD5 hashing across SFMC SQL and scripting contexts.

Triggering and managing journeys programmatically with the Journey Builder API

Once you outgrow “marketer clicks publish,” the API becomes the lever that makes Journey Builder part of your broader martech stack.

Salesforce’s developer documentation makes an important architectural point: the Journey Builder API is designed to interact with journeys as assets and supports automation scenarios like creating, updating, and managing journey definitions programmatically, which is how teams standardize templates, enforce governance, or promote changes across environments programmatic management of journey assets through the Journey Builder API.

A practical use case I’ve implemented:

  • Keep a “journey template” in source control (JSON payloads and config).
  • Use deployment scripts to update activities, entry sources, or messaging references across business units.
  • Enforce naming conventions and required fields automatically.

Even if you never fully automate deployments, the API mindset helps: treat journeys as managed assets, not one-off canvases.

Debugging Journey Builder: what practitioners repeatedly run into

When I’m troubleshooting a journey that “looks right” but behaves wrong, the issues usually cluster into a few buckets: entry criteria logic, re-entry settings, contact resolution, or data not updating when you think it is.

You see these themes echoed in community troubleshooting threads where practitioners dig into why a contact did not enter, why an activity did not fire, or why a split evaluated unexpectedly, often circling back to entry source configuration and data state at evaluation time recurring community troubleshooting patterns around entry and evaluation behavior. The same kinds of “why didn’t this person go down path B?” questions show up in practitioner discussions across the ecosystem, especially around timing and re-entry assumptions real-world Journey Builder issues practitioners debate around timing and re-entry.

My field checklist:

  • Confirm Contact Key vs Subscriber Key alignment (identity mismatches cause phantom behavior).
  • Validate entry DE contains the row at the moment the entry event runs.
  • Check journey settings: re-entry, exit criteria, and evaluation windows.
  • Trace data refresh jobs feeding segmentation DEs.
  • Verify suppression lists are applied where you think they are (send-level vs entry-level).

Getting data out of Data Extensions during a journey (and why it matters)

A common real-world requirement: “At send time, look up extra fields that were not present when the person entered the journey.” Maybe the product name changed, the assigned rep changed, or you need the latest status.

MartechNotes lays out a practical approach for querying Data Extensions via server-side JavaScript and AMPscript, which is useful when the send context does not include all the attributes you need and you need to fetch related rows safely at render time runtime lookup patterns for pulling additional fields from Data Extensions.

A simplified AMPscript lookup pattern:

This looks harmless, but at scale it can be expensive if you do many lookups per email or if the DE is not indexed well. I usually push repeated lookups into a single row retrieval or pre-join data into the sendable DE when possible.

Practical governance: how to keep Journey Builder from becoming a mess

Journey Builder scales quickly, and without guardrails it turns into a maze of duplicated journeys, inconsistent naming, and unclear ownership.

One of the better mental models is to treat personalization and automation as a system: journeys are just one layer that depends on segmentation, data hygiene, and content operations. MartechNotes frames marketing automation personalization as a practical balancing act between relevance and operational complexity, where stronger personalization requires stronger data discipline and testing rigor why deeper personalization demands tighter data discipline and testing.

What I typically standardize early:

  • Naming conventions: Journey, Entry Source DE, and key attributes.
  • A reusable “entry DE contract” (required columns, datatypes, dedupe rules).
  • A consistent suppression strategy (global exclusions, channel exclusions, journey-specific exclusions).
  • Promotion process: draft, test in a lower BU, then publish in production.
  • A journey inventory with owner, purpose, last updated date, and dependencies.

When Journey Builder is the right tool (and when it isn’t)

Journey Builder is best when you need:

  • Multi-step lifecycle messaging with timing and branching.
  • Cross-channel orchestration.
  • Event-driven automation tied to behavior.

It is not always ideal when:

  • You need complex real-time decisioning across many data sources without pre-modeling (you’ll feel the limits of data freshness and lookup cost).
  • You need version-controlled, heavily modular orchestration without strong governance (you’ll end up building that layer yourself using the API and process).

In practice, the teams that get the most from Journey Builder treat it like production software: defined inputs, predictable logic, observable outputs, and tight control over data and change management.

How journeys work

Marcel Szimonisz
Table of contents: Journey builder

Journey Builder in Salesforce Marketing Cloud Engagement is designed to orchestrate customer interactions across channels using a visual canvas. You define how contacts enter, what steps they go through, and how the system reacts based on data and behavior.

Journey Builder works by taking an entry event (like a Data Extension row, an API event, or a Sales Cloud trigger), mapping it to a Contact, and then moving that Contact through a series of activities (messages, splits, waits, updates) based on the data SFMC can reliably access at each step. The “reliably” part is where most real-world builds succeed or fail.

The core mechanics: entry event, contact model, and orchestration

Entry sources decide what data you truly have at runtime

In most implementations I see, teams treat “Entry Source” as a checkbox decision. It is actually the foundation of how Journey Builder runs.

Trailhead’s Journey Builder basics make it clear that journeys start from defined entry events (for example, a Data Extension or an API event), and then move contacts through configured activities on a schedule the journey controls, not your intuition about “instant” execution. That framing matters when stakeholders expect immediate sends from batched entry sources. You can see that entry-event-driven design reflected in the platform’s learning material on how journeys use entry events and activities to orchestrate steps.

Practical implication: If your journey starts from a Data Extension, you are usually dealing with “whatever was in that DE at injection time,” plus whatever additional data your activities can look up later. If your journey starts from an API event, you can sometimes push richer context in the payload, but you also inherit stricter dependency on integration reliability.

The Contact model is the “spine” Journey Builder uses to move people

Behind the canvas, Journey Builder is operating on the Marketing Cloud contact model. If the Contact Key (Subscriber Key) strategy is inconsistent across systems, journeys will look haunted: duplicates, missed exits, or contacts re-entering unexpectedly.

SalesforceBen’s breakdown is useful because it emphasizes Journey Builder as the orchestration layer for multi-step, multi-channel automation, not just an email flow, and it reinforces how your data and keying choices affect re-entry and audience control. This shows up in real projects where the journey is fine, but the contact identity strategy is not. That perspective is embedded in how Journey Builder orchestrates customer journeys across steps and channels.

Practical implication: Decide early what your Contact Key is (CRM ID, e-commerce ID, etc.), and make sure every entry source uses it consistently. Fixing this after you have live journeys is painful.

What actually happens when a contact enters a journey

“Injection” is not the same thing as “send time”

One common issue I have solved: an email uses personalization from a Data Extension field, but the field is blank in the email even though it is populated later. That is often because Journey Builder evaluated the entry data at injection, then the email rendered before your upstream process updated the DE (or updated a different DE than the one referenced).

Marketing Cloud’s developer documentation for the platform highlights that integrations and features are bounded by system and API behavior and by what the platform can access at specific processing steps. Even though the “getting started” spec is broad, it reinforces a pattern I see daily: you need to design with platform constraints in mind, not assume real-time data propagation everywhere. This aligns with how Marketing Cloud platform capabilities and integration boundaries influence implementation.

Practical implication: If your personalization depends on data arriving “later,” do not rely on the entry DE snapshot alone. Add a lookup at send time (AMPscript/SSJS) or redesign to update a canonical attribute store before the journey step.

Entry settings control throughput and contact behavior more than most teams realize

If you have ever watched a journey “slow down” under load, it is usually not magic. It is configuration and processing behavior: entry scheduling, filter evaluation, and how frequently Journey Builder can pick up new entrants from that source.

When I’m debugging this, I often confirm:

  • Is the journey set to allow re-entry, and under what rule?
  • Is the entry source injecting continuously or in scheduled batches?
  • Is the entry filter doing heavy evaluation against large data sets?

If you need deeper troubleshooting patterns and real-world gotchas, the community threads tagged for Journey Builder are often where edge cases appear first. You will find a steady stream of problems around exits, re-entry, and activity behavior in real-world Journey Builder troubleshooting threads and edge cases.

Activities: what Journey Builder is doing step-by-step

Message activities: email is “easy” until personalization gets heavy

Sending an email from a journey is straightforward until you need dynamic content at scale. At that point, you run into a practical limit: AMPscript is great, but not always enough for complex, multi-row, multi-lookup scenarios.

A pattern that consistently helps is moving heavier logic into SSJS where needed, especially when you need iterative processing, advanced branching, or more control over data structures. MartechNotes captures this reality well, describing situations where AMPscript alone becomes unwieldy and JavaScript becomes the practical workaround for heavy personalization. That maps closely to what I typically do when a message needs complex transformations at render time: using server-side JavaScript to handle heavy email personalization when AMPscript gets strained.

Practical implication: Treat email rendering like an execution environment. Keep AMPscript readable for simple lookups and formatting. Use SSJS for heavier computation, but be disciplined about performance.

Decision splits: data access rules decide what’s “true”

Engagement splits and decision splits feel deterministic, but they are only as good as the data they can see at that moment. If you evaluate against a Data Extension that is being refreshed asynchronously, you can accidentally route contacts down the wrong path.

In my experience, when teams complain that splits are “random,” the root cause is almost always data freshness or inconsistent joins across DEs. That is why I like designing splits around stable attributes (contact flags, lifecycle status) instead of volatile transactional tables when possible.

Data: the real engine behind reliable journeys

Query Activities and SQL: how most serious journeys stay sane

Once your journey is more than a small nurture, you usually need SQL Query Activities to standardize data, dedupe, and create clean “audience slices” for entry or for branching.

MartechNotes’ SQL examples are practical because they focus on patterns you actually use in SFMC: deduplication with window functions, filtering recent records, and building segment DEs designed for automation. Those patterns are often what separates a journey that “mostly works” from one you can operate confidently. You can see that in practical SQL patterns for building audience segments and clean Data Extensions in Marketing Cloud.

Practical implication: I try not to make Journey Builder do complex segmentation live on the canvas. I precompute segments with SQL so the journey runs on clean inputs.

SSJS and AMPscript for Data Extension lookups: the send-time rescue kit

When the journey needs a value at the exact moment of send (and you cannot trust the entry snapshot), I use send-time lookups.

MartechNotes walks through ways to query Data Extensions via SSJS and AMPscript, which is exactly what you need when a journey email must pull the latest preferences, the most recent order, or a derived value not stored on the entry DE. That approach is reflected in practical techniques to query Data Extensions from SSJS and AMPscript at runtime.

Here’s a basic, real-world pattern I’ve used inside a journey email to fetch the latest row for a contact from a DE (simple example, but operationally useful):

If you need to blend SSJS and AMPscript (for example, you want SSJS to compute something but still reuse AMPscript functions), a workable approach is calling AMPscript from SSJS rather than rewriting everything twice. MartechNotes demonstrates that interoperability pattern in how to invoke AMPscript functions within SSJS for flexible runtime logic.

Journey Builder and APIs: event-driven orchestration beyond the UI

The Journey Builder API is how “real-time” journeys usually happen

When teams want a journey to start the moment an event happens in another system (purchase, ticket created, app action), the UI entry sources can be limiting. That’s where the Journey Builder API becomes the practical bridge.

Salesforce’s developer documentation describes the Journey Builder API as the programmatic layer for interacting with journeys, including triggering entry events and managing journey assets. In real builds, this is how you wire an external system to inject contacts with context and keep the journey aligned with real customer behavior. That capability is laid out in how the Journey Builder API supports programmatic event injection and journey interactions.

Practical implication: If you are serious about event-driven marketing, you plan for API injection, retries, and observability (logging), not just the canvas design.

Personalization strategy inside journeys: keep it modular or it will collapse

Automation plus personalization is where Journey Builder shines, but it needs guardrails

Personalization gets described as “add the first name.” In practice, the valuable stuff is rules-based and lifecycle-aware: different content, timing, and next best action depending on customer state.

MartechNotes’ perspective on personalization with marketing automation emphasizes that personalization is most effective when it is operationalized through automation rules and reliable data inputs, not one-off clever scripts. That matches what I typically see: the best journeys treat personalization as a system, not a template trick. That approach is captured in how marketing automation turns personalization into repeatable rules and customer-state driven messaging.

Practical implementation guardrails I use:

  • Keep “decisioning” fields in a canonical DE (or synchronized source) so splits and content reference the same truth.
  • Precompute complex classifications (SQL) instead of computing inside every email.
  • Use SSJS sparingly and profile performance when scaling.

Operational reality: what people actually struggle with (and how I handle it)

Common production issues you should expect

If you want a journey that survives contact volume spikes, data delays, and inevitable mid-campaign changes, design for the problems you will eventually hit. The fastest way to get honest signals is to read what practitioners complain about.

A surprisingly useful pulse check is scanning community chatter for recurring Journey Builder pain points like re-entry confusion, exit criteria, and activity limits. Reddit threads can be messy, but the repeated themes are often real. You can see that practitioner noise and recurring operational issues in community discussions highlighting recurring Journey Builder implementation pain points.

My go-to fixes and patterns:

  • Re-entry confusion: enforce a single “eligibility” DE that only includes contacts who should enter now, and rebuild that DE daily/hourly via SQL.
  • Wrong split outcomes: validate the exact DE and field the split reads, then confirm the update timing relative to the contact reaching the split.
  • Personalization failures: add default values and fallbacks everywhere. Your email should still render even when lookups return nothing.

A practical build blueprint I’ve used for reliable journeys

H3) Step 1: Prepare audience and state tables
  • A “Journey_Eligibility” DE (one row per ContactKey) that controls entry.
  • A “Customer_State” DE updated by SQL, used by splits and content.
H3) Step 2: Build the journey around stable states
  • Entry: “Journey_Eligibility” DE.
  • First wait: short buffer if upstream updates run close to injection.
  • Split: check “Customer_State” flags (stable, computed fields).
  • Email: use minimal send-time lookups for truly dynamic last-mile values.
H3) Step 3: Use API entry for true events
  • Purchases, app actions, support events: inject through the API.
  • Store event payload essentials in an Event DE keyed by ContactKey + EventId for traceability.

This structure keeps Journey Builder doing what it is best at: orchestrating steps. It also keeps segmentation, classification, and heavy logic out of the canvas, where debugging is slower and operational risk is higher.

Exit criteria and goals

Marcel Szimonisz
Table of contents: Journey builder

I might be really slow learning but I learned about this feature two years into working with salesforce marketing cloud, and I said to myself what a nice feature to have. Let me tell you what it is and give you some real life examples when to use it.

Exit criteria and goals share a common objective—they both work to remove contacts from a journey when specific criteria are met. However, there is a fundamental distinction between the two.

Goals: Goals allow you to establish the purpose of your journey and the specific objectives you aim to achieve. When these objectives are met, they contribute to your journey’s goals and are counted as such.

Exit criteria: Are also captured and you can see them in the  in the Health Stats panel on a running journey.

GOOD TO KNOW:
When both exit criteria and goals are configured in a customer journey, it’s important to note that goals are evaluated first. In other words, the system will check whether the goals you’ve set have been achieved before considering the exit criteria for removing contacts from the journey. This ensures that goal achievements take precedence in determining the journey’s progress and the fate of contacts within it.

Both exit criteria and goals are evaluated after the contact leaves the wait activity. This means that if your journey has a wait activity set to 15 days, and any of the contacts have already met the exit or goal criteria, they will be removed from the journey after they exit the wait activity.

How to work with exit criterias / journey goals

Journey criteria can be found on the administration panel of each journey and can be set / removed or changed per each journey version separatelly.

In journeys, you have the capability to work with two types of data:

  • Journey Data: This refers to data that enters the journey alongside the contact. These data points remain constant throughout the entire duration of the contact’s journey. They provide a fixed reference point for the journey’s operations.
  • Account Data: Account data is dynamic and can be refreshed at any point during the contact’s journey. This allows you to access the most up-to-date information about the contact’s status or attributes. To achieve this, you simply need to link a data extension in the attribute groups, ensuring that you have real-time access to the contact’s current state.

This fact makes it obvious that, for a contact to be removed from the journey, we need to utilize account data. Account data consists of sendable data extensions that have been linked in Contact Builder’s Attribute Groups. Don’t worry; it’s not complex at all. Simply create a new attribute group and link your data extension to the contact key. Additionally, consider the reusability aspect while setting this up.

For instance, you can collect form captures from all lead-capturing cloud pages or add data to the contact segmentation table. Avoid creating an attribute group that will be used only for a one-off activity.

Scenarios

We have a journey where our objective is to send reminders to:

  • Contacts who have not clicked on a specific call-to-action (CTA) or opened an email.
  • Contacts who have not submitted a specific form.
  • Contacts that purchased products in abandon basket journey.

We aim to conduct a thorough check of contact data before one or more multi-step journey sections are executed. This check involves:

  • Verifying marketing consent before sending them another email. If their marketing consent has changed, we may also consider sending them an SMS or push notification.
  • Evaluating whether they have received a certain email in the past.

Our ultimate goal is to remove contacts from the journey where they reached the goal or we no longer need them to continue the journey.

Tracking and reporting

Introduction to Data Views

Marcel Szimonisz
Table of contents: Tracking and reporting

Data Views in Salesforce Marketing Cloud Engagement are system-generated tables that expose email and automation tracking data for querying, troubleshooting, and reporting. If you are building dashboards, validating sends, debugging journeys, or trying to answer “who actually got what, when, and how did they interact?”, Data Views are usually the most reliable place to start because they reflect platform tracking events rather than whatever you happened to store in a Data Extension. In practice, they let you join “send context” (job, list, subscriber) with “behavior” (opens, clicks, bounces, unsubscribes) using SQL in Automation Studio, without needing to instrument custom logging.

What Data Views are (and what they are not)

Data Views are read-only system tables (exposed in SFMC SQL as names like `_Sent`, `_Open`, `_Click`, `_Bounce`, `_Unsubscribe`, etc.) designed for analysis. They are not Data Extensions, and you do not control their schema, retention, or refresh behavior. A practical way to frame them is: Data Extensions store the marketing data you model, while Data Views expose the behavioral exhaust the platform produces.

SalesforceBen’s breakdown is useful here because it calls out that these tables are primarily intended for querying tracking data and include common send and engagement objects such as sends, opens, clicks, bounces, and unsubscribes, which makes them ideal for building custom performance reporting beyond standard Tracking dashboards: how SFMC data views map to core tracking events like sends, opens, clicks, and bounces.

Why Data Views matter in real implementations

A common issue is assuming your audience table or sendable Data Extension tells the whole story. It rarely does. What typically happens is:

  • A record exists in your audience Data Extension, but the send failed for that subscriber.
  • A send occurred, but the contact changed attributes later, and you need the historical send context.
  • You need to reconcile Journey Builder outcomes with email engagement and find gaps.

Data Views help because the tracking record is generated by the platform as the message is processed and interacted with, so you can validate what happened even when your audience data changes.

Where Data Views fit in SFMC’s data model

Marketing Cloud’s core data concept is still “tables and relationships,” but SFMC splits responsibilities: you model audience and business data in Data Extensions, and you query system activity through Data Views.

Trailhead’s data management module reinforces this separation by emphasizing that Data Extensions are your primary storage for subscriber and business attributes while tracking and system datasets are queried differently for reporting and operational insights: how SFMC separates data extension storage from system and tracking data used for analysis.

Data Views vs Data Extensions: practical differences that change how you query

Data Extensions are configurable tables you own

From a platform behavior standpoint, Data Extensions are the “predictable” part of SFMC. You define fields, data types, primary keys, retention, and whether the table is sendable.

Salesforce’s developer documentation highlights that Data Extensions are table-like objects with defined fields and can be configured for sendability and relationships, which is why they are the right choice for durable customer attributes or campaign inputs, not behavioral tracking: how data extensions behave like configurable database tables with schema you control.

Data Views are fixed, read-only, and designed for tracking queries

You query Data Views like tables, but you cannot insert, update, or change them. You also need to design queries around platform constraints (for example, time windows, job-level identifiers, and the fact that tracking records can be event-based and high volume).

A practical implication: your reporting output almost always lands in a Data Extension you create, because Query Activities write results to Data Extensions even when the input comes from Data Views.

Common Data Views you will actually use (and what they’re good for)

Most day-to-day work uses a short list:

  • `_Sent`: the baseline “attempted send” log; use it as your denominator for engagement rates when you want control.
  • `_Open`: open events (be careful: opens are not the same as reads).
  • `_Click`: click events (often more trustworthy than opens for engagement).
  • `_Bounce`: bounce category and reasons.
  • `_Unsubscribe`: unsubscribe events at send context.
  • `_Job`: metadata about the send job (email name, send classification context, etc.).

There can be delays in data loading, especially in the _Click view. When working with this table, make sure to allow at least 72 hours after your send.

You will also see `_Subscribers` in many examples, but many implementations now anchor identity around Contact Key rather than Subscriber Key, so your join strategy matters.

Querying Data Views with SQL in Automation Studio

The normal workflow is:

  • Write a SQL Query Activity against Data Views (and sometimes against Data Extensions).
  • Write the output to a reporting Data Extension (overwrite or append).
  • Schedule in Automation Studio.

MartechNotes’ SQL examples are valuable because they reflect the patterns people actually run in SFMC Query Activities, including joins between tracking tables and audience tables to create consumable reporting datasets: real-world SFMC SQL patterns used to join tracking data to data extensions.

Example: building a “send to click” dataset you can report on

Below is a typical pattern: start from `_Sent` (so you keep non-openers/non-clickers), then left join `_Open` and `_Click` to derive flags and timestamps. Output to a Data Extension like `rpt_EmailEngagementDaily`.

SELECT
 s.JobID,
 s.SubscriberKey,
 s.EventDate AS SentDate,
 MIN(o.EventDate) AS FirstOpenDate,
 MIN(c.EventDate) AS FirstClickDate,
 CASE WHEN MIN(o.EventDate) IS NULL THEN 0 ELSE 1 END AS Opened,
 CASE WHEN MIN(c.EventDate) IS NULL THEN 0 ELSE 1 END AS Clicked
FROM _Sent s
LEFT JOIN _Open o
 ON o.JobID = s.JobID
 AND o.SubscriberKey = s.SubscriberKey
LEFT JOIN _Click c
 ON c.JobID = s.JobID
 AND c.SubscriberKey = s.SubscriberKey
WHERE s.EventDate >= DATEADD(day, -7, GETDATE())
GROUP BY
 s.JobID,
 s.SubscriberKey,
 s.EventDate

In practice, you’ll usually add `_Job` to attach email name or subject metadata, and you will constrain the date range aggressively to keep queries performant.

Retrieving data without SQL: SSJS, AMPscript, and why it matters

Data Views are queried via SQL in Query Activities, but sometimes you need retrieval at send time or in a custom process. That’s where Data Extension retrieval methods come in.

Salesforce’s docs describe how Data Extensions can be retrieved programmatically (for example, via WSProxy/SSJS patterns) which is useful when you need runtime lookups or operational scripts, but it also underscores a key limitation: this retrieval model is oriented around Data Extensions you control, not high-volume tracking tables designed for reporting: how SFMC supports programmatic retrieval patterns for data extensions in scripts.

MartechNotes shows how teams mix SQL for batch reporting with SSJS or AMPscript for targeted runtime lookups, which is often the real operational split: SQL for aggregations and tracking joins, script lookups for personalization and decisioning: practical patterns for mixing SQL with SSJS and AMPscript data extension lookups.

Identity and join keys: the hidden source of “wrong numbers”

Most “my open rate is wrong” troubleshooting ends up being a join problem.

SubscriberKey, ContactKey, JobID, and why you can’t guess

Data Views frequently key engagement by `SubscriberKey` and `JobID`. Your audience tables might be keyed by `ContactKey`, CRM ID, email address, or a composite. When those don’t align, joins silently drop rows, and your counts fall apart.

A practical workaround is normalizing to a consistent key in your reporting layer. If your source data does not share a stable ID, hashing can be used as a deterministic bridge.

MartechNotes’ hashing approach is useful because it focuses on generating consistent MD5 outputs across SFMC SQL and AMPscript, which helps when you need the same derived key in both batch queries and send-time logic: how to produce consistent MD5 hashes across SQL and AMPscript for stable join keys.

Data Views and personalization: where tracking data helps (and where it hurts)

Personalization often starts with profile attributes, but behavior is what makes it smarter. Data Views can feed behavioral segments like “clicked in last 14 days” or “no opens in 90 days,” which then get written into a segmentation Data Extension for targeting.

MartechNotes’ automation-focused personalization guidance aligns with what works in the field: personalization systems stay maintainable when you compute behavioral signals in automations and store them as simple flags or scores, rather than trying to do complex logic inside every email: why precomputing behavioral flags in automations scales better than complex per-email logic.

When AMPscript is not enough

When teams try to do heavy, conditional personalization at render time, email performance and maintainability can degrade fast. One common pattern is moving complex decisioning to server-side JavaScript where needed, but keeping the underlying “facts” (segments, eligibility, last engagement date) precomputed via SQL from Data Views.

MartechNotes captures that real constraint: AMPscript is great for straightforward dynamic content, but more complex logic often becomes clearer and more maintainable in JavaScript, especially when you combine it with prebuilt data sets coming out of automations: why heavy personalization logic often shifts from AMPscript to JavaScript for maintainability.

Troubleshooting and edge cases you’ll see in production

“My numbers don’t match the Tracking tab”

This is extremely common. The Tracking tab is a productized view with its own rules. Your SQL is rawer, and you control grouping, deduplication, and lookback windows. A tiny change (first open vs all opens) can create big deltas.

The quickest path is to define your metric rules explicitly: unique vs total events, time window, and what counts as the denominator (sent vs delivered).

“Query runs forever” or “data disappears”

Data Views can be large, and platform retention windows apply. You need tight `WHERE` clauses, indexed join paths where possible (typically on `JobID` and `SubscriberKey`), and reporting tables that store daily snapshots if you need longer history.

Stack Exchange threads on Data Views repeatedly surface the same practical debugging themes: retention limits, needing date filters, and confusion around which tracking view to use for a given metric, which mirrors what you see on real projects when reporting is built without explicit constraints: common production issues like retention, date filtering, and metric definitions when working with SFMC data views.

Reddit discussions add a more candid layer: teams often discover Data Views only after leadership asks for cross-journey reporting or deliverability troubleshooting, and the repeated advice is to treat Data Views as the source of truth for tracking, then persist what you need into your own reporting Data Extensions for stability: practitioner discussions on using data views as tracking truth and persisting rollups into reporting tables.

A practical implementation pattern that holds up

If you want Data Views to be useful long-term, the pattern that typically survives platform changes and reporting requests looks like this:

  • Daily extraction queries against Data Views with strict time windows. Do mind that there is delay in writing data into the data views (For some tables like _Click the delay we have seen surpassed 72 hours)
  • Write to curated reporting Data Extensions designed for consumption (job metadata, subscriber identity, derived flags).
  • Build segmentation on top of curated tables, not directly on Data Views.
  • Reconcile identities early (SubscriberKey vs ContactKey), and document your joins.
  • Keep send-time personalization lightweight by using precomputed fields where possible.

That setup prevents the usual pain: slow ad-hoc queries, inconsistent metrics, and last-minute reporting that breaks because the tracking window moved or identity keys drifted.

Reporting with Data Views

Marcel Szimonisz
Table of contents: Tracking and reporting

Using Data Views in Salesforce Marketing Cloud (SFMC) is the fastest way to build reliable reporting when you need answers the standard tracking UI cannot give you: send volumes by job, true delivered vs bounced, unique clicks by URL, subscriber-level engagement, and automation outcomes you can actually reconcile. Data Views are system tables you can query with SQL inside Automation Studio, so they let you turn raw event logs (sends, opens, clicks, bounces, unsubscribes) into dashboards, alerting, and campaign diagnostics without exporting files or guessing from aggregated summaries. Salesforce positions them as the primary way to access tracking and system data for analysis, with the key caveat that they are query-only objects designed for reporting, not storage or editing queryable system data views for tracking and system records.

What Data Views are (and why they matter for reporting)

Data Views vs Data Extensions: what changes in practice

A Data Extension is your managed table. You choose the schema, you load data, you can update it. Data Views are different: they expose SFMC’s internal tracking and operational data as read-only tables you can join into your queries. That distinction matters because reporting workloads often fail when teams try to “report off” marketing tables that were never designed to capture full event history.

The practical takeaway is that Data Views give you event-level truth, while Data Extensions typically hold business-level intent (audience lists, campaign attributes, preference centers). When you join the two, you can answer questions like “how did Segment A actually perform last Tuesday’s send?” without relying on UI rollups.

SalesforceBen’s breakdown is useful here because it highlights how teams commonly use Data Views to get beyond the Email Studio tracking screens, especially when you need job-level and subscriber-level detail rather than summaries how SFMC tracking data views unlock deeper reporting than the standard interface.

The internal tables you will query most

For campaign reporting, most implementations lean heavily on:

  • `_Sent` for send events
  • `_Open` for opens (and unique opens)
  • `_Click` for click events (and URLs)
  • `_Bounce` for bounce categories and codes
  • `_Unsubscribe` for opt-out events
  • `_Job` to tie events back to email name, subject, send classification, and more

A common issue is mixing grains. `_Job` is job-level. `_Click` is event-level. Your reporting gets weird fast if you do not define whether your output row represents a subscriber, a job, a subscriber-job pair, or a click event.

Where Data Views fit in the SFMC reporting toolchain

Query Activities and scheduled reporting outputs

In SFMC, the normal pattern is:

  • Write a SQL query against one or more Data Views (and optionally Data Extensions).
  • Output the results to a reporting Data Extension.
  • Schedule it in Automation Studio.
  • Feed that reporting DE into dashboards, extracts, or downstream systems.

Trailhead’s Data Management module reinforces this operational model: you typically build repeatable automations that refresh reporting tables on a cadence, rather than trying to “live query” everything from scratch in every dashboard pull how automation and structured tables support repeatable SFMC data operations.

When you should not rely on the Tracking UI

The UI is fine for basic “did it send” checks. It becomes limiting when you need:

  • Custom attribution logic (campaign + audience + creative)
  • Cross-journey comparisons
  • URL-level click reporting that matches how your links are actually constructed
  • Diagnostics (for example: “why did this segment bounce more?”)

This is exactly where Data Views are worth the effort.

Key nuances that impact accuracy

Retention windows and “why did my historical data disappear?”

Data Views are not a data warehouse. They are optimized for system operations and standard reporting, and some data is retained only for a limited time window. This is one of the most common reasons a report “worked last quarter” and now returns incomplete results.

In community troubleshooting, practitioners regularly flag that Data Views are internal and have platform-defined constraints, so long-term trending usually requires copying results into your own Data Extensions on a schedule why internal data views require you to plan for platform constraints like history retention.

Time zones and event timing

Event timestamps in tracking data can create off-by-one-day problems when your business reports by local time but tracking fields are stored differently. The fix is rarely glamorous: define a single reporting time zone and standardize how you transform timestamps before aggregating.

Deduplication: unique vs total metrics

Opens and clicks are event logs, not pre-aggregated metrics. If you want “unique clicks,” you typically dedupe by SubscriberKey + JobID (or SubscriberKey + JobID + URL depending on the question). If you want “total clicks,” you count rows.

This is why two reports can both be “correct” and still disagree, because they measure different grains.

Practical reporting patterns (with real SQL you can reuse)

Build a daily send-deliver-bounce report (job-level)

This produces a job-level table with sends and bounces for a date range. It is the kind of baseline report you can run daily and trust.

SELECT
 j.JobID,
 j.EmailName,
 j.EmailSubject,
 CAST(s.EventDate AS DATE) AS SendDate,
 COUNT(<em>) AS SentEvents,
 SUM(CASE WHEN b.JobID IS NULL THEN 1 ELSE 0 END) AS DeliveredEstimate,
 SUM(CASE WHEN b.JobID IS NOT NULL THEN 1 ELSE 0 END) AS BouncedEvents
FROM _Sent s
INNER JOIN _Job j
 ON j.JobID = s.JobID
LEFT JOIN _Bounce b
 ON b.JobID = s.JobID
 AND b.SubscriberKey = s.SubscriberKey
WHERE s.EventDate >= DATEADD(day, -7, GETDATE())
GROUP BY
 j.JobID,
 j.EmailName,
 j.EmailSubject,
 CAST(s.EventDate AS DATE)

This pattern maps to the same approach you see in many SFMC consultant “field query” libraries: join `_Sent` to `_Job`, then left join bounce data to separate delivered vs bounced counts practical SFMC SQL patterns built around _Sent, _Job, and tracking joins.

Implementation note: “DeliveredEstimate” here is simply Sent minus matched bounces. If you need stricter logic (for example, excluding suppressed), you will refine the joins and filters based on your send model.

Subscriber-level engagement table for BI tools

If you want Power BI or Tableau to slice engagement by audience attributes, you typically materialize a table like:

  • SubscriberKey
  • JobID
  • SendDate
  • OpenedFlag (0/1)
  • ClickedFlag (0/1)
  • UnsubFlag (0/1)

The trick is to reduce event logs to flags at the subscriber-job grain.

SELECT
 s.SubscriberKey,
 s.JobID,
 MIN(s.EventDate) AS FirstSendDate,
 CASE WHEN o.SubscriberKey IS NULL THEN 0 ELSE 1 END AS OpenedFlag,
 CASE WHEN c.SubscriberKey IS NULL THEN 0 ELSE 1 END AS ClickedFlag,
 CASE WHEN u.SubscriberKey IS NULL THEN 0 ELSE 1 END AS UnsubFlag
FROM _Sent s
LEFT JOIN (
 SELECT DISTINCT SubscriberKey, JobID
 FROM _Open
) o ON o.SubscriberKey = s.SubscriberKey AND o.JobID = s.JobID
LEFT JOIN (
 SELECT DISTINCT SubscriberKey, JobID
 FROM _Click
) c ON c.SubscriberKey = s.SubscriberKey AND c.JobID = s.JobID
LEFT JOIN (
 SELECT DISTINCT SubscriberKey, JobID
 FROM _Unsubscribe
) u ON u.SubscriberKey = s.SubscriberKey AND u.JobID = s.JobID
WHERE s.EventDate >= DATEADD(day, -30, GETDATE())
GROUP BY
 s.SubscriberKey,
 s.JobID,
 CASE WHEN o.SubscriberKey IS NULL THEN 0 ELSE 1 END,
 CASE WHEN c.SubscriberKey IS NULL THEN 0 ELSE 1 END,
 CASE WHEN u.SubscriberKey IS NULL THEN 0 ELSE 1 END

In practice, this “flattened engagement” output performs better for analytics tools than repeatedly querying raw event logs, and it keeps your BI layer simpler.

Joining Data Views to Data Extensions (the part that breaks most often)

Use Data Extensions for business context and filtering

Data Views tell you what happened. Data Extensions tell you who* that person is in your business model (segment, lifecycle stage, product, region). The common pattern is:

  • Query tracking events in Data Views
  • Join to a DE that contains the attributes you want to report by
  • Output to a reporting DE

Salesforce’s guidance on retrieving DE data emphasizes that DE access patterns depend on the API or query method you choose, and you need to align your approach with what the platform supports efficiently (for example, selecting specific columns rather than pulling everything) how to retrieve data extension records in a controlled, field-based way.

A reliable join key: SubscriberKey

If your DE is keyed by email address but your tracking uses SubscriberKey, you will get mismatches and “missing” engagement. A lot of teams only discover this when reports look suspiciously low.

Reporting on dynamic content and tracked links (AMPscript nuances)

Why click reporting can be wrong when links are built dynamically

What typically happens: an email uses AMPscript to build a URL, so the click report in the UI groups clicks under a tracking alias that does not match the final URL you expect to analyze. The fix is to explicitly control link tracking and parameters so that the recorded URL or alias is consistent.

A practical pattern is to structure tracked links so the variable parts are captured in query string parameters you can parse later, instead of letting every subscriber generate a “unique-looking” link that is hard to group. This aligns with the real-world behavior highlighted in guidance on tracking links built from AMPscript variables, where consistent tracking becomes a design decision, not an afterthought how dynamic AMPscript links can complicate click tracking and how to structure them for reporting.

When SQL is not enough: pulling reporting data with SSJS + AMPscript

Use server-side scripting for operational lookups and spot checks

SQL Query Activities are great for scheduled reporting tables. But sometimes you need to retrieve a few rows on demand (for example, “show me the last 10 transactions for this subscriber” inside a CloudPage) or to enrich logging during a send.

In those cases, SSJS and AMPscript can query Data Extensions directly and return results in real time, which is a different workflow than Data Views reporting. A practical walkthrough of querying DEs with scripting shows how teams use SSJS or AMPscript to fetch rows and handle them programmatically, which is useful when you need immediate output rather than an automated, scheduled table how SSJS and AMPscript retrieve data extension rows for real-time use.

Important boundary: Data Views are for reporting via SQL. If you need interactive page logic, you usually stage your reporting outputs into DEs and read from those.

Scaling personalization without breaking reporting

Heavy personalization often pushes teams toward more complex scripting, but it can also make reporting harder because content and links vary widely per subscriber. One practical mitigation is to log “which experience was shown” (variant IDs, content keys, offer codes) into a DE at send time or click time, so Data View events can be tied back to a consistent label.

This aligns with the reality that advanced personalization sometimes requires JavaScript to go beyond what AMPscript alone can comfortably handle, especially when logic becomes complex, but you still need structured identifiers for measurement how complex personalization often shifts to JavaScript and why measurement needs structured identifiers.

Common implementation pitfalls (and how to avoid them)

Pitfall: building reports straight from event logs forever

Event logs are great, but repeatedly aggregating large ranges is slow and fragile. The fix is to materialize reporting outputs daily (or hourly) into purpose-built DEs.

Pitfall: inconsistent campaign identifiers

If your email names, subjects, and UTM parameters are not standardized, your Data View reports will reflect that chaos. In practice, the most useful reporting improvement is often a naming convention and a “campaign dimension” DE that your SQL can join to.

Pitfall: treating Marketing Cloud reporting as separate from automation

Personalization and marketing automation are tightly coupled: segmentation logic, content decisions, and orchestration determine what gets sent, which then determines what you can measure. Practical automation guidance emphasizes building repeatable processes with clear data inputs and outputs, which is the same mindset that keeps Data View reporting stable as programs scale how automation-driven personalization depends on disciplined data inputs and repeatable processes.

Tracking Extract

Marcel Szimonisz
Table of contents: Tracking and reporting

Tracking Extract in Salesforce Marketing Cloud Engagement is the Automation Studio extract type for tracking data that turns engagement records into a file for reporting, transfer, or archiving. It matters when native tracking screens or SQL-only reporting are not enough – especially when another system needs the data on a schedule or when engagement history has to be stored outside the platform.

Tracking Extract is a file export, not a reporting view

Tracking Extract is best understood as a batch export mechanism. In practice, it sits in Automation Studio and produces a file that another step can move, ingest, or archive. That is very different from querying live reporting tables inside the platform.

Under the hood, Marketing Cloud exposes TrackingExtract as a dedicated extract object, which is why teams usually create it as a named, reusable configuration instead of treating it like a one-off report download. That design makes it workable for repeatable automations, but it also means file handling becomes part of the implementation.

How Tracking Extract actually runs in Automation Studio

The extract step is only part of the workflow

What typically happens is the tracking file is created first, with use of data extract activity, then a file transfer activity that moves output from Safehouse to Enhanced FTP makes it available for anything downstream. This is one of the most important real-world details. A lot of failed setups are not caused by the extract itself, but by missing the transfer step or pointing the next process to the wrong location.

Data extract activity setup for tracking extract

Because of that, Tracking Extract works best in scheduled, file-oriented processes. If the business wants a predictable handoff to a data warehouse, SFTP pickup, or archive process, the model fits well. If the business wants interactive reporting inside Marketing Cloud Engagement, it usually does not.

Naming and scheduling matter more than most teams expect

In practice, teams that standardize filenames, run order, and destination folders early have far fewer support issues later. A common issue is assuming the file will be available as soon as the extract starts. It will not. The extract has to finish, the transfer has to run, and only then can another system reliably pick it up.

Tracking Extract vs Data Views in Marketing Cloud Engagement

The closest internal alternative is working with system data views that expose tracking and subscriber data through SQL. Data views are better when the job is to filter, join, and transform data inside Marketing Cloud Engagement before writing the result to a standard data extension.

Tracking Extract is better when the desired output is a file from the start. That distinction sounds small, but it changes the whole implementation pattern. With data views, the logic usually lives in SQL. With Tracking Extract, the logic usually lives in automation sequencing and downstream file processing.

Another upside of tracking extract, it is the only place where you can find the link between campaign and send.

Link between campaign and send only available in trakcking extract
When data views are usually the better option

If the reporting requirement includes custom joins, subscriber-level filters, calculated fields, or business-rule enrichment, SQL against data views is normally easier. You can basically shape the dataset before anything leaves the platform.

When Tracking Extract is usually the better option

If another system expects delivered files, Tracking Extract is the more direct tool. It avoids the extra step of querying Marketing Cloud Engagement externally and makes the handoff predictable inside Automation Studio.

This is especially useful for historical archiving. In practice, many teams start with data views for operational reporting and move to Tracking Extract when retention, audit requirements, or warehouse ingestion become more important than in-platform analysis.

What Tracking Extract is good at

Tracking Extract works well when the goal is transport. It gives you a repeatable way to package tracking data and hand it to another system on a schedule.

Typical use cases include:

  • nightly engagement exports to a data warehouse
  • recurring archive files for governance or compliance
  • handoffs to reporting pipelines that already ingest files from FTP
  • separating operational reporting inside Marketing Cloud from long-term storage outside it

What typically happens in mature setups is a split model. Data views handle short-term querying and reporting logic inside the platform, while Tracking Extract handles delivery.

Where Tracking Extract becomes limiting

It does not replace SQL-based reporting

One limitation is that Tracking Extract is not built for data shaping. If the business needs a curated reporting table with custom logic, segmentation rules, or nontrivial joins, you usually still need SQL or external transformation after the file lands.

That is why Tracking Extract can feel blunt compared with data views. It solves the export problem well, but it does not solve modeling, cleansing, or enrichment on its own.

File behavior varies across extract types

A common issue is assuming every Automation Studio extract behaves the same once the file leaves the platform. There is a UTF-8 setting on Data Extension Extract activities for file output, which is a useful reminder that downstream file handling depends on the exact extract type and configuration being used. In practice, encoding, delimiters, and import expectations should be tested with the real downstream system, not assumed from another extract pattern.

It is not the right tool for custom table change capture

Tracking Extract is built for tracking data, not for detecting row-level changes in your own data extensions. If the actual requirement is extracting only changed rows from a data extension, that is a different extraction pattern entirely. Mixing those use cases is a common design mistake.

Send Log

Marcel Szimonisz
Table of contents: Tracking and reporting

Send log in Salesforce Marketing Cloud is a feature that allows you to track the delivery, open, click, and other engagement metrics for the emails that you send from your account. This feature helps you to gain insights into the performance of your email campaigns and optimize them for better results.

When you enable send log in Marketing Cloud, the system creates a record for each email sent from your account. This record includes information about the recipient, the sender, the date and time of the send, and other metadata. As the email is delivered and interacted with by the recipient, the system updates this record with engagement data, such as opens, clicks, bounces, and unsubscribes.

You can view send logs for individual sends or for a group of sends based on criteria such as date range, email name, or subscriber list. This data can help you to identify trends and patterns in your email engagement, and make informed decisions about your email marketing strategy.

Overall, send log is a useful feature in Salesforce Marketing Cloud that provides valuable insights into the effectiveness of your email campaigns and allows you to optimize them for better results.

What I did not know?

I was pleasantly surprised to discover that you can store automatically any data coming from source data extension or any AMPScript variable defined in the message content, and as well as any personalization strings.

For instance, if you wanted to add a subject line used for a message, you create a new column in the send log data extension and name it the same as the variable used to display subject line (i.e., “subjectline”).

Programing languages

SSJS (Server Side JavaScript)

Introduction to SSJS

Marcel Szimonisz
Table of contents: SSJS (Server Side JavaScript)

Server-side JavaScript (SSJS) in Salesforce Marketing Cloud Engagement is JavaScript that runs on Marketing Cloud servers before a page or response is sent, and it matters most in four jobs: processing form submissions, controlling CloudPage output, working with platform data, handling integrations or personalizing content that is sent to customers.

What is the difference between Core and Platform functions

When working with SSJS in Salesforce Marketing Cloud, you will likely use two sets of functions, Core and Platform, even without realizing the distinction.

Core and Platform functions are two ways to access Marketing Cloud Engagement features through SSJS. Their capabilities overlap. The main differences are how you load them, how you call them, and where Salesforce recommends using them.

Platform functions are available without loading the Core library and can be used in messages, CloudPages, and applications, depending on the function. For example, Platform.Function.InsertData() inserts rows into a data extension from a CloudPage.

Platform.Function.InsertData(
    "Contacts",
    ["EmailAddress"],
    ["alex@example.com"]
);

Core functions require you to load the library first using Platform.Load("core", "1");. They provide objects for working with Marketing Cloud data and features. For example, DataExtension.Init() connects your script to a data extension, and its Rows.Add() method adds records. Salesforce recommends using Core functions in landing pages and applications, while using Platform functions or AMPscript in emails.

Platform.Load("core", "1");

var de = DataExtension.Init("ContactsExternalKey");
de.Rows.Add({ EmailAddress: "alex@example.com" });

You can use both approaches in the same CloudPage. Keep the library loading and related code clearly organized so dependencies are easy to understand and maintain.

Which JavaScript Version Does Salesforce Marketing Cloud SSJS Support?

The biggest implementation detail is that SSJS follows an ECMAScript Third Edition syntax model inside server-side script tags. A common issue is pasting code from Node.js, browser tutorials, or modern frameworks and then hitting parser errors because the runtime is older and far less forgiving. If a snippet depends on newer JavaScript syntax, you should assume it needs to be rewritten or rewritten by using polyfill functions that will bring some of the newer ECMAScript functions like Array.prototype.find().

Where SSJS is useful in everyday Marketing Cloud Engagement work

Server-Side JavaScript (SSJS) is useful across messaging, CloudPages, and automations in Salesforce Marketing Cloud Engagement. It can personalize emails and SMS using functions supported by each channel, retrieve customer data, and apply conditional content. On CloudPages, it can process form submissions, update data extensions, and return content or redirect visitors. The available functions depend on where the script runs.

In Automation Studio, SSJS runs through Script Activities to process data, update salesforce objects, connect to external services, and automate recurring tasks. These scripts can also prepare data used to personalize communications across other marketing channels.

SSJS is also useful for administration and maintenance. Through API calls and tools such as WSProxy, a wrapper for the SOAP API, developers can retrieve platform metadata and create, update, or delete supported objects. This helps with bulk tasks where the interface offers limited options, reducing manual work and making repeated operations more consistent. WSProxy is available in contexts such as CloudPages and Script Activities, rather than during message sending.

Testing SSJS without slowing your development

A common issue is debugging SSJS that runs in an automation. The error message often provides little detail unless you use a proper try/catch block and save the error to a logging data extension. A cleaner approach is using a dedicated CloudPage to test SSJS and AMPscript snippets, because you can print intermediate values using Write function, pass controlled inputs, and isolate one block of logic at a time. That removes a lot of guesswork when the real problem is not the output itself but the request data, a Data Extension lookup, or a branch that is never being reached.

Security and access control have to happen before the page renders

Because CloudPages are public endpoints, access control needs to happen on the server. The safer pattern is validating access in SSJS before a CloudPage returns protected content, whether that check is based on a signed value, a session-driven rule, or another server-side condition. Rendering the page first and trying to hide content afterward is the kind of implementation that looks protected but still exposes the endpoint.

Session handling is useful, but only if the page logic respects it

Session-aware pages are one of the reasons SSJS matters in Marketing Cloud Engagement. A common issue is treating a CloudPage like a static landing page even when it is acting more like an application endpoint. Once the page starts managing identity, gated content, or sensitive form flows, server-side validation needs to happen consistently on every request, not only on the first load.

JavaScript in Marketing Cloud

Marcel Szimonisz
Table of contents: SSJS (Server Side JavaScript)

Salesforce Marketing Cloud uses JavaScript where a advanced customization is needed e.g. automations, cloud pages and even in message personalization.

Last time we discussed how to JavaScript in Adobe Campaign, we discovered that it utilizes an older version of ECMAScript. However, it’s worth noting that Salesforce Marketing Cloud (SFMC) goes even further back and employs ECMAScript 3 (ES3), which dates back to 1999. SFMC uses a customized version of the Rhino JavaScript engine. Although based on ES3 specifications, SFMC’s version of Rhino has likely been tailored and modified by Salesforce to suit the platform’s specific requirements and functionality. For example ES3 does not have native JSON.parse() or JSON.stringify() functions and you have to use platform functions.

<script runat="server">
     var str = '{ "prop1": "propVal" }';
     var obj = Platform.Function.ParseJSON(str);
     var val = obj.prop1;
     Platform.Function.Write(Platform.Function.Stringify(obj));
</script>

It is important to consult Salesforce’s official documentation, resources, and examples to ensure compatibility and adhere to the syntax and best practices provided for SSJS development within the SFMC environment.

ES3 compared to ES5

We learnt that ES5 does not have fancy arrow functions, spreading, object decomposing and many more. What can be even worse than that? In ES3 we do not have functions like Array.map() or Arary.filter() and to do any operation with Arrays we have to do good old for loop. For traversing objects we need to bring ES5 Object.keys() polyfil function and many more.

The transition from ECMAScript 3 (ES3) to ECMAScript 5 (ES5) introduced several significant changes and improvements to the JavaScript language. Some of the major differences between ES3 and ES5 include:

  1. Strict Mode: ES5 introduced strict mode, which enables a stricter set of rules for JavaScript code, helping to eliminate common mistakes and improve code quality.
  2. JSON Support: ES5 standardized the JSON object, providing built-in methods for parsing JSON strings and serializing JavaScript objects to JSON format.
  3. Array Methods: ES5 introduced several new methods for working with arrays, such as forEach(), map(), filter(), reduce(), and indexOf(). These methods provide a more concise and expressive way to manipulate arrays.
  4. Function Enhancements: ES5 introduced new methods for functions, including bind(), call(), and apply(), which allow explicit control over function execution context and arguments.
  5. Object Enhancements: ES5 introduced new methods for objects, such as Object.create(), Object.defineProperty(), and Object.keys(), which provide more flexible object creation and property manipulation capabilities.
  6. StrictEquality Operator: ES5 introduced the === and !== strict equality operators, which perform a strict type and value comparison, eliminating type coercion in equality comparisons.

These are just some of the major differences between ES3 and ES5. It’s worth noting that ES5 was a significant step forward in the evolution of JavaScript and brought several important language improvements, enhancing the overall developer experience and enabling more sophisticated programming techniques.

Polyfills

We can use polyfills that provide the implementation of a specific feature or functionality in an older or less capable environment. It allows developers to use modern or advanced language features in older browsers or environments that do not natively support those features.

While there aren’t many dedicated polyfill libraries specifically targeting ES3, there are utility libraries and toolkits that can provide additional functionality or compatibility in ES3 environments. Here are a few options you can explore:

  1. Underscore.js: Underscore.js (https://underscorejs.org/) is a popular utility library that provides a wide range of functions to assist with common programming tasks. It is compatible with ES3 and can be used to enhance your ES3 codebase with useful utility functions.
  2. Lodash: Lodash (https://lodash.com/) is a modern JavaScript utility library that offers a collection of helper functions. Although it is designed for newer versions of JavaScript, it also provides an ES3-compatible build that you can use in ES3 environments.
  3. Modernizr: Modernizr (https://modernizr.com/) is a feature detection library that allows you to check for browser support of specific JavaScript features. While its main purpose is feature detection, it can be used to conditionally load polyfills or alternative code paths in ES3 environments based on feature availability.
  4. ES5-Shim: ES5-Shim (https://github.com/es-shims/es5-shim) is a popular library that provides polyfills for various ES5 features in older browsers or environments. While it primarily targets ES5 compatibility in ES3 environments, some of its features may require ES5 support.

It’s important to note that these libraries provide additional functionality but may not fully polyfill all ES5 or newer features in an ES3 environment. Additionally, ensure compatibility and test thoroughly when incorporating any library or polyfill into your codebase.

WSproxy

Marcel Szimonisz
Table of contents: SSJS (Server Side JavaScript)

WSProxy in Salesforce Marketing Cloud Engagement is a native server-side JavaScript wrapper around the SOAP API that supports retrieve, create, update, delete, and perform calls with less overhead. In practice, it matters because it turns repetitive platform administration into manageable SSJS instead of hand-built SOAP requests or bulky helper patterns.

What WSProxy actually does

You use WSProxy by instantiating the proxy and calling methods like `retrieve()`, `getNextBatch()`, `createItem()`, `updateItem()`, `deleteItem()`, and `performItem()`, with response details such as `Results`, `RequestID`, and `HasMoreRows`. What typically happens is that scripts become easier to read and debug because the request pattern stays familiar, even when the underlying object changes.

Why WSProxy shows up so often in real Marketing Cloud work

The range of SSJS examples that use WSProxy for retrieval, setup, and maintenance tasks shows its real role inside Salesforce Marketing Cloud Engagement: it is not just for data lookups. In practice, it becomes the practical option when you need to work with platform objects that are cumbersome to manage manually or require SOAP-level access.

Bulk provisioning of configuration objects

A clear example is building SQL Query Activities in bulk by creating `QueryDefinition` objects through SSJS. What typically happens in larger implementations is that the work is not conceptually difficult, just repetitive. WSProxy turns that repetition into a controlled script, which is much easier to standardize than creating large numbers of nearly identical query activities by hand.

Cleanup and destructive admin tasks

The same approach applies to maintenance. A WSProxy-based deletion pattern for data extensions shows that WSProxy can handle cleanup operations as well as creation and retrieval. In practice, this is where discipline matters most – a common issue is treating delete logic like a casual utility when it really needs exact identifiers and tight scope control.

Between those two use cases, the platform behavior difference is clear. Creating a query activity means sending a configuration payload for a setup object. Deleting a data extension means locating an existing object correctly before issuing a destructive call. WSProxy hides some of the SOAP complexity, but it does not make all object types behave the same way.

How `retrieve()` works in practice

Most teams first encounter WSProxy through retrieval scripts. The standard retrieve pattern accepts an object type, an array of properties, an optional filter, and optional settings such as `BatchSize` and `QueryAllAccounts`. In practice, those extra parameters are not minor details. They affect how much data comes back, how broad the search is, and how much extra looping or filtering your script will need later.

Retrieval is usually iterative, not one-and-done

A common issue is assuming a single retrieve call will always be enough. The volume of community troubleshooting around paging, batch handling, filters, and object-specific WSProxy errors shows the opposite. What typically happens is that a simple test works fine on a small result set, then production scripts need additional handling for pagination, larger batches, or unexpected object behavior.

Where WSProxy gets tricky

One limitation is that WSProxy looks consistent at the method level but not always at the filter or object level. Practical testing documented in real-world notes on WSProxy retrieve filter limitations shows why this matters: filters that appear valid can still behave unexpectedly, and the same approach does not always translate cleanly from one object to another. In practice, the safest pattern is to test the exact filter against the exact SOAP object before you rely on it in automation.

Something to remember when retrieving any object with WSProxy:

  • Not all filter operations are supported for all object always verify with documentation. This can vary object to object
  • Not all columns described in the object are retrievable
  • You can retrieve 2500 rows in one call

Advanced retrieve with WSProxy getting query definitions

<script runat="server">
    Platform.Load("Core","1");
    var prox = new Script.Util.WSProxy(),
        objectType = "QueryDefinition",
        cols = ["Name", "CustomerKey","CreatedDate","ObjectID","QueryText","ModifiedDate","Status","TargetType","TargetUpdateType","DataExtensionTarget.Name"], // Adjusted properties relevant to QueryDefinition
        moreData = true,
        reqID = null,
        numItems = 0, 
        results=[];

    while(moreData) {
        moreData = false;
        var data = reqID == null ?
            prox.retrieve(objectType, cols) :
            prox.getNextBatch(objectType, reqID);

        if(data != null) {
            moreData = data.HasMoreRows;
            reqID = data.RequestID;
            if(data && data.Results) {
                for(var i=0; i < data.Results.length; i++) {
                    // Example of logging the query definition details
                    var result = data.Results[i];
                    Platform.Function.UpsertData( 
                        "query_definitions",
                        ['Name','CustomerKey','ObjectID'],
                        [result.Name,result.CustomerKey,result.ObjectID],
                        ['CreatedDate','ModifiedDate','QueryText','Status','TargetType','TargetUpdateType','DataExtensionTarget','Client','CategoryID','Description'],
                        [result.CreatedDate,result.ModifiedDate,result.QueryText,result.Status,result.TargetType,result.TargetUpdateType,result.DataExtensionTarget.Name,result.Client, result.CategoryID, result.Description]
                    );
                }
            }
        }
    }
</script>
The method names stay the same, but the payloads do not

That inconsistency is what catches teams off guard. `retrieve()` is always called `retrieve()`, but the field names, supported filters, and response handling can shift depending on whether you are working with metadata, rows, or configuration objects. What typically happens is that developers standardize on the syntax quickly, then spend the real effort learning each object’s quirks.

When WSProxy is the right tool

WSProxy is usually the right choice when the task is server-side, SOAP-backed, and repetitive. Looking up object metadata, provisioning assets, updating configuration, and cleaning up older objects all fit that pattern well. The more your work resembles platform administration instead of simple row-level scripting, the more useful WSProxy tends to become.

The trade-off is predictability. WSProxy simplifies the call structure, but it does not eliminate pagination, filter edge cases, or object-specific behavior. In practice, the best results come from narrow retrieves, careful identifier handling, and testing against the exact object model you plan to automate.

Create data extensions with SSJS

Marcel Szimonisz
Table of contents: SSJS (Server Side JavaScript)

Imagine you need to create a lot of data extensions. Let’s not overcomplicate things and just say we will have the same fields added to all of them. What is the number of data extensions you’d be willing to create manually? Or, where is the line where you’d say, “I’d better let a script do it, or else I’ll definitely get carpal tunnel from doing this”?

For me, the number is definitely above 10. But in this case, it doesn’t matter because the number of data extensions I needed to create was close to 800. That’s a number nobody—especially with a user-friendly interface like Marketing Cloud—wants to handle manually by copying.

Preparation

Here are some things we need to prepare beforehand. How do we name the data extensions we create in bulk? Should we organize them by country or use another naming pattern? It’s important to get that sorted first. Also, for future reference, such as when referencing a data extension in a query definition, it’s a good idea to make the customer key and name something we can easily reference them anywhere using our predefined pattern.

For our example we will start of the script for creating data extension using SSJS. And use WS proxy as that is our go to function to basically do anything advanced in Marketing Cloud Engagement. WS proxy is a wrapper to

Script
<script runat="server">

    Platform.Load("core", "1");

    var api = new Script.Util.WSProxy();
	
	try {

        api.setClientId({"ID": Platform.Function.AuthenticatedMemberID()});

        var fields = [
            {
                "Name": "SubscriberKey",
                "FieldType": "Text",
                "MaxLength": 50,
                "IsPrimaryKey": true,
                "IsRequired" : true
            },
            {
                "Name": "FirstName",
                "FieldType": "Text",
                "MaxLength": 50
            },
            {
                "Name": "LastName",
                "FieldType": "Text",
                "MaxLength": 80
            }, 
            {
                "Name": "EmailAddress",
                "FieldType": "EmailAddress"
            }
        ];

        var config = {
            "CustomerKey": GUID(),
            "Name": "MyDataExtension",
            "CategoryID": 1234,
            "Fields": fields,
            "SendableDataExtensionField": { 
                "Name" : "SubscriberKey", 
                "FieldType" : "Text" 
            }, 
            "SendableSubscriberField": {
                "Name": "Subscriber Key"
            },
            "IsSendable": true,
            "IsTestable": true,
            "DataRetentionPeriodLength": 7,
            "DataRetentionPeriod": "Days",
            "RowBasedRetention": 0,
            "ResetRetentionPeriodOnImport": 1,
            "DeleteAtEndOfRetentionPeriod": 0
        };

        var result = api.createItem("DataExtension", config); 

        Write(Stringify(result));
		
	} catch(error) {
        Write(Stringify(error));
    }	

</script>
Detailed script explanation

Platform.Load(“core”, “1”): This loads the core SSJS library in Marketing Cloud, which is necessary for executing functions like Platform.Function.AuthenticatedMemberID().

WSProxy: var api = new Script.Util.WSProxy(); initializes the WSProxy object. WSProxy is a more efficient and simplified way of interacting with the SOAP API in Marketing Cloud. It wraps around SOAP methods to make it easier to perform tasks like creating or updating data extensions, subscribers, etc.

api.setClientId(): This line sets the client context, using the AuthenticatedMemberID to ensure the script operates under the correct business unit.

Field Definitions (fields array): The fields array defines the structure of each data extension. In this example:

  • "SubscriberKey" is a text field, primary key, and required.
  • "DateAdded" is a date field, optional.
  • "EmailAddress" is an email field.

You can add more fields here if needed for your specific DE structure.

Settings (settings array): The settings array contains multiple configurations for creating different sets of data extensions. Each setting has:

  • "namePrefix": A prefix (like “AA”, “BB”, etc.) that will be part of the DE name.
  • "folderId": The ID of the folder where the data extensions will be created.

getCombinedNames Function: This function generates the names of the data extensions by combining the namePrefix (from settings) with a list of commonNames (like “DD”, “EE”, etc.). For example, if the prefix is “AA”, the resulting DE names will be ["AA_DD", "AA_EE", "AA_GG", "AA_LL"].

Main Loop: There are two nested loops:

  • Outer loop (for (var j = 0; j < settings.length; j++)) goes through each configuration in settings. For example, it first uses the namePrefix “AA” and folderId 581025.
  • Inner loop (for (var i = 0; i < dataExtensions.length; i++)) iterates over the combined names generated by getCombinedNames. For each combination, a new DE is created.

Creating Data Extensions: For each combination, a config object is created, which defines how the data extension should be configured:

  • CustomerKey: A unique key for each data extension, generated by taking the MD5 hash of the DE name and truncating it to 36 characters.
  • Name: The actual name of the DE.
  • Fields: The field structure (from the fields array).
  • CategoryID: The folder ID where the DE will be stored.
  • IsSendable: true means the DE is sendable (you can send emails using this DE).
  • SendableDataExtensionField and SendableSubscriberField: These fields define how the sendable relationship is set up, using the “SubscriberKey” field.

Result Handling:

  • api.createItem("DataExtension", config) makes the SOAP API call to create the DE using the WSProxy method.
  • If the creation is successful (result.Status == "OK"), it writes a success message (Data Extension created: [name]).
  • If there’s an error, it writes a failure message and could log the error for further inspection.

Error Handling: The entire operation is wrapped in a try-catch block to handle any exceptions. If something goes wrong (e.g., an invalid configuration), the error is caught and displayed using Write(Stringify(e)).

How to find folder id in marketing cloud engagement?

You may be wondering how to find the folder ID. There’s no ID visible in the UI interface, and to find one, you need to either hover over the folder to see the ID in the link, or inspect the page and check the HTML element. It couldn’t be more confusing, but you need to look for the “categoryId.”

Hover over folder

This works in Email Studio, and when you hover over the folder, the category ID will be displayed where the URL shows in the browser.

Hover over folder to see data extension folder id. Look for category id.
Inspect element to find folder id

This works in both Email Studio and Contact Builder, but Contact Builder is less hassle. Email Studio captures right-click to display an additional menu for the data extension navigation tree, making it a bit more cumbersome.

Right-click on any folder and select Inspect from the menu to open the inspector tool. The folder ID should be visible right away, next to the label, as an attribute called id on the span element.

Securing SFMC Cloud Pages with SSJS

Filip Boštík
Table of contents: SSJS (Server Side JavaScript)

In Salesforce Marketing Cloud (SFMC), Cloud Pages are commonly used for developing and testing scripts. But once these pages are published, they become accessible to anyone, which can pose a security threat if they contain sensitive info like API tokens or personal information.

Additionally, if Cloud Pages are used as HTML forms without proper security measures, they can be exploited by spammers. This article focuses on securing Cloud Pages for development and internal use, not on other technical aspects like SSL, HTML headers, logging or captcha.

Options

To mitigate these risks and bolster security, developers can implement various measures. These require a trade-off between security and convenience, as the more secure options often require additional steps both during development and during testing.

Another thing to consider is, that there are multiple scenarios to cover. From normal Cloud Page (forms & unsubcribe pages, MC Apps), Script Activities and Custom Cloud Page Resources APIs. Each of the following options is suitable for different scenarios.

IP Whitelisting

This is probably the easiest approach to securing Cloud Pages. By whitelisting the IP addresses of the developers, the pages can only be accessed from the specified IP addresses. Let’s take a look at how this can be implemented.

Proposed Data Extension
Name and Extension Key: `devIPWhitelist`
Fields:
– `IP` (Text, 15)
– `allowed` (Boolean)
– `description` (Text, 100)

<script runat=server language="JavaScript">
	Platform.Load("core", "1.1.1");

	var IP_WHITELIST_DE = "devIPWhitelist";

	try {
		// get user IP:
		var clientIp = Platform.Request.ClientIP;
		// check whitelist:
		var allowed = Platform.Function.Lookup("devIPWhitelist", 'ip', ['ip', 'allowed'], [clientIp, true]) ? true : false;
		// set allow or not:
		Platform.Variable.SetValue('allowed', allowed);
	} catch(err) {
		Write("An error has occurred: " + String(err));
		Platform.Variable.SetValue('allowed', false);
	}
</script>
%%[ IF @allowed == true THEN ]%%
	You are authenticated.
%%[ ELSE ]%%
	You are not authenticated.
%%[ ENDIF ]%%

As you can see, this is a simple and effective way to secure the pages, but lacks when the developers are changing the location often without using VPN. It can also be more difficult to implement in case of Cloud Page APIs as you need to implement whole API ranges of SFMC.

URL Token

This approach involves appending a randomly generated token to the URL, effectively creating a simplified authentication. This token can be checked against a stored value in the page to ensure that only authorised users can access the page.

<script runat=server language="JavaScript">
	Platform.Load("core", "1.1.1");

	var TOKEN = "9262b3d2-cb91-4c4a-aca2-6e9f7af8eeb4";

	try {
		// Get the token from the request:
		var allowed = Request.GetQueryStringParameter("dev-token") === TOKEN;
		// Set the allowed:
		Platform.Variable.SetValue('allowed', allowed);
	} catch(err) {
		Write("An error has occurred: " + String(err));
		Platform.Variable.SetValue('allowed', false);
	}
</script>
%%[ IF @allowed == true THEN ]%%
	You are authenticated.
%%[ ELSE ]%%
	You are not authenticated.
%%[ ENDIF ]%%

This is yet another effective way to secure the pages, but the token should be changed regularly to increase security. This is a great approach to use, if you want to handle your custom Cloud-page APIs, as you can switch the `Platform.Request.GetQueryStringParameter()` for `Platform.Request.GetRequestHeader()` and use it similar to API tokes. It becomes more complicated, once you start using this for multi-page forms as the token should be passed to all of the form pages.

Login Form

This approach requires users to authenticate themselves before accessing the page via a custom login form (similar to HTTP Basic Auth).

<script runat="server">
  Platform.Load("core","1.1.1");

  var AUTH_DEFAULT = 'user:my-password-123';

  function getAuthFormValues() {
    var username = Platform.Request.GetFormField('username');
    var password = Platform.Request.GetFormField('password');
    return username + ':' + password;
  }

	try {
    var allowed = getAuthFormValues() === AUTH_DEFAULT;
		Variable.SetValue("allowed", allowed);
  } catch(err) {
		Write("An error has occurred: " + String(err));
		Platform.Variable.SetValue('allowed', false);
  }
</script>
%%[ IF @allowed == true THEN ]%%
	You are authenticated.
%%[ ELSE ]%%
	<h2>Login:</h2>
	<form method="post">
		<div>
			<label for="username">Username:</label>
			<input type="text" id="username" name="username" required>
		</div>
		<div>
			<label for="password">Password:</label>
			<input type="password" id="password" name="password" required>
		</div>
		<div>
			<input type="submit" value="Login">
		</div>
	</form>
%%[ ENDIF ]%%

This is also a rather simple solution, but without storing the credentials in the page, it will require developers to enter the credentials with every new page open. While it’s rather simple and secure, without those additional steps it will get tedious. Also, SSJS does not seem to offer any function to work with session storage, so it would require using for example cookies. Use `Platform.Response.SetCookie()` & `Platform.Request.GetCookieValue()`, but do not forget to hash the secrets!

Server-to-Server login

You might be asking: “why I wouldn’t use SFMC API credentials to do the heavy-lifting?” And that’s exaclty this (and the next) method. When using this proposed method, you use the server-to-server credentials to validate requests. In the context of the custom APIs, you could handle this as:

1) Authenticate via SFMC Auth API: the process begins with authenticating through the SFMC Auth endpoint to obtain a Bearer token, which serves as the token for subsequent step.
2) Passing Token to Custom SFMC API: Once authenticated, the acquired token is transmitted as an Authentication Header in requests made to the custom SFMC API.
3) Token Validation Check: A critical step involves validating the received token by initiating a basic request, such as GET /platform/v1/configcontext, to confirm its authenticity and validity.
4) Authentication Handling: Based on the validation result, the system proceeds with the intended actions if the token is deemed valid; otherwise, it rejects unauthorized access attempts, safeguarding against potential security threats.

In following example, let’s take a look at steps 2-4:

<script runat=server language="JavaScript">
	Platform.Load("core", "1.1.1");

	var SFMC_SETUP = {
		// only the organization part of the api path ('https://{subdomain}.auth.marketingcloud.com)
		'subdomain': '{{MC_SUBDOMAIN}}'
	};

	var mcApiTest = {
		setup: function (token) {
			this.authUrl = 'https://' + SFMC_SETUP.subdomain + '.auth.marketingcloudapis.com';
			this.restUrl = 'https://' + SFMC_SETUP.subdomain + '.rest.marketingcloudapis.com';

			this.token = token;
		},

		request: function (httpMethod, path, body, urlParams, useAuthUrl) {
			var result = {
				'ok': false,
				'body': 'API request ' + path + ' failed.'
			};

			try {
				var u = useAuthUrl === true ? this.authUrl : this.restUrl;
				var requestUrl = this.buildUrl(u, path, urlParams, false);

				var req = new Script.Util.HttpRequest(requestUrl);
				req.emptyContentHandling = 0;
				req.retries = 2;
				req.continueOnError = true;
				req.contentType = "application/json";
				var token = 'Bearer ' + this.token;
				req.setHeader("Authorization", token);
				req.setHeader("Accept", "application/json");
				req.method = httpMethod;

				if (body !== undefined) {
					if (typeof (body) === 'string') {
						req.postData = body;
					} else {
						req.postData = Stringify(body);
					}
				}
				
				var httpResult = req.send();
				
				var status = Number(httpResult.statusCode);
				if (status == 200 || status == 201 || status == 202 || status == 204) {
					result.ok = true;
				}
				result.body = httpResult.content + '';
				result.status = status;
			} catch (err) {
				throw "Error in request(): " + err + " - message: " + err.message;
			}
			return result;
		},

		buildUrl: function (fqdn, path, params, encodeSpaces) {
			encodeSpaces = encodeSpaces === undefined ? true : encodeSpaces;
			if (!fqdn || !path) {
				throw 'BuildPath() missing fqdn or path.';
			}
			fqdn = fqdn.replace(//$/, '');
			path = path.replace(/^//, '');
			path = path.replace(//$/, '');
			var url = fqdn + '/' + path;
			if (params && Object.items(params).length > 0) {
					var list = [];
					for (var key in params) {
							list.push(key + '=' + params[key]);
					}
					url += '?' + list.join('&');
					url = Platform.Function.UrlEncode(url, encodeSpaces);
			}
			return url;
		}
	}

	var apiResult = {
		status: 500,
		'body': 'API request failed.'
	};
	try {
		// Get the token from the request:
		var tokenHeader = Platform.Request.GetRequestHeader('Authorization');
		if (tokenHeader) {
			var token = tokenHeader.split(' ')[1];
			// Test the token:
			mcApiTest.setup(token);
			var result = mcApiTest.request('GET', '/platform/v1/tokenContext');

			apiResult.status = result.ok ? 200 : 401;
			apiResult.body = result.body;
			if (result.ok) {
				// TODO: continue your logic here and return the result in the apiResult object:
				apiResult.body = 'Hello World!';
			}
		} else {
			// not allowed:
			apiResult.status = 401;
			apiResult.body = 'No token provided.';
		}
		Platform.Variable.SetValue('apiResult', Stringify(apiResult));
	} catch(err) {
		apiResult.body = String(err);
		Platform.Variable.SetValue('apiResult', Stringify(apiResult));
	}
</script>
%%=v(@apiResult)=%%

This method is well-suited for scenarios where server-to-server communication is involved like custom SFMC APIs. However, it may not be ideal for user logins due to potential issues with sharing of client credentials or the need for individual user Installed Packages. Additionally, it’s essential to note that while this approach handles authentication for REST API calls made behind the scenes, it may not address other security considerations such as package scopes. And it requires an additional API call (most of the time).

Web App

This approach requires users to authenticate themselves using the SFMC login and Web App API Credentials behind the scenes. Following code lets you set you handle the Web Auth within a single Cloud Page. You also will need to set up Web App Installed Package.

<script runat=server language="JavaScript">
	Platform.Load("core", "1.1.1");

	var SFMC_SETUP = {
		// only the organization part of the api path ('https://{subdomain}.auth.marketingcloud.com)
		'subdomain': '{{MC_SUBDOMAIN}}',
		'clientId': '{{WEB_APP_CLIENT_ID}}',
		'clientSecret': '{{WEB_APP_CLIENT_SECRET}}',
		'redirectUrl': '{{WEB_APP_REDIRECT_URL}}' // can be itself
	};

	// UTILITIES:
	if (!Object.items) {
		Object.items = function (obj) {
			var arr = [], key;
			for (key in obj) {
				if (obj.hasOwnProperty(key)) {
					arr.push(obj[key]);
				}
			}
			return arr;
		};
	}

	var mcWebApp = {
		credentials: {
			grant_type: 'authorization_code',
			client_id: '',
			client_secret: ''
		},

		setup: function (code) {
			this.authUrl = 'https://' + SFMC_SETUP.subdomain + '.auth.marketingcloudapis.com';
			this.restUrl = 'https://' + SFMC_SETUP.subdomain + '.rest.marketingcloudapis.com';

			this.credentials.client_id = SFMC_SETUP.clientId;
			this.credentials.client_secret = SFMC_SETUP.clientSecret;
			this.credentials.code = code;
			this.credentials.redirect_uri = SFMC_SETUP.redirectUrl;
			// get the token:
			if (code && !this.getToken(code)) {
				throw 'Marketing Cloud API token was not found.';
			}
		},

		getToken: function (code) {
			var loginUrl = this.authUrl + '/v2/token';
			var body = this.credentials;
			var result = false;

			var req = new Script.Util.HttpRequest(loginUrl);
			req.emptyContentHandling = 0;
			req.retries = 2;
			req.continueOnError = true;
			req.contentType = "application/json; charset=utf-8";
			req.method = "POST";
			req.postData = Stringify(body);

			var result = req.send();

			if (Number(result.statusCode) === 200) {
				var responseObj = Platform.Function.ParseJSON(result.content + '');
				this.token = responseObj['access_token'];
				return true;
			} else {
				throw 'API token not obtained: ' + result.statusCode + '.';
				return false;
			}
		},

		request: function (httpMethod, path, body, urlParams, useAuthUrl) {
			var result = {
				'ok': false,
				'body': 'API request ' + path + ' failed.'
			};

			try {
				var u = useAuthUrl === true ? this.authUrl : this.restUrl;
				var requestUrl = this.buildUrl(u, path, urlParams, false);

				var req = new Script.Util.HttpRequest(requestUrl);
				req.emptyContentHandling = 0;
				req.retries = 2;
				req.continueOnError = true;
				req.contentType = "application/json";
				var token = 'Bearer ' + this.token;
				req.setHeader("Authorization", token);
				req.setHeader("Accept", "application/json");
				req.method = httpMethod;

				if (body !== undefined) {
					if (typeof (body) === 'string') {
						req.postData = body;
					} else {
						req.postData = Stringify(body);
					}
				}
				
				var httpResult = req.send();
				
				var status = Number(httpResult.statusCode);
				if (status == 200 || status == 201 || status == 202 || status == 204) {
					result.ok = true;
				}
				result.body = httpResult.content + '';
				result.status = status;
			} catch (err) {
				throw "Error in request(): " + err + " - message: " + err.message;
			}
			return result;
		},

		redirectToAuth: function() {
			var url = this.authUrl + '/v2/authorize?response_type=code&client_id=' + this.credentials.client_id + '&redirect_uri=' + mcWebApp.credentials.redirect_uri;
			url = Platform.Function.UrlEncode(url);
			Platform.Response.Redirect(url);
		},

		buildUrl: function (fqdn, path, params, encodeSpaces) {
			encodeSpaces = encodeSpaces === undefined ? true : encodeSpaces;
			if (!fqdn || !path) {
				throw 'BuildPath() missing fqdn or path.';
			}
			fqdn = fqdn.replace(//$/, '');
			path = path.replace(/^//, '');
			path = path.replace(//$/, '');
			var url = fqdn + '/' + path;
			if (params && Object.items(params).length > 0) {
					var list = [];
					for (var key in params) {
							list.push(key + '=' + params[key]);
					}
					url += '?' + list.join('&');
					url = Platform.Function.UrlEncode(url, encodeSpaces);
			}
			return url;
		}
	}

	// AUTOMATION CODE:
	try {
		var code = Platform.Request.GetQueryStringParameter('code');
		
		if (code) {
			// verify code:
			mcWebApp.setup(code);
			/* *** APP LOGIC START *** */
			var body = undefined;
			var qParams = undefined;

			var res = mcWebApp.request('GET', '/v2/userinfo', body, undefined, true);

			if (res.ok) {
				var body = Platform.Function.ParseJSON(res.body);
				if (body && body.user && body.user.name) {
					Platform.Variable.SetValue('username', body.user.name);
				} else {
					Platform.Variable.SetValue('username', 'unknown');
				}
				Platform.Variable.SetValue('allowed', true);
			} else {
				throw "Error - API call failed:" + Stringify(res);
			}
			/* *** APP LOGIC END *** */
		} else {
			mcWebApp.setup();
			mcWebApp.redirectToAuth();
		}
	} catch (err) {
		Write("An error has occurred: " + String(err));
		Platform.Variable.SetValue('allowed', false);
	}
</script>
%%[ IF @allowed == true THEN ]%%
	You are authenticated as %%=v(@username)=%%.
%%[ ELSE ]%%
	You are not authenticated.
%%[ ENDIF ]%%

This is probably the most secure way to access the pages, but the login process is even more complicated to setup. Not to forget, that the auth code (query string code) is valid for much shorter time (and for a single login). It also requires the developers to have the Web App API credentials (and have those in the Cloud Page), which is not always practical.

A big advantage of this approach is, that the developers can use the same credentials as they use for the SFMC login and they do not need to remember another set of credentials for API calls. However, each user that needs to access such a page, needs to have SFMC user.

Conclusion

Each of these methods has its own advantages and disadvantages. Overall, the biggest trade-off is between security and convenience. The more secure options require additional steps during development and testing, which can be a hassle. However, the security they provide is invaluable, especially when dealing with sensitive data.

One more thing that we need to mention is, that the developers should not forget to remove the security measures from some of the production scripts, as they are not necessary there and can cause issues with the page functionality (script activities, subscriber forms, etc.).

If you want to secure your Dev Cloud Pages without the hassle of manually implementing these security measures, you can use the SSJS Manager VSCode extension. It provides a simple and effective way to secure your pages, and it also helps with the deployment of the pages. You also do not need to worry about leaving your security scripts within Script activities.

As of v0.3.7 it already supports tokenization and login forms, and future versions will include even more options for securing your pages. Plus, your development environment will be protected with automatic security patches for Dev Pages.

25 Salesforce Marketing Cloud SSJS examples

Marcel Szimonisz
Table of contents: SSJS (Server Side JavaScript)

If you have ever worked with Server-Side JavaScript (SSJS) in Salesforce Marketing Cloud, you already know two things, it’s incredibly powerful and at the same time full of limitations. I have curated 50 SSJS scripts that I have used at least once in a production environment. There is no specific order – I wrote them as they came to mind. The best way to read this article is to check the table of contents and find any example that interests you.

Read a query string parameters safely

When working with SSJS in Salesforce Marketing Cloud, you’ll often reach for:

Platform.Request.GetQueryStringParameter('id');

It works – but it’s not always safe or reliable in real-world scenarios, so let’s overengineer it a bit and wrap it in a function.

<script runat="server">
Platform.Load("Core","1");

// Function to safely get query string parameter
function getQueryParam(paramName, defaultValue) {
    try {
        var value = Platform.Request.GetQueryStringParameter(paramName);

        // Normalize
        if (value === null || value === undefined || value === '') {
            return defaultValue || '';
        }

        return String(value);
    } catch (e) {
        return 'Error: ' + String(e);
    }
}

try {
    var token = getQueryParam('token', ''),
         authorized = token === 'my-secret'
    if (!authorized) throw "Nothing to see here."
 
    //show secret content

} catch (e) {
    Platform.Response.Write('Error: ' + String(e));
}
</script>

This is the simplest form of protection for CloudPages. Without it, anyone can call your page and trigger logic (data lookups, inserts, API calls). Even a basic shared secret drastically reduces abuse.

Process form submission in cloud page

I have a confession – I’ve never used CloudPages Smart Capture. Since I wanted to be a developer, I skipped it entirely and went straight to AMPscript and SSJS for form submissions.

<!DOCTYPE html>
<html>
<head>
    <title>Signup Form</title>
</head>
<body>

<script runat="server">
Platform.Load("Core", "1.1.1");

var request = Platform.Request;
var errors = [];

// Email validation function
function isValidEmail(email) {

    var regex = /^[^\s@]+@[^\s@]+\.[^\s@]+$/;
    if (!regex.test(email)) return false;

    email = email.toLowerCase().trim();

    var blockedDomains = [
        "test.com",
        "example.com",
        "mailinator.com",
        "tempmail.com"
    ];

    var domain = email.split("@")[1];

    if (blockedDomains.indexOf(domain) > -1) return false;

    if (email.indexOf("asdf") > -1) return false;
    if (email.indexOf("test") === 0) return false;

    return true;
}

if (request.Method === "POST") {

    try {

        var email = request.GetFormField("email");
        var firstname = request.GetFormField("firstname");
        var country = request.GetFormField("country");

        // Validation
        if (!email) {
            errors.push("Email is required");
        } else if (!isValidEmail(email)) {
            errors.push("Invalid email address");
        }

        if (!country) {
            errors.push("Country is required");
        }

        // If no errors → insert + redirect
        if (errors.length === 0) {

            var result = Platform.Function.InsertData(
                "Form_Submissions",
                ["EmailAddress", "FirstName", "Country", "CreatedDate"],
                [email, firstname, country, Now()]
            );

            // Redirect to thank you page
            Platform.Response.Redirect(CloudPagesURL(3333));

        }

    } catch (e) {
        errors.push("Unexpected error occurred");
        //you can also log errors into data extension using logger function you can find it later in this article
        // and redirect to thank you page so the user experience is intact.
    }
}

if (errors.length > 0) {
    Write("<div style='color:red;'>");
    for (var i = 0; i < errors.length; i++) {
        Write("• " + errors[i] + "<br>");
    }
    Write("</div><br>");
}
</script>
<form method="POST" action="%%=RequestParameter('PAGEURL')=%%">
    <input type="hidden" name="submitted" value="true">

    <label>Email:</label><br>
    <input type="email" name="email"><br><br>

    <label>First Name:</label><br>
    <input type="text" name="firstname"><br><br>

    <label>Country:</label><br>
    <input type="text" name="country"><br><br>

    <button type="submit">Submit</button>
</form>

</body>
</html>
Retrieve Data Extension Rows

We have more than a handful of different ways to retrieve data from Data Extensions using SSJS. We will start with some very simple examples without filters and gradually move to more advanced ones that use complex filters and loops. The following lookup methods have a limitation of retrieving only the first 2,500 rows after filtering.

Rows.Retrieve
<script runat="server">
var de = DataExtension.Init("Master_DE");
var rows = de.Rows.Retrieve();
</script>
Rows.Lookup
<script runat="server">
var de = DataExtension.Init("Master_DE");
var rows = de.Rows.Lookup(["name","last_name"], ["John","Doe"],10,"name");
</script>

There are also Platform functions like Lookup, LookupRows, and others that you may have seen used in AMPscript.

Retrieve Data Extension Rows With Simple Filter

It’s really good practice to keep the Name and External Key the same when creating a Data Extension. This helps ensure you always use the correct identifier, since some functions use the Name while others rely on the External Key for data retrieval.

In the example below, DataExtension.Init uses the External Key.

<script runat="server">
var de = DataExtension.Init("Master_DE");
var rows = de.Rows.Retrieve({
  Property: "Email",
  SimpleOperator: "equals",
  Value: email
});
</script>

Supported operators:

  • equals
  • notEquals
  • greaterThan
  • lessThan
  • like
  • isNull
  • isNotNull
Retrieve Data Extension Rows With Advanced Filter

Usually, when we select anything from the database, we use filters. SSJS comes with various filtering methods, but it is not as advanced as having SQL at hand. The best practice is to complement SSJS with pre-made queries that run within automation.

<script runat="server">
var de = DataExtension.Init("Master_DE");
var rows = de.Rows.Retrieve({
  LeftOperand: {
    Property: "Country",
    SimpleOperator: "equals",
    Value: "DE"
  },
  LogicalOperator: "AND",
  RightOperand: {
    Property: "Status",
    SimpleOperator: "equals",
    Value: "Active"
  }
});
</script>

You can add even nested conditions but for some object not all operators are supported the best thing to do before you want to create any complex filter is to check object definition and if there are any limitations. For example automation object can only use in and equals. So any date filters wont work as expected

<script runat="server">
var de = DataExtension.Init("Master_DE");
var filter = {
  LeftOperand: {
    LeftOperand: {
      Property: "Country",
      SimpleOperator: "equals",
      Value: "DE"
    },
    LogicalOperator: "OR",
    RightOperand: {
      Property: "Country",
      SimpleOperator: "equals",
      Value: "AT"
    }
  },
  LogicalOperator: "AND",
  RightOperand: {
    Property: "Status",
    SimpleOperator: "equals",
    Value: "Active"
  }
};

var rows = de.Rows.Retrieve(filter);
</script>
Retrieve Data Extension Rows Using WSProxy
<script runat="server">
var api= new Script.Util.WSProxy();

var cols = ["Email", "FirstName"];

var res = api.retrieve(
  "DataExtensionObject[Master_DE]",
  cols
);

var rows = res.Results;
</script>
Advanced data retrieves with WSProxy

We can retrieve not only Data Extensions, but also many other SOAP service objects. In addition to retrieving data, we can also modify, add, or remove records, essentially performing full CRUD operations on these objects.

<script runat="server">
Platform.Load("core", "1");

var prox = new Script.Util.WSProxy();

// Object type for Automation Studio
var objectType = "Automation";

// Fields to retrieve
var cols = [
    "Name",
    "CustomerKey",
    "Status",
    "CreatedDate",
    "LastRunTime",
    "LastSaveDate"
];

// Optional filter (only active automations)
var filter = {
    Property: "Status",
    SimpleOperator: "equals",
    Value: 2 // 2 = Active
};

var moreData = true;
var reqID = null;
var total = 0;

while (moreData) {

    moreData = false;

    var data = (reqID == null)
        ? prox.retrieve(objectType, cols, filter)
        : prox.getNextBatch(objectType, reqID);

    if (data != null) {

        moreData = data.HasMoreRows;
        reqID = data.RequestID;

        if (data.Results && data.Results.length > 0) {

            for (var i = 0; i < data.Results.length; i++) {

                var a = data.Results[i];

                Write(
                    a.Name + " | Status: " + a.Status +
                    " | Last Run: " + a.LastRunTime + "<br>"
                );

                total++;
            }
        }
    }
}

Write("<br>Total Automations: " + total);
</script>
Insert data into data extensions

Similar to the various retrieve methods, we also have a handful of ways to insert data into Data Extensions. Here, we will mostly use AMPscript functions wrapped in SSJS. One thing to keep in mind is that AMPscript can be more forgiving, but in SSJS you need to use the exact function names as defined – otherwise, you will encounter a server runtime error.

InsertData

SSJS function to insert data from CloudPages, landing pages, microsites, and SMS messages in MobileConnect.

<script runat="server">
Platform.Load("core", "1");

try {

    var response = Platform.Function.InsertData(
        "Order_Log",
        ["OrderID", "EmailAddress", "Amount", "OrderDate", "Status"],
        ["ORD-10001", "john.doe@email.com", 129.99, Now(), "Completed"]
    );

    if (response == 1) {
        Write("Order record created");
    } else {
        Write("Insert failed");
    }

} catch (e) {
    Write("Error: " + Stringify(e));
}
</script>
InsertDE

Similar to its AMPscript sibling this function is best to use within email send.

<script runat="server">
Platform.Load("core", "1");
var response = Platform.Function.InsertDE(
        "Order_Log",
        ["OrderID", "EmailAddress", "Amount", "OrderDate", "Status"],
        ["ORD-10001", "john.doe@email.com", 129.99, Now(), "Completed"]
    );
</script>
UpsertData

To get a proper searchable list of file transfer locations first we need to perform REST API call to get json array of locations. Then we can parse JSON and save file locations into data extension.

<script runat="server">
  try{
    var fileTransferLocations = 
    [
        ...
        {
            "customerKey": "customer-key",
            "name": "File location name",
            "description": "",
            "locationType": "ExternalSftp",
            "sFtpFileTransferLocation": {
                "portNumber": 22,
                "userName": "groot",
                "url": "https://martechnotes.com",
                "authType": "Password"
            }
        }
    ],fields = [], values= [];
  
  for(var i=0;i<fileTransferLocations.length;i++){
    fields = [];
    values = [];
    fields.push('locationType'); 
    values.push(fileTransferLocations[i].locationType);
    if (fileTransferLocations[i].hasOwnProperty('sFtpFileTransferLocation')){
      fields.push('url'); 
      values.push(fileTransferLocations[i].sFtpFileTransferLocation.url);
      fields.push('user'); 
      values.push(fileTransferLocations[i].sFtpFileTransferLocation.userName);
    }
    Platform.Function.UpsertData( "file_locations_info",['name','externalKey'],[fileTransferLocations[i].name,fileTransferLocations[i].customerKey],fields, values);
  }
  }catch(e){
    Platform.Response.Write(Platform.Function.Stringify(e));
  }
  
</script>
UpsertDE

Similarly to insertDE this function is to be used in sendable context within email or sms templates

<script runat="server">
Platform.Load("core", "1");

var result = Platform.Function.UpsertDE(
    "Customer_Profile",
    ["EmailAddress"],                          // Primary key
    ["john.doe@email.com"],                    // Lookup value
    ["FirstName", "LastName", "Status", "LastLoginDate"], 
    ["John", "Doe", "Active", Now()]
);

if (result > 0) {
    Write("Customer profile updated or inserted");
} else {
    Write("No changes made");
}
</script>
UpdateData
<script runat="server">
Platform.Load("core", "1");

try {

    var result = Platform.Function.UpdateData(
        "Order_Status",
        ["OrderID"],                         // Lookup field
        ["ORD-20240301"],                    // Lookup value
        ["Status", "ShippedDate"],           // Fields to update
        ["Shipped", Now()]                   // New values
    );

    if (result > 0) {
        Write("Order status updated");
    } else {
        Write("Order not found");
    }

} catch (e) {
    Write("Error: " + Stringify(e));
}
</script>
UpdateDe
<script runat="server">
Platform.Load("core", "1");

try {

    var result = Platform.Function.UpdateDE(
        "Order_Status",
        ["OrderID"],                         // Lookup field
        ["ORD-20240301"],                    // Lookup value
        ["Status", "ShippedDate"],           // Fields to update
        ["Shipped", Now()]                   // New values
    );

    if (result > 0) {
        Write("Order status updated");
    } else {
        Write("Order not found");
    }

} catch (e) {
    Write("Error: " + Stringify(e));
}
</script>
Send API Requests

I will give here to most versatile HTTP request we have included in our SSJS within Salesforce Marketing Cloud.

<script runat="server">
  /* Load core beacause we do not want to write Platform.Function everytime :) */
  Platform.Load('Core','1');
 /* Create an authentication string to pass as a request header */
  var token = "exapmle_token";
  var auth = "Bearer " + token;

  /* Specify the request body as a string */
  var requestBody = '{name: x,email:me@example.com}';

  try {
    /* Initialize the request handler */
    var request = new Script.Util.HttpRequest("https://www.api.example.com/put");

    /* Set request headers */
    request.setHeader("Authentication", auth);
    request.setHeader("sample-header", "HeaderValue");

    /* Configure the request properties */
    request.method = "PUT";
    request.encoding = "UTF-8";
    request.postData = requestBody;
    request.contentType = "application/json";

    /* Send the request */
    var response = request.send();

    /* Necessary lines to process the response */
    var responseString = String(response.content);
    var responseJSON = ParseJSON(responseString );

    /* Output the response body */
    Write(Stringify(responseJSON));
  } catch(e) {
    Write(Stringify(e));
  }
</script>
Remove data from autosupressions or data extensions

Very simple, yet very powerful. One of the few ways to clean suppression lists in Salesforce Marketing Cloud is to use a simple SSJS snippet that does the job. This is not only a great helper for suppression lists, but also useful anytime you need to purge a Data Extension – for example, when running daily stats or other recurring activities where you need to start with a clean slate.

<script runat="server">
      Platform.Load("Core","1");
      var api = new Script.Util.WSProxy(),
      supressionLists = [  
            // { CustomerKey: '2A7C2304-23A7-AEF0-C9BD-43DC21C860FE'},
           // { CustomerKey: '2A7C2304-23A7-AEF0-C9BD-43DC21C860FE'},
      ],data;
      for (var i=0;i<supressionLists.length;i++){
        data = api.performItem("DataExtension", supressionLists[i], "ClearData", {});  
        Write(Platform.Function.Stringify(data));
      } 
      
</script>
Create data extensions using WSProxy

Creating Data Extensions via SSJS using WSProxy is useful when you want to standardize structures or automate setup instead of manually creating them in the UI. This approach is especially helpful when deploying consistent schemas across multiple environments or projects.

<script runat="server">
Platform.Load("core", "1");

var api = new Script.Util.WSProxy();

// Data Extension configuration
var config = {
    CustomerKey: "example_de_key",
    Name: "Example_Data_Extension",
    CategoryID: 12345, // Folder ID

    Fields: [
        { Name: "SubscriberKey", FieldType: "Text", MaxLength: 100, IsPrimaryKey: true, IsRequired: true },
        { Name: "EmailAddress", FieldType: "EmailAddress", MaxLength: 254, IsRequired: true },
        { Name: "FirstName", FieldType: "Text", MaxLength: 100, IsRequired: false },
        { Name: "LastName", FieldType: "Text", MaxLength: 100, IsRequired: false },
        { Name: "Country", FieldType: "Text", MaxLength: 2, IsRequired: true },
        { Name: "Language", FieldType: "Text", MaxLength: 5, IsRequired: true },
        { Name: "Status", FieldType: "Text", MaxLength: 50, IsRequired: true },
        { Name: "Score", FieldType: "Number", IsRequired: false },
        { Name: "IsActive", FieldType: "Boolean", IsRequired: false },
        { Name: "CreatedDate", FieldType: "Date", IsRequired: true }
    ],

    // Sendable configuration
    IsSendable: true,
    SendableDataExtensionField: {
        Name: "SubscriberKey",
        FieldType: "Text"
    },
    SendableSubscriberField: {
        Name: "Subscriber Key"
    }
};

// Create Data Extension
try {
    var result = api.createItem("DataExtension", config);
    Write("Data Extension created successfully");
} catch (e) {
    Write("Error creating Data Extension: " + Stringify(e));
}
</script>
Delete data extensions using WSProxy

Just like we can create Data Extensions, we can also act as executioners and remove them with no mercy using a script. Keep in mind that these will be deleted permanently – nothing will be moved to the recycle bin. You should only execute this when you are 100% sure about the outcome.

<script runat="server">

    Platform.Load("core", "1.1.1");
   var api = new Script.Util.WSProxy(); 
   api.deleteItem("DataExtension", { 
         "CustomerKey": "your-customer-key" 
   });
</script>
<script runat="server">

    Platform.Load("core", "1.1.1");

    var deNames = [
        'test_delete'
    ],
    i = 0;

    var retrieveDataExtension = function(name){
        var api = new Script.Util.WSProxy();
        var cols = [
                "ObjectID",
                "PartnerKey",
                "CustomerKey",
                "Name",
                "CreatedDate",
                "ModifiedDate",
                "Client.ID",
                "Description",
                "IsSendable",
                "IsTestable",
                "SendableDataExtensionField.Name",
                "SendableSubscriberField.Name",
                "Template.CustomerKey",
                "CategoryID",
                "Status",
                "IsPlatformObject",
                "DataRetentionPeriodLength",
                "DataRetentionPeriodUnitOfMeasure",
                "RowBasedRetention",
                "ResetRetentionPeriodOnImport",
                "DeleteAtEndOfRetentionPeriod",
                "RetainUntil",
                "DataRetentionPeriod"
            ];

            var request = api.retrieve("DataExtension", cols, {
                Property: "Name",
                SimpleOperator: "equals",
                Value: name
            });
            if(request.Status == "OK"){
                return request.Results.shift();
            }else  return null;
    }
    try{
        var properties,
            result,
            api = new Script.Util.WSProxy();
        for (i=0;i<deNames.length;i++){
            properties = retrieveDataExtension(deNames[i])
            result  = api.deleteItem("DataExtension", { 
                "CustomerKey": properties.CustomerKey 
            });
            if (result.Status == "Ok")
              Write("Deleted- " + properties.Name + " by Customer Key " + properties.CustomerKey );
            else
              Write(Stringify(result))
        }

    }catch(e){
        Write(Stringify(e))
    }
</script>
Add columns to data extensions

This is very useful when adding fields to Data Extensions with many columns, as the UI tends to freeze and it takes ages. Not saying that having a large number of columns is the best approach, but we’ve all had projects where master tables span hundreds of columns. Also another example is to add one or more columns to multiple data extensions. Adding fields with SSJS takes effect immediately and avoids any UI freezing.

<script runat="server">
Platform.Load("Core","1.1.1");


var customerKeys = [
 
  "FC2C3BCF-3740-4433-A103-E6A1F2F47120",
  "A0164833-3747-4444-45DA-A01648347120"
];
// Define the new field once
var newField = {
    Name : "new_field",
    CustomerKey : GUID(), 
    FieldType : "Text",
    MaxLength : 1,
    IsRequired : false,
    DefaultValue : "Y"
};
// Loop through the DEs and add the field
for (var i = 0; i < customerKeys.length; i++) {
    try {
        var de = DataExtension.Init(customerKeys[i]);
        var result = de.Fields.Add(newField);
        Write("Added field to DE: " + customerKeys[i] + "<br>");
    } catch(e) {
        Write("Error on DE: " + customerKeys[i] + " - " + Stringify(e) + "<br>");
    }
}
</script>
Set Up Logging for CloudPages and Automations

Another really good real-life example is setting up proper logging. This is very useful when debugging your script in an automation, monitoring the outcome, or coming back to it when issues are raised and the issue lays withing your script activity.

<script runat="server">
 Platform.Load("Core", "1.1.1");

 var isCloudPage = false,
     logDataExtension = "my_log_de";
 
 function logMessage(type, message, htmlOutput) {
    function logToDataExtension(type, message) {
            Platform.Function.InsertDE(
                logDataExtension,
                ["type", "message"],
                [String(type || ""), String(message || "")]
            );
    }
    if (!isCloudPage) {
        logToDataExtension(type, message);
    } else {
        Write(htmlOutput ? htmlOutput : "<br>" + String(message || ""));
    }
}
</script>
Get query definition activities

This is used plenty when any field or data extension is removed and we want to check where the data extension or field is used so we can update our query definitions and prevent from unwanted failures

<script runat="server">

    Platform.Load("Core","1");
    var prox = new Script.Util.WSProxy(),
        objectType = "QueryDefinition",
        cols = ["Name", "CustomerKey","CreatedDate","ObjectID","QueryText"], // Adjusted properties relevant to QueryDefinition
        moreData = true,
        reqID = null,
        numItems = 0, 
        results=[];

    while(moreData) {
        moreData = false;
        var data = reqID == null ?
            prox.retrieve(objectType, cols) :
            prox.getNextBatch(objectType, reqID);

        if(data != null) {
            moreData = data.HasMoreRows;
            reqID = data.RequestID;
            if(data && data.Results) {
                for(var i=0; i < data.Results.length; i++) {
                    // Example of logging the query definition details
                    var result = data.Results[i];
                    Platform.Function.UpsertData( 
                        "query_definition_info",
                        ['Name','CustomerKey','ObjectID'],
                        [result.Name,result.CustomerKey,result.ObjectID],
                        ['CreatedDate','QueryText',],
                        [result.CreatedDate,result.QueryText]
                    );
                    numItems++;
                }
            }
        }
    }
    Platform.Response.Write("<br />" + numItems + " total " + objectType + " items found.");
</script>
Remove query definitions

Also there are times that entire set of query activities has to be removed and there is nothing such as builk select and remove in the ui and there fore here comes the power of scripting.

<script runat="server">
    Platform.Load("Core", "1.1.1");
    var api = new Script.Util.WSProxy(),
        res, 
        batch = [],
        toRemove = 
        [""]//array of customer keys to be removed
    try{
        
        for (var i = 0; i < toRemove.length; i++){
                Write("Removing " + toRemove[i] +  " ...... " );
                res = QueryDefinition.Init(toRemove[i]).Remove();
                Write(res);
                Write("<br>");
           
        }
    }catch(e){
        Write(Stringify(e.Description));
    }
</script>
Change table occusrence in query definitions

You can change various settings of a Query Definition object, and one of them is the QueryText. You can either replace the entire query or simply search and replace specific parts as needed.

<script runat="server">
Platform.Load("Core", "1.1.1");

// Query Definition External Keys
var queryKeys = [
    "customer-key-1",
    "customer-key-2"
];

// Replace logic
var searchFor = /old_table/gi;
var replaceWith = "new_table";

for (var i = 0; i < queryKeys.length; i++) {

    var key = queryKeys[i];

    try {

        // Init Query Definition directly
        var qd = QueryDefinition.Init(key);

        // Get current SQL
        var originalQuery = String(qd.QueryText);

        if (!originalQuery) {
            Write("No query found for key: " + key + "<br>");
            continue;
        }

        // Replace text
        var updatedQuery = originalQuery.replace(searchFor, replaceWith);

        if (originalQuery === updatedQuery) {
            Write("No changes needed for: " + key + "<br>");
            continue;
        }

        // Update Query
        var result = qd.Update({
            QueryText: updatedQuery
        });

        if (result === "OK") {
            Write("Updated: " + key + "<br>");
        } else {
            Write("Failed: " + key + "<br>");
        }

    } catch (e) {
        Write("Error for " + key + ": " + Stringify(e) + "<br>");
    }
}
</script>
Advanced examples

For my fellow premium users I have also prepared set of addit

🔒 Premium Subscriber Content

Please log in to preview content. Log in or Register

You must log in and have a Premium Subscriber account to preview the content.

When upgrading, please use the same email address as your WordPress account so we can correctly link your Premium membership.

Please allow us a little time to process and upgrade your account after the purchase. If you need faster access or encounter any issues, feel free to contact us at info@martechnotes.com or through any other available channel.

To join the Discord community, please also provide your Discord username after subscribing, or reach out to us directly for access.

You can subscribe even before creating a WordPress account — your subscription will be linked to the email address used during checkout.

Premium Subscriber

29,99 € / Year

  • Free e-book with all revisions - 101 Adobe Campaign Classic (SFMC 101 in progress)
  • All Premium Subscriber Benefits - Exclusive blog content, weekly insights, and Discord community access
  • Lock in Your Price for a Full Year - Avoid future price increases
  • Limited Seats at This Price - Lock in early before it goes up
  • Monthly 15-Minute Call - Discuss any topic directly

AMPscript

What is AMPscript

Marcel Szimonisz
Table of contents: AMPscript

Most Salesforce Marketing Cloud Engagement emails look personalized at first glance – until you take a closer look. Many teams are not using the full potential of the platform’s personalization scripting capabilities. “Hi %%=v(@FirstName)=%%” is easy. The hard part is tailoring content, offers, and logic per subscriber without creating 40 versions of the same email. That is where AMPscript comes in. It is Marketing Cloud’s server-side scripting language for email personalization, dynamic content, and data lookups, and it is still one of the fastest ways to make an email feel like it was assembled just for one person.

What AMPscript is (and what it is not)

AMPscript is a scripting language designed specifically for Salesforce Marketing Cloud Engagement to help marketers personalize messages using subscriber attributes and data stored in Data Extensions. Salesforce describes it as a server-side language you can use in emails, landing pages, SMS, and more, with output that renders at send time for each recipient, which is why it is so useful for true one-to-one personalization in bulk sends.

What AMPscript is not: a full programming environment with modern debugging tools. It is intentionally lightweight and optimized for message rendering, so you want to keep logic clear, minimize expensive lookups, and treat it like production code even when “it’s just email.”

Where AMPscript can be used in Marketing Cloud Engagement?

One of the reasons AMPscript is so popular is its flexibility across multiple areas of Marketing Cloud Engagement, not just Email Studio. While it’s most commonly associated with emails, it can also be used in CloudPages and, with some workarounds, even within Automation Studio script activities.

In practice, you’ll most often use AMPscript in these places:

  • Email HTML
    For subject line personalization, dynamic content blocks, and conditional logic inside emails
  • Content Builder
    To power reusable blocks with dynamic text, images, or data-driven variations
  • Landing pages (CloudPages)
    When you need to retrieve, update, or insert data in Data Extensions
  • Triggered and transactional messaging
    Where personalization must be deterministic, fast, and reliable at send time

In short, AMPscript sits at the core of real-time personalization across Marketing Cloud Engagement, especially anywhere content needs to adapt based on subscriber or data context.

The AMPscript building blocks you actually use to personalize emails
Variables, output, and the “print” pattern

Most email AMPscript follows a predictable rhythm:

  • Declare variables (optional but for clarity good to be used)
  • Set variables from attributes or lookup results
  • Output variables into HTML
AMPscript case sensitivity

AMPscript is case insensitive, which means you can declare and reference variables using different casing. It is not recommended, but it is definitely a way to make someone else’s day worse. The best way is to define team wide naming convention and use that.

Personalization strings and AttributeValue()

Personalization strings in AMPscript are the simplest way to pull data directly into your emails without writing full scripting blocks. They use a %% syntax to reference subscriber attributes, data extension fields, or system values, making them perfect for quick wins like names, dates, or basic segmentation. For example, %%FirstName%% or %%emailaddr%% will render values at send time based on the recipient. While they are easy to use and great for straightforward personalization, they have limits – once you need conditional logic, transformations, or multiple data lookups, you will typically move from personalization strings into full AMPscript blocks for better control.

If you have ever seen an email where a missing attribute prints a blank (or worse, the literal string), you already understand why defensive personalization matters.

A common best practice is using `AttributeValue()` to safely pull a subscriber attributes and handle null-ish cases more predictably. In case you would directly call attribute by [attribute name] and your source data extension does not have such field it would throw an error.

A simple version of the pattern looks like this:

%%[
var @firstName
set @firstName = AttributeValue("FirstName")
if empty(@firstName) then
set @firstName = "there"
endif
]%%
Hi %%=v(@firstName)=%%,

It is not fancy, but it stops “Hi ,” from slipping into production.

Conditionals for content targeting

Conditional logic is where AMPscript really starts to earn its keep. It lets you dynamically swap out hero sections, offers, or disclaimers based on things like loyalty tier, geography, lifecycle stage, or any attribute available at send time.

This is not the same as basic merge fields.

Merge fields are simple placeholders – for example, %%FirstName%% – that pull a single value from a subscriber record and drop it into the content. They’re useful, but limited. You’re essentially just displaying data, not making decisions.

AMPscript goes much further. It brings scripting into personalization, which opens up a completely different level of control.

With AMPscript, you can:

  • Run IF/ELSE logic to decide what content to show
  • Query Data Extensions using functions like Lookup or LookupRows
  • Build variables and reuse them across your template
  • Combine multiple data points into a single decision
  • Assign vouchers

For example, instead of just inserting a first name, you can:

  • Look up a customer’s latest order
  • Check their loyalty tier
  • Decide which offer they should see
  • Render completely different sections of the email based on that logic

In practice, this means you’re no longer just inserting data into a template. You’re programming how the content behaves at send time.

Instead of maintaining multiple versions of emails for different audiences, you define the rules once and let AMPscript dynamically assemble the right experience for each subscriber.

Assign voucher for subscriber

To assign vouchers, Salesforce Marketing Cloud Engagement is equipped with a dedicated function just for this purpose. I learned this the hard way – before looking it up, I tried using WriteDE, assuming the write would happen immediately. In reality, the write (or commit) happens only after the entire email personalization is finished. That means multiple subscribers can receive the same voucher if they are processed at the same time.

The ClaimRow function is designed to safely retrieve a unique, unused record from a data extension – most commonly used for coupon codes, promo vouchers, or any limited inventory assets. When the function runs, it “claims” a row by updating a specified field (for example, setting a Claimed flag or timestamp), ensuring that the same code is not assigned to multiple subscribers.

A typical setup includes:

  • a data extension that stores voucher codes
  • a status or flag field (for example IsClaimed)
  • optional metadata like claim date or subscriber identifier

When executed, ClaimRow will:

  • find the next available (unclaimed) row
  • lock and update it to prevent reuse
  • return the claimed row so you can use the value in your email

This makes it one of the most reliable ways to handle one-time-use codes directly at send time, without needing external systems or complex pre-processing.

Data Extension lookups for “real” personalization

Subscriber attributes alone rarely cover what marketers actually need today. Most real-world personalization depends on Data Extensions – that’s where the useful, contextual data lives:

  • Last purchase date
  • Next appointment
  • Nearest store
  • Recommended products
  • Membership status
  • Content entitlements

This is where AMPscript clearly goes beyond basic personalization. Instead of just reading fields from a subscriber record, you can query additional data at send time and shape the experience around it.

The AMPscript function library is quite extensive, and you’ll often refer back to the official function reference to confirm parameters or return values. But in practice, most use cases follow a small number of repeatable patterns.

The most common one is a lookup by SubscriberKey (or another unique identifier):

  • Retrieve a single value with Lookup()
  • Retrieve multiple rows with LookupRows()
  • Loop through results when needed (for example, product recommendations)

A typical flow looks like this:

  • Use SubscriberKey as the join key
  • Pull related data from a Data Extension
  • Store the result in a variable
  • Use conditional logic to decide what to display

This is what turns personalization from “Hi John” into something meaningful like:

  • Showing a customer their last order or renewal date
  • Highlighting products they are likely to buy
  • Displaying location-specific content
  • Tailoring messaging based on real behavioral or transactional data

At that point, you’re no longer just inserting fields – you’re building context-aware experiences directly inside your email or page at runtime.riberKey (or a contact id), then using returned fields to drive both copy and conditional logic.

Use LookupRows within your email instead of multiple single Lookup calls to improve personalization performance. Repeated single-value lookups can significantly slow down processing and impact delivery time, especially at scale.

AMPscript functions

AMPscript functions are the core building blocks behind most personalization logic. They cover everything from retrieving data to transforming it and controlling how it is displayed at send time.

You will mainly work with a few key groups:

  • Data lookup functions like Lookup, LookupRows, and LookupOrderedRows to retrieve data from data extensions
  • Conditional functions such as IIF, Empty, and IsNull (along with IF/ELSE) to control what content is shown
  • String functions like Concat, Substring, Replace, and ProperCase to format and clean values
  • Date and time functions such as Now, DateAdd, DateDiff, and FormatDate for time-based logic
  • Data extension write functions like InsertDE, UpdateDE, and UpsertDE to store or update data during send
  • Row handling functions including Row, Field, and RowCount to work with datasets returned from lookups
  • Utility functions like GUID, RaiseError, and AttributeValue for safer data handling and debugging

In practice, most real-world emails combine several of these together – pulling data, applying logic, formatting it, and then rendering the final output for each subscriber.

%%[
/* Utility + attribute */
VAR @email, @subscriberKey, @guid
SET @email = AttributeValue("EmailAddress")
SET @subscriberKey = AttributeValue("SubscriberKey")
SET @guid = GUID()

/* Lookup */
VAR @rows, @rowCount, @row, @firstName, @lastPurchase
SET @rows = LookupRows("CustomersDE", "EmailAddress", @email)
SET @rowCount = RowCount(@rows)

/* Conditional */
IF @rowCount > 0 THEN

  SET @row = Row(@rows, 1)

  /* Row + Field */
  SET @firstName = ProperCase(Field(@row, "FirstName"))
  SET @lastPurchase = Field(@row, "LastPurchaseDate")

ELSE

  SET @firstName = "Customer"

ENDIF

/* String manipulation */
SET @firstName = Replace(@firstName, "-", "")
SET @shortName = Substring(@firstName, 1, 10)

/* Date functions */
VAR @today, @expiryDate, @daysSincePurchase
SET @today = Now()
SET @expiryDate = DateAdd(@today, 7, "D")
SET @daysSincePurchase = DateDiff(@lastPurchase, @today, "D")

/* Conditional (IIF) */
VAR @offer
SET @offer = IIF(@daysSincePurchase > 30, "We miss you - here is 20% off", "Check out our latest products")

/* Write to DE */
InsertDE("EmailLogDE", "SubscriberKey", @subscriberKey, "Email", @email, "GUID", @guid, "SendDate", @today)

/* Safety check */
IF IsNull(@email) OR Empty(@email) THEN
  RaiseError("Missing email address", true)
ENDIF

]%%

Hello %%=v(@shortName)=%%,

%%=v(@offer)=%%

Your offer expires on %%=FormatDate(@expiryDate, "yyyy-MM-dd")=%%.
A practical personalization workflow that avoids common AMPscript failures
Start with the data, not the email

Before writing a single line of AMPscript, define the foundation:

  • Which field is your join key (SubscriberKey, ContactId, etc.)
  • Which Data Extension is the source of truth
  • What should happen when data is missing or incomplete

AMPscript is ultimately about pulling data into your message at send time and controlling what renders per subscriber. That only works if your data model is stable and predictable. If the inputs are messy, the output will be too.

Build a “safe default” layer first

This is the step most teams skip – and then pay for during QA.

For every variable or dynamic section, define:

  • Default values (for missing FirstName, tier, store, etc.)
  • Fallback content (for example, a generic hero if personalization fails)
  • Whether to hide the entire section if required data is missing

And yes – do not call attributes directly from random Data Extensions. Always go through AttributeValue() / attribute groups (Contact Builder) so your data is consistent and portable.

Using AttributeValue() with a safe fallback:

%%=IIF(NOT EMPTY(AttributeValue("FirstName")), AttributeValue("FirstName"), "Customer")=%%
%%[
SET @firstName = AttributeValue("FirstName")
SET @safeFirstName = IIF(NOT EMPTY(@firstName), @firstName, "Customer")
]%%

Hello %%=v(@safeFirstName)=%%,

Do not call data extension attributes directly and start using AttributeValue(). I will see this somewhere I swear I’m coming after you 🙂

Keep business logic readable and centralized

If your email has five modules that all depend on the same variables define them once and reuse everywhere through variables. Sometimes you will notice that certain blocks can be reused across multiple emails. In those cases, you can create a code snippet from that piece of logic and simply include it in your emails. There are a couple of functions to insert content blocks into an email, but personally, , the best option is to use ContentBlockByKey(). It helps avoid issues like “block not found” when the content is moved or reorganized, since it relies on a stable external key rather than folder structure.

Test like a developer, even if you are a marketer

AMPscript failures tend to be binary: it either renders or it breaks. And when it breaks, it usually breaks for a segment of subscribers you did not test.

One thing worth calling out – debugging AMPscript can be painful.

A missing quote, bracket, or small syntax issue can turn into a full rendering failure, and finding it can feel like searching for a needle in a haystack. There’s no friendly stack trace. Sometimes you just get… nothing.

A practical way to debug is:

  • Remove sections of your code incrementally
  • Test after each change
  • Narrow down the exact block that causes the failure

Once you isolate the problematic section, it becomes much easier to spot the issue.

It’s not glamorous, but this “strip it down and rebuild” approach is often the fastest way to track down AMPscript errors and get your email rendering again.

AMPscript failures tend to be binary: it renders or it breaks. And when it breaks, it usually breaks for a segment of subscribers you did not test.


In marketing automation roles, responsibilities often overlap. You are not just a developer – you more often act as a tester and campaign manager. That is why additionally to your working code, email personalization needs to be tested across all possible variants the email can produce.

Dynamic email patterns that work well in the real world
Dynamic modules based on profile or behavior

As we already learnt that AMPscript is a scripting language embedded directly into emails, landing pages, and other channels, giving you constructs like variables, IF/ELSE, loops to control how content is rendered and plenty of functions to work with database or simple date functions.

More importantly, it shows that a dynamic email is not just about personalization tokens. It’s an email where things like purchase history, loyalty status, or offers are assembled at send time based on data.

That’s exactly the pattern you want to follow.

This is the approach to use when your email needs to be programmatically assembled, not duplicated:

  • Different banners for different categories
  • Different CTAs for customers vs prospects
  • Compliance or legal content that varies by region
  • Language blocks controlled by a locale field

Instead of creating multiple versions, you define logic and let AMPscript decide what gets rendered. As the developer blog highlights, AMPscript even allows you to modify the HTML structure itself, meaning entire sections of the email can appear or disappear based on data.

That’s the shift – from “fill in placeholders” to building dynamic email experiences driven by data and logic at send time.

Reusable snippets and modular code

Once AMPscript shows up in more than one template, you will want consistency. For that we can fetch shared code snippets so common logic can be managed centrally and reused across emails or cloud pages reducing duplication, mistakes and centralizes the entire logic into single file.

Advanced use cases: beyond “Hello, FirstName”

Once you move past simple personalization, AMPscript starts acting less like a templating helper and more like a mini backend inside your email.

In more advanced scenarios, it is used to extend Marketing Cloud beyond out-of-the-box functionality, enabling custom logic, real-time data handling, and deeper personalization patterns that standard tools cannot handle .

That shows up in things like:

  • generating dynamic, parameterized URLs based on subscriber data
  • combining AMPscript with JSON payloads and templating layers to process complex event-driven data
  • using data extension functions to lookup, insert, or update records at runtime
  • even interacting directly with Salesforce objects to read or write CRM data

These are not just “nicer emails”. They are cases where AMPscript becomes part of the system design, handling logic that would otherwise require backend services.

This is typically the point where AMPscript alone can feel limiting. But instead of replacing it, teams usually combine it with other layers (like GTL, SSJS, or external data payloads) to scale personalization without losing control over execution.

Expectations vs reality: the platform behaviors that surprise teams

AMPscript feels approachable, but production environments surface gotchas: data mismatches, inconsistent attribute mapping, and scripts that work in one context but fail in another due to where and how they render.

A few practical guardrails that reduce pain:

  • Prefer simple, predictable branching over deeply nested IF trees
  • Handle missing data explicitly
  • Keep lookups minimal and cache results in variables when reused
  • Treat every email like it will be forwarded, viewed in dark mode, and rendered with images off, and ensure the personalized parts still make sense
Debugging and maintainability: simple habits that save hours
Case sensitivity and naming discipline

AMPscript is case insensitive but that does not mean we will type our variables as VaR @fiRsTnAme. The practical takeaway is to pick a naming convention and stick to it across all your scripts. A naming convention is not only useful for your script variables, but it is also worth sitting down and defining clear guidelines – as we know, developers can spend hours coming up with names.

When AMPscript is not enough

Sometimes the personalization goal is heavy – complex transformations, dynamic lists, or logic that quickly becomes unreadable in AMPscript. The good thing is that you can switch between AMPscript and SSJS at any point and take your personalization to another level.

A realistic way to level up AMPscript skills without boiling the ocean

If your team is new to AMPscript, the fastest path is usually:

  • master safe attribute personalization (defaults, empty checks)
  • add one lookup-driven module (store, tier, or next appointment)
  • centralize shared logic into snippets
  • only then introduce more complex data handling

And most importantly, practice is key – you need to apply your learnings immediately to reinforce your memory.

Advanced Personalization Examples

AMPscript works well for inline personalization – pulling values, simple conditions, maybe looping through a small rowset.

But the moment you need:

  • arrays
  • JSON handling
  • sorting
  • grouping
  • prioritization logic

AMPscript becomes painful fast.

This is where SSJS comes in.

Instead of rendering data line by line, you can:

🔒 Premium Subscriber Content

Please log in to preview content. Log in or Register

You must log in and have a Premium Subscriber account to preview the content.

When upgrading, please use the same email address as your WordPress account so we can correctly link your Premium membership.

Please allow us a little time to process and upgrade your account after the purchase. If you need faster access or encounter any issues, feel free to contact us at info@martechnotes.com or through any other available channel.

To join the Discord community, please also provide your Discord username after subscribing, or reach out to us directly for access.

You can subscribe even before creating a WordPress account — your subscription will be linked to the email address used during checkout.

Premium Subscriber

29,99 € / Year

  • Free e-book with all revisions - 101 Adobe Campaign Classic (SFMC 101 in progress)
  • All Premium Subscriber Benefits - Exclusive blog content, weekly insights, and Discord community access
  • Lock in Your Price for a Full Year - Avoid future price increases
  • Limited Seats at This Price - Lock in early before it goes up
  • Monthly 15-Minute Call - Discuss any topic directly

Syntax and first examples

Marcel Szimonisz
Table of contents: AMPscript

To effectively leverage any advanced marketing automation platform, understanding its personalization language is essential. In Salesforce Marketing Cloud, AMPScript serves as the go-to language for email personalization and as a backend tool for cloud pages. This scripting language allows marketers to create dynamic, personalized content, making your campaigns more engaging and effective.

What is AMPScript?

AMPScript is a proprietary scripting language developed by Salesforce for Marketing Cloud. It allows marketers to personalize and manipulate email content dynamically. With AMPScript, you can pull data from data extensions, personalize emails, and create complex conditional logic within your messages.

Basic Syntax

Before diving into examples, let’s cover some fundamental syntax rules.

Case insensitive

I do not know if it’s a good thing, but AMPScript is case insensitive. A good practice is to use any programming language naming convention of your choice (camel case, snake case, Pascal case, etc.).

My personal best practice is to use:

  • uppercase letters with conditions.loops and variable declaration and definition e.g. IF ELSEIF ENDIF FOR DO NEXT, SET, VAR, NOT etc.
  • Pascal case for all AMPScript functions Lookup, LookupRows, ClaimRow, etc.
  • camel case for any variables
  • lowercase for personalization strings
%%[
    /* Camel Case */
    SET @firstName = "John" /* Variable using camel case */

    /* Pascal Case */
    SET @FirstName = "Jane" /* Variable using Pascal case */

    /* Snake Case */
    SET @first_name = "Alice" /* Variable using snake case */

    /* Kebab Case (Not typically used in AMPScript, but shown for reference) */
    /* SET @first-name = "Bob" */ /* This would not work in AMPScript, as dashes are not allowed in variable names */

    /* Upper Snake Case (for constants) */
    SET @FIRST_NAME = "Charlie" /* Variable using upper snake case */

    /* Hungarian Notation */
    SET @strFirstName = "Dave" /* Variable using Hungarian notation */
]%%

Choose one and stick with it for the entirety of the script, or establish a project-wide naming convention.

%%[
    SET @firstName = Lookup("Subscribers", "FirstName", "SubscriberKey", _subscriberkey)
    SET @fiRstNAme = LOOKUP("Subscribers", "FirstName", "SubscriberKey", _subscriberkey)
	/* you can bring some of the mocking meme style to the business world you can */
    SET @firstname = LoOKuP("Subscribers", "FirstName", "SubscriberKey", _subscriberkey)
]%%
%%=v(@FIRSTNAME)=%%
AMPScript block

AMPScript block, is used for more complex scripting needs. It’s enclosed within %%[ and ]%% delimiters and is typically placed at the beginning of your email or in a designated section. This format allows you to execute multiple lines of AMPScript code, including setting variables, performing lookups, and creating conditional logic.

%%[
    SET @firstName = Lookup("Subscribers", "FirstName", "SubscriberKey", _subscriberkey)
    SET @lastName = Lookup("Subscribers", "LastName", "SubscriberKey", _subscriberkey)
    SET @fullName = Concat(@firstName, " ", @lastName)
]%%
Inline AMPScript

Inline AMPScript is used for embedding AMPScript directly within the HTML content of your emails or cloud pages. It’s enclosed within %%= and =%% delimiters and is typically used for simple expressions and variable outputs. Inline AMPScript is ideal for quick, single-line statements or inserting dynamic content directly into the email body.

Certain functions (iif, indexof) or double quotes within inline AMPScript used within anchor tag (ahref) can break the email text version and thus prevent you from sending any email and giving you headaches.

Variables

Variables in AMPScript must start with (@), which is the only condition. This means you can begin your variable name with a number. However, avoid using characters like /, !, and @ after the initial @ symbol, as they are not allowed.

Initialize variables

This can be done, but it is not a requirement and won’t cause any harm if you skip the initialization entirely. The only scenario that comes to mind where initialization might be beneficial is when you are setting your variables within conditional blocks.

%%[ VAR @name,@surname,@ahoy ]%%
Define variables

Defining or setting variables is done with the keyword SET and cannot be done otherwise in AMPscript.

%%[ SET @name = "John Doe" ]%%
Assign variables from data extension

You might say that assigning personalization variables from the data extension is as easy as simply using the assignment operator ‘=’. However, this can sometimes lead to personalization errors. Let’s take a look at the following example.

%%[
SET @firstname = firstname

IF Empty(@firstname) THEN
/*do something*/
ENDIF
]%%

When the firstname column is not defined in the data extension, the email will result in a personalization error because we are referencing a non-existent variable. A safe way to achieve email personalization without causing an error is to use the AttributeValue() function. With this function, the same example will render without error.

%%[
SET @firstname = AttributeValue('firstname')

IF Empty(@firstname) THEN
/*do something*/
ENDIF
]%%
Arithmetic Operations

Perform arithmetic operations to manipulate numeric values.

%%[ 
    SET @a = 10
    SET @b = 5
    SET @sum = Add(@a, @b) /* Addition */
    SET @difference = Subtract(@a, @b) /* Subtraction */
    SET @product = Multiply(@a, @b) /* Multiplication */
    SET @quotient = Divide(@a, @b) /* Division */
]%%
Comparators
Basic comparators
%%[ 
    IF @a == @b THEN
        SET @result = "Equal"
    ELSEIF @a > @b THEN
        SET @result = "Greater"
	ELSE
        SET @result = "Lesser"
    ENDIF
]%%
NOT operator

Negate a condition using NOT operator.

%%[ 
    SET @isActive = "true"
    IF NOT @isActive == "false" THEN
        SET @status = "Active"
    ELSE
        SET @status = "Inactive"
    ENDIF
]%%
Empty() Function

Check if a value is empty using EMPTY.

%%[ 
    SET @firstName = Lookup("Subscribers", "FirstName", "SubscriberKey", _subscriberkey)
    IF Empty(@firstName) THEN
        SET @greeting = "Hello, valued subscriber!"
    ELSE
        SET @greeting = Concat("Hello, ", @firstName, "!")
    ENDIF
]%%
IndexOf() Function

Find the position of a substring within a string using INDEXOF.

%%[ 
    SET @email = "john.doe@example.com"
    SET @atPosition = IndexOf(@email, "@")
    IF @atPosition > 0 THEN
        SET @domain = Substring(@email, Add(@atPosition, 1), Length(@email))
    ELSE
        SET @domain = "Invalid email address"
    ENDIF
]%%
Examples
Personalized Greeting

Personalizing email content is a powerful way to engage subscribers and enhance their experience. A common personalization technique is to greet subscribers by their first name. However, sometimes the first name may not be available in the data. In this example, we will use AMPScript to dynamically generate a personalized greeting. We will check if the subscriber’s first name is available and use it if present; otherwise, we will use a generic greeting. This ensures that each subscriber receives a tailored message, whether their name is known or not. Let’s explore the code to see how this can be achieved effectively.

%%[ SET @firstName = Lookup("Subscribers", "FirstName", "SubscriberKey", _subscriberkey) ]%%
%%[ IF NOT EMPTY(@firstName) THEN ]%%
   Hello, %%=v(@firstName)=%%!
%%[ ELSE ]%%
   Hello, valued subscriber!
%%[ ENDIF ]%%
Adding query parameters to existing link dynamically

When working with email marketing campaigns, adding UTM parameters to your URLs is crucial for tracking the performance of your links. However, it can be challenging to dynamically add these parameters, especially when you are unsure if the original URL already contains query parameters. In this example, we will use AMPScript’s INDEXOF function to check for existing query parameters in a URL and appropriately append UTM parameters. This ensures that your links are correctly formatted for tracking, regardless of their initial state. Let’s dive into the code to see how this can be done efficiently.

%%[
    SET @link = "https://example.com/page"
    SET @utmParameters = "utm_source=newsletter&utm_medium=email&utm_campaign=spring_sale"
    SET @queryIndex = IndexOf(@link, "?")

    IF @queryIndex > 0 THEN
        /* If there is already a query parameter, add UTM parameters with & */
        SET @finalLink = Concat(@link, "&", @utmParameters)
    ELSE
        /* If there are no query parameters, add UTM parameters with ? */
        SET @finalLink = Concat(@link, "?", @utmParameters)
    ENDIF
]%%

<a href="%%=RedirectTo(@finalLink)=%%">Click here</a>

Explanation:

  1. Define the Variables:
    • @link: The original URL.
    • @utmParameters: The UTM parameters you want to add.
    • @queryIndex: The position of the ? character in the URL.
  2. Check for Existing Query Parameters:
    • Use IndexOf(@link, "?") to find the position of the ? character.
    • If @queryIndex is greater than 0, it means the URL already has query parameters.
  3. Add UTM Parameters:
    • If the URL has query parameters (@queryIndex > 0), concatenate the UTM parameters with &.
    • If the URL does not have query parameters (@queryIndex == 0), concatenate the UTM parameters with ?.
  4. Output the Final Link:
    • Use RedirectTo(@finalLink) to create the final clickable link with the correct UTM parameters.
Cloud page form submission using @@ExecCt

Handling form submissions on Cloud Pages in Salesforce Marketing Cloud is a common task for collecting and processing user data. While Server-Side JavaScript (SSJS) offers a way to get the request method, AMPScript can also be used effectively by utilizing the @@ExecCtx variable to determine the execution context. This approach helps in distinguishing between form submissions (POST requests) and page loads (LOAD requests), ensuring proper handling of user inputs. Using this method is a good practice as it enhances security, improves data processing, and provides clear user feedback. Let’s explore an example to see how this can be done using AMPScript.

%%[
    /* Check the execution context: LOAD or POST */
    IF @@ExecCtx == "POST" THEN
        /* Retrieve form data */
        SET @firstName = RequestParameter("firstName")
        SET @email = RequestParameter("email")

        /* Perform your processing here, such as storing data in a data extension */
        IsertDE("FormSubmissions", "FirstName", @firstName, "Email", @email)

        /* Set a thank-you message */
        SET @message = Concat("Thank you for your submission, ", @firstName, "!")
    ELSE
        /* Prompt the user to fill out the form */
        SET @message = "Please fill out the form."
    ENDIF
]%%
%%=v(@message)=%%
<form action="%%=RequestParameter('PAGEURL')=%%" method="post">
    <label for="firstName">First Name:</label>
    <input type="text" id="firstName" name="firstName" required>
    <label for="email">Email:</label>
    <input type="email" id="email" name="email" required>
    <input type="submit" value="Submit">
</form>
For loops

A FOR loop in AMPScript allows you to execute a block of code repeatedly for a specified number of times. This is useful when you need to process or display multiple pieces of data. The basic structure of a FOR loop involves initializing a counter, setting the loop’s starting and ending conditions, and defining the actions to be taken on each iteration.

Syntax
FOR @counter = start TO end DO
    /* Code to be executed in each iteration */
NEXT @counter
  • @counter: The loop counter variable.
  • start: The initial value of the counter.
  • end: The final value of the counter.
Example
%%[
    FOR @i = 1 TO 5 DO
        Output(Concat("Iteration: ", @i, "<br>"))
    NEXT @i
]%%
Peronalization strings

Personalization strings in Salesforce Marketing Cloud are placeholders that dynamically populate specific information about the subscriber, email, or context in which the message is being rendered. These strings allow marketers to tailor content to individual recipients.

emailname_

Name of the email

%%=emailname_=%%
_subscriberkey

The contact subscriber key is available when landing on a cloud page from an email communication. Links to the landing page must be created with the CloudPagesURL() function in combination with RedirectTo().

emailaddr

Subscribers email address.

%%=v(@emailaddr)=%%
_IsTestSend

Evaluates to True if the email job is designated as a Test Send. I use this to add labels to multivariant proofs.

%%[
IF _isTestSend == false THEN
    ... // this code doesn’t run for test sends
ENDIF
]%%
Common Functions
Lookup

Retrieve a value from a data extension. This function is used for quick lookups based on criteria when you only need to retrieve a single column value. To get the entire row, other lookup functions such as LookupRows must be used.

Syntax
SET @value = Lookup("DataExtensionName", "ColumnName", "LookupColumn1", "LookupValue1" [, "LookupColumn2", "LookupValue2", ...])
Example
%%[ SET @value = Lookup("DataExtensionName", "ColumnName", "LookupColumn", "LookupValue") ]%%
Lookuprows

Use to retrieve multiple rows based on criteria and loop through the results for further processing.

Syntax
SET @rows = LookupRows("DataExtensionName", "LookupColumn1", "LookupValue1" [, "LookupColumn2", "LookupValue2", ...])
Example
%%[
    /* Retrieve rows from the Products data extension where ProductCategory is "Electronics" */
    SET @productRows = LookupRows("Products", "ProductCategory", "Electronics")

    /* Get the number of rows returned */
    SET @rowCount = RowCount(@productRows)

    /* Initialize counter */
    SET @counter = 1

    /* Loop through each row */
    IF @rowCount > 0 THEN
        FOR @i = 1 TO @rowCount DO
            /* Get the current row */
            SET @row = Row(@productRows, @i)

            /* Retrieve column values from the current row */
            SET @productID = Field(@row, "ProductID")
            SET @productName = Field(@row, "ProductName")
            SET @productPrice = Field(@row, "ProductPrice")

            /* Output the product details */
            Output(Concat("<p>Product ID: ", @productID, "<br>"))
            Output(Concat("Product Name: ", @productName, "<br>"))
            Output(Concat("Product Price: $", @productPrice, "</p>"))
        NEXT @i
    ELSE
        Output(v("<p>No products found in the Electronics category.</p>"))
    ENDIF
]%%

Have you noticed something with the Output function? It can only output a value if it is returned from a nested function. If you reference a variable directly, nothing will be printed. To properly display a variable’s value with the Output function, you need to use functions like v() or Concat().

TreatAsContent

The TreatAsContent function in AMPScript is used to render a string as content, allowing the string to be processed as if it were part of the email or landing page content. This is useful when you need to dynamically generate or include content that should be treated as HTML or AMPscript.

Syntax
TreatAsContent(string)
  • string – string to evaluate

When using the TreatAsContent function in AMPScript, it’s important to note that any links defined within the content will not be tracked automatically. To enable link tracking, you need to prepend httpgetwrap| before the protocol (e.g., httpgetwrap|https://). Additionally, only the first 100 links defined with TreatAsContent can be tracked. This function is typically used in dynamic content blocks or when rendering modules that contain HTML or links, allowing for more flexible and dynamic content management in your emails and landing pages.

Before this feature had to be enabled by support for your business unit but now it is enabled by default.

ClaimRow

The ClaimRow function in AMPScript is used to claim or reserve a row in a data extension. This function is particularly useful in scenarios where you need to assign unique values, such as vouchers or promo codes, to users. By claiming a row, you ensure that the same voucher or promo code is not assigned to multiple users.

Syntax
ClaimRow("DataExtensionName", "ClaimColumn", "ClaimValue")
  • DataExtensionName: The name of the data extension from which you want to claim a row.
  • ClaimColumn: The column used to mark the row as claimed.
  • ClaimValue: The value that signifies a row has been claimed (typically a unique identifier for the user).
Example: How to assign a voucher

This example demonstrates how to use ClaimRow to assign a voucher to a user. If no voucher is available, it uses the RaiseError function to handle the fallback scenario.

Data Extension Setup

Assume we have a data extension named Vouchers with the following columns:

  • VoucherCode (Primary Key)
  • IsClaimed (Boolean indicating if the voucher is claimed) default is set to false
  • EmailAddress (The email of the user who claimed the voucher)
Claim Coupon Code Example
%%[

    /* Attempt to claim a voucher */
    SET @voucherRow = ClaimRow("Vouchers", "IsClaimed", "EmailAddress", emailAddr)

    /* Check if a voucher was successfully claimed */
    IF RowCount(@voucherRow) > 0 THEN
        /* Retrieve the voucher code */
        SET @voucherCode = Field(@voucherRow, "VoucherCode")

        /* Output the voucher code */
        Output(Concat("Your voucher code is: ", @voucherCode))
    ELSE
        /* No vouchers available, handle the fallback */
        RaiseError("No vouchers available at the moment. Please try again later.", true)
    ENDIF
]%%
RequestParameter

The RequestParameter function in AMPScript is used to retrieve data submitted via form inputs as well as query parameters from the URL. This function is essential for handling user input and dynamically personalizing content based on parameters passed to the landing page.

Syntax
RequestParameter("parameterName")
Example
%%[
SET parameterName = RequestParameter("parameterName")
]%%

Read attributes with AttributeValue

Marcel Szimonisz
Table of contents: AMPscript

AMPscript is the powerful scripting language behind personalization and dynamic content in Salesforce Marketing Cloud (SFMC). One of the most commonly used – and often misunderstood – functions in AMPscript is AttributeValue().

At first glance, it seems like a simple utility for retrieving subscriber data. But its real power lies in how it helps you avoid null reference errors, cleanly access personalization fields, and write more defensive code for your emails, landing pages, and SMS messages.

In this article, we’ll break down how AttributeValue() works, when and why you should use it, and some best practices and examples to make your AMPscript safer and more robust.

What is AttributeValue() in AMPscript?

AttributeValue() is a function that returns the value of a specified attribute from data source (data extension, cloud page get parameter), but with a smart twist:

If the attribute is null or doesn’t exist, AttributeValue() returns an empty string ("") instead of throwing an error.

AttributeValue("attribute_name")

This makes it a safer alternative to directly referencing an attribute like FirstName, especially in large campaigns where not all subscribers may have complete data.

Where AttributeValue() Looks for Data

AttributeValue() searches in this order:

  1. Email Subscriber Profile Attributes
  2. Sendable Data Extension Fields
  3. Journey Builder Entry Source Attributes
  4. MobileConnect List Attributes
  5. MobilePush Attributes
Common Use Case: Fallback Personalization

Let’s say you’re trying to personalize an email greeting with a first name:

%%=v(@FirstName)=%%

If @FirstName is undefined or null, this may cause errors or show up as a blank string, or even “%%=v(@FirstName)=%%” in the email if the variable wasn’t initialized correctly.

Safe Version

%%=AttributeValue("FirstName")=%%
Using Fallbacks with IF Conditions

You can combine AttributeValue() with logic

🔒 Premium Subscriber Content

Please log in to preview content. Log in or Register

You must log in and have a Premium Subscriber account to preview the content.

When upgrading, please use the same email address as your WordPress account so we can correctly link your Premium membership.

Please allow us a little time to process and upgrade your account after the purchase. If you need faster access or encounter any issues, feel free to contact us at info@martechnotes.com or through any other available channel.

To join the Discord community, please also provide your Discord username after subscribing, or reach out to us directly for access.

You can subscribe even before creating a WordPress account — your subscription will be linked to the email address used during checkout.

Premium Subscriber

29,99 € / Year

  • Free e-book with all revisions - 101 Adobe Campaign Classic (SFMC 101 in progress)
  • All Premium Subscriber Benefits - Exclusive blog content, weekly insights, and Discord community access
  • Lock in Your Price for a Full Year - Avoid future price increases
  • Limited Seats at This Price - Lock in early before it goes up
  • Monthly 15-Minute Call - Discuss any topic directly

Look up data extension records

Marcel Szimonisz
Table of contents: AMPscript

Querying data from Data Extensions in Salesforce Marketing Cloud can be done with both AMPscript and Server-Side JavaScript (SSJS). While AMPscript offers simple functions like Lookup or LookupRows, SSJS provides more flexibility for complex filtering through the Rows.Retrieve() method. In this guide, we’ll compare both approaches and show how to use filters and logical operators effectively.

It’s important to note that in AMPscript, we use the data extension name to reference the table for any query. On the other hand, in SSJS, we utilize the data extension’s external key to reference the table. Understanding this distinction can save you hours of debugging.

For many cases we will suffice with simple AMPscript Lookup or LookupRows. But when you need to set more complex queries we would need to use SSJS Rows.Retrieve method of DataExtension object.

var  dataExtension = DataExtension.Init("external_key"),
     data = dataExtension.Rows.Retrieve();

TIP: make the name and external key of data extension same so you don’t need to care what function is using one or the other.

AMPscript: Simple Queries for Most Use Cases

AMPscript is usually sufficient for basic lookups and personalization tasks.
You can retrieve specific records from a Data Extension using its name (not external key).

Lookup() – Retrieve a single field value
Lookup(DEName, FieldToReturn, FieldToMatch, ValueToMatch)
  • “Subscribers” – Data Extension name (not external key)
  • “FirstName” – field you want to return
  • “Email” – field to match
  • “john@example.com” – value to match

Returns:

  • The value of the first matching row’s FirstName field (string).
  • If no match is found, it returns an empty string.
%%[
SET @FirstName = Lookup("Subscribers", "FirstName", "Email", "john@example.com")

IF NOT EMPTY(@FirstName) THEN Output(@FirstName) ELSE Output("Hello") ENDIF
]%%

%%[IF NOT EMPTY(@FirstName) THEN]%%
%%=v(@FirstName)=%%
%%[ELSE]%%
Hello
%%[ENDIF]%%

This works perfectly for simple conditions, like matching a single column for personalization.

LookupRows() – Retrieve multiple rows
LookupRows(DEName, FieldToMatch, ValueToMatch)
%%[
SET @rows = LookupRows("Subscribers", "Country", "Slovakia", "Status", "Active")
SET @rowCount = RowCount(@rows)
IF RowCount(@rows) > 0 THEN
   FOR @counter = 1 to @rowCount do
       SET @row = Row(@rows, 1)
       SET @email = Field(@row, "Email")
       SET @firstName = Field(@row, "FirstName")
   NEXT @counter
ENDIF
]%%

LookupOrderedRows() – Retrieve and sort rows
LookupOrderedRows(DEName, RowCount, OrderBy, FieldToMatch, ValueToMatch)
SET @rows = LookupOrderedRows("Orders", 3, "OrderDate DESC", "CustomerID", "12345")

Also we have case sensitive functions for LookupOrderedRowsCS() and LookupRowsCS to search exact matches or case sensitive matches.

However, when you need to perform more complex filtering or nested logic, AMPscript quickly becomes limited — that’s where SSJS steps in.

SSJS: Advanced Queries with DataExtension.Rows.Retrieve

The Rows.Retrieve method accepts a single argument known as the “filter,” which allows us to construct our filtering conditions.

var dataExtension = DataExtension.Init("external_key"),
    filter = {Property:"Domain",SimpleOperator:"like",Value:"martechnotes.com"},
    data = dataExtension.Rows.Retrieve(filter);

You can select from multiple filter simple operators:

  • equals
  • notEquals
  • greaterThan
  • lessThan
  • isNull
  • isNotNull
  • greaterThanOrEqual
  • lessThanOrEqual
  • between
  • IN
  • like

Logical operators that can be used are:

  • AND
  • OR

You can also create complex filters wherever they are needed:

var 
filter = {
	leftOperand: {
      Property:"Domain",SimpleOperator:"like",Value:"https://martechnotes.com"
    }
  	LogicalOperator: "AND",//OR
  	rightOperand:{
  		leftOperand: {
      		Property:"Domain",SimpleOperator:"like",Value:"/path1"
		},
  		LogicalOperator: "OR",//AND
  		rightOperand:{
  			Property:"Domain",SimpleOperator:"like",Value:"/path2"
    	}
	}
},
data =  dataExtension.Rows.Retrieve(filter);

As you can see we can create as many nested filters as needed.

The results of each query are returned as an array of objects, consisting of the returned rows in JSON format.

[
  {Domain:"https://martechnotes.com/path1",...},
  {Domain:"https://martechnotes.com/path2",...},
]
Accessing Shared Data Extensions Across Business Units

For this lookup function, it does not work. You cannot query Data Extensions even with WSProxy set to the parent Business Unit.

WS proxy will reward you with nice error

{"Status":"Error: RequestID: d4546e78-401f-4f42-9a18-5e1e1db2c76c Message: MemberID 9999999 does not have access to ClientID: ID[888888] PartnerClientKey[] UserID[] PartnerUserKey[] supplied in the request","RequestID":"d4546e78-401f-4f42-9a18-5e1e1db2c76c","Results":null,"HasMoreRows":false}

To look up shared data extension we need to use lookup function in AMPscript

%%[
    SET @email = Lookup("ent.shared_table","email","email","john.doe@example.com")
    SET @rows = LookupRows( "ent.shared table", "email", john.doe@example.com, "SubscriberKey", _subscriberkey ) 
]%%

TIP: If you need to combine the two scripting languages, see our guide to AMPscript functions in SSJS.

Track dynamic links

Marcel Szimonisz

When you save links as part of an HTML code in an AMPScript variable, such as a paragraph containing a link to a page, you may face challenges in tracking these links.

Salesforce offers a great feature that allows tracking of such links using the “httpgetwrap” inserted right before the URL protocol.

href="httpgetwrap|https://martechnotes.com"

When dealing with AMPScript variables containing links for tracking, it is crucial to use the TreatAsContent() function instead of the v() function. This way, both the link and the tracking will work seamlessly.

%%[
SET @note = "Lorem ipsum dolor sit amet, consectetur adipiscing elit. <a href='httpgetwrap|https://martechnotes.com'>Vestibulum</a> eu lorem vel tortor mattis convallis. Etiam vulputate pharetra varius.</p>
]%%

%%=TreatAsContent(@note)=%%

GOOD TO KNOW

One important aspect to take into account when utilizing the “httpgetwrap” feature is its limitation in tracking only the first 100 unique URLs in the send. If you combine the prefix with Parameter Manager, it’s highly improbable that the click activity on these prefixed links will be fully tracked.

There is no longer a requirement to contact support for enabling this feature, as was the case in the past. Nowadays, the feature is automatically enabled on business units.

There is no longer a requirement to contact support for enabling this feature, as was the case in the past. Nowadays, the feature is automatically enabled on business units.

AMPscript examples

Marcel Szimonisz
Table of contents: AMPscript

Last time, we created 50 SQL examples and 25 SSJS examples (only 25 because I couldn’t think of more at the time. I might expand that later). Today, it’s time to continue the series and add 50 more real-life examples in a scripting language, AMPscript, used in Salesforce Marketing Cloud and very recently also in Marketing Cloud Next the younger brother that is directly on core CRM platform.

Below are 50 real-life AMPscript examples, written the way you’d actually use them in emails, CloudPages, or landing flows – not toy snippets. In fact, this is not just a collection of examples, it is a complete AMPscript guide that can take you from zero to hero.

Basic Personalization with Fallback

All emails use personalization, so what better place to start than getting the basics right. A good practice, although often overlooked, is to use AttributeValue to retrieve any field from your data extension used in the communication.

%%[
SET @firstName = AttributeValue("FirstName")
IF EMPTY(@firstName) THEN
  SET @firstName = "there"
ENDIF
]%%
%%=Concat("Hi ", @firstName, ",")=%%

This script gets the subscriber’s first name using AttributeValue. If it’s empty, it defaults to "there" so the greeting still works. Then it uses Concat() to join strings together – "Hi ", the name, and a comma – into one final message.

Output example:

  • If name exists → Hi John,
  • If missing → Hi there,
Preferred name personalization with fallback

Another example of displaying the subscriber’s name, in case your database also holds information about a preferred name, is to combine the preferred name with the first name.

%%[
VAR @firstName, @preferredName, @displayName
SET @firstName = AttributeValue("FirstName")
SET @preferredName = AttributeValue("PreferredName")
SET @displayName = IIF(NOT EMPTY(@preferredName), @preferredName, @firstName)

IF EMPTY(@displayName) THEN
  SET @displayName = "there"
ENDIF
]%%
Welcome back, %%=v(@displayName)=%%.
Conditional Greeting Based on Time

Sometimes your business unit serves customers across different time zones, and personalizing greetings can be done based on their time zone shift relative to UTC.

%%[
/* timezone_offset offset from UTC as number -1 -2 -3 0 1 2 3 */
SET @tzUTCOffset = AttributeValue("timezone_offset")

IF EMPTY(@tzUTCOffset ) THEN
  SET @tzUTCOffset = 0
ENDIF

/* SFMC is UTC-6, so shift to UTC first (+6) */
SET @totalShift = Add(@tzUTCOffset, 6)

/* apply final shift */
SET @localNow = DateAdd(Now(), @totalShift, "H")

SET @hour = FormatDate(@localNow,"","HH")

IF @hour < 12 THEN
  SET @greeting = "Good morning"
ELSEIF @hour < 18 THEN
  SET @greeting = "Good afternoon"
ELSE
  SET @greeting = "Good evening"
ENDIF
]%%
%%=v(@greeting)=%%

This script personalizes a greeting based on the subscriber’s timezone. It first reads the user’s timezone_offset and defaults it to 0 if missing. Because Salesforce Marketing Cloud system time is always UTC-6 , it adds 6 hours to convert to UTC and then applies the user’s offset. The adjusted time is calculated using DateAdd(Now(), ...), where Now() returns the current system time . It then extracts the hour and uses simple conditions to decide whether to show “Good morning”, “Good afternoon”, or “Good evening”.


FormatDate(date, dateFormat, timeFormat, locale)

Units:
HH = Hour 24-hour format – 0-24
dd = days – 1-31
MM = months – 01-12
etc.

DateAdd(date, amount, unit)

Units:
HH = Hour 24-hour format – 0-24
dd = days – 1-31
MM = months – 01-12
etc.

Country-Based Content Switch

Many organizations serve customers across multiple countries and regions, where audiences speak different languages and operate in different cultural and time zone contexts. In Europe, for example, it is common for a single team to manage the entire CEE or even broader European market, which introduces additional complexity in communication, campaign execution, and personalization.

%%[
SET @country = Lowercase(AttributeValue("Country"))
IF EMPTY(@country) THEN SET @country= "en" ENDIF

IF @country == "de" THEN
  SET @greeting = "Halo"
ELSEIF @country == "gb" THEN
  SET @greeting = "Hello"
ENDIF
]%%
%%=v(@greeting)=%%

This script reads the subscriber’s Country, converts it to lowercase for consistency, and defaults it to "en" if missing. It then uses simple conditions to assign a greeting based on the country code – "Halo" for Germany (de) and "Hello" for the UK (gb). Finally, it outputs the greeting.

This can be used in many scenarios not only for language content variation but also for variation in email hero sections, CTA buttons or displaying different discounts on the email for different segment. Again here is good to mention that we use AttributeValue and empty check on value.

%%[
SET @segment = Lowercase(AttributeValue("Segment"))
IF EMPTY(@segment) THEN SET @segment = "default"
IF @segment == "vip" THEN
  SET @discount = "20%"
ELSEIF @segment == "gold" THEN
  SET @discount = "15%"
ELSE
  SET @discount = "10%"
ENDIF
]%%
</p>Enjoy your %%=v(@discount)=%%% discount on any purchased items for your next order. Use code SUMMERSALE%%=v(@discount)=%%</p>
Lookup Product Info

Product recommendations or transactional product details are often stored in separate Data Extensions. Using AMPscript, you can dynamically fetch product information like name, image, price, and URL, and render it as a structured content block inside your email.

The example below shows how to retrieve product data using a Lookuprows() with fallback products and display it as a simple product card with an image, price, and call-to-action button.

%%[
VAR @sku1, @sku2, @sku3, @country
VAR @fallbackRows, @row, @rows

/* Final product variables */
VAR @name1, @price1, @image1, @url1
VAR @name2, @price2, @image2, @url2
VAR @name3, @price3, @image3, @url3

SET @sku1    = AttributeValue("SKU1")
SET @sku2    = AttributeValue("SKU2")
SET @sku3    = AttributeValue("SKU3")
SET @country = AttributeValue("Country")

/* --- PRELOAD FALLBACK PRODUCTS --- */
SET @fallbackRows = LookupOrderedRows("Products_DE", 3, "Price DESC", "Country", @country)

/* Fallback 1 */
SET @row = Row(@fallbackRows,1)
SET @fb_name1  = Field(@row,"ProductName")
SET @fb_price1 = Field(@row,"Price")
SET @fb_image1 = Field(@row,"ImageURL")
SET @fb_url1   = Field(@row,"ProductURL")

/* Fallback 2 */
SET @row = Row(@fallbackRows,2)
SET @fb_name2  = Field(@row,"ProductName")
SET @fb_price2 = Field(@row,"Price")
SET @fb_image2 = Field(@row,"ImageURL")
SET @fb_url2   = Field(@row,"ProductURL")

/* Fallback 3 */
SET @row = Row(@fallbackRows,3)
SET @fb_name3  = Field(@row,"ProductName")
SET @fb_price3 = Field(@row,"Price")
SET @fb_image3 = Field(@row,"ImageURL")
SET @fb_url3   = Field(@row,"ProductURL")

/* ---------- SLOT 1 ---------- */
IF NOT EMPTY(@sku1) THEN
  SET @rows = LookupRows("Products_DE","ProductID",@sku1)

  IF RowCount(@rows) > 0 THEN
    SET @row = Row(@rows,1)

    SET @name1  = Field(@row,"ProductName")
    SET @price1 = Field(@row,"Price")
    SET @image1 = Field(@row,"ImageURL")
    SET @url1   = Field(@row,"ProductURL")
  ELSE
    SET @name1=@fb_name1 SET @price1=@fb_price1 SET @image1=@fb_image1 SET @url1=@fb_url1
  ENDIF
ELSE
  SET @name1=@fb_name1 SET @price1=@fb_price1 SET @image1=@fb_image1 SET @url1=@fb_url1
ENDIF

/* ---------- SLOT 2 ---------- */
IF NOT EMPTY(@sku2) THEN
  SET @rows = LookupRows("Products_DE","ProductID",@sku2)

  IF RowCount(@rows) > 0 THEN
    SET @row = Row(@rows,1)

    SET @name2  = Field(@row,"ProductName")
    SET @price2 = Field(@row,"Price")
    SET @image2 = Field(@row,"ImageURL")
    SET @url2   = Field(@row,"ProductURL")
  ELSE
    SET @name2=@fb_name2 SET @price2=@fb_price2 SET @image2=@fb_image2 SET @url2=@fb_url2
  ENDIF
ELSE
  SET @name2=@fb_name2 SET @price2=@fb_price2 SET @image2=@fb_image2 SET @url2=@fb_url2
ENDIF

/* ---------- SLOT 3 ---------- */
IF NOT EMPTY(@sku3) THEN
  SET @rows = LookupRows("Products_DE","ProductID",@sku3)

  IF RowCount(@rows) > 0 THEN
    SET @row = Row(@rows,1)

    SET @name3  = Field(@row,"ProductName")
    SET @price3 = Field(@row,"Price")
    SET @image3 = Field(@row,"ImageURL")
    SET @url3   = Field(@row,"ProductURL")
  ELSE
    SET @name3=@fb_name3 SET @price3=@fb_price3 SET @image3=@fb_image3 SET @url3=@fb_url3
  ENDIF
ELSE
  SET @name3=@fb_name3 SET @price3=@fb_price3 SET @image3=@fb_image3 SET @url3=@fb_url3
ENDIF

]%%
Dynamic Balance Lookup with currency formatting

In many real-world scenarios, key customer data like account balance is not stored directly in your sendable Data Extension. Instead, it lives in a separate table that gets updated by external systems. In those cases, AMPscript allows you to fetch that data at send time and display it dynamically in your email.

The example below shows how to retrieve a subscriber’s balance from a dedicated Data Extension using a lookup, apply a fallback if no record is found, and format the value for display.

%%[
/*
It's fine to declare variables but things works without it
VAR @subscriberKey, @balance
*/

/*
SET @subscriberKey = AttributeValue("SubscriberKey") 
we can use personalization string '_subscriberkey' that is available in every email by default
*/

/* Lookup balance from a DE called Customer_Balance_DE */
SET @balance = Lookup("Customer_Balance_DE", "Balance", "SubscriberKey", _subscriberKey)

/* Fallback in case no record is found */
IF EMPTY(@balance) THEN
  SET @balance = 0
ENDIF
]%%

Balance due: %%=FormatCurrency(@balance, "en_GB")=%%

AMPscript is a server-side scripting language used in Salesforce Marketing Cloud to personalize content in emails, SMS, and CloudPages. It runs at the time of send or page load, allowing you to dynamically retrieve data, apply logic, and control how content is rendered for each individual subscriber. In practice, it acts as the bridge between your data and your messaging, enabling real-time personalization without needing to pre-process every value in advance.

Get Latest Order (Simple)
%%[
SET @rows = LookupOrderedRows("Orders_DE", 1, "OrderDate DESC", "SubscriberKey", _subscriberkey)
SET @row = Row(@rows, 1)
SET @lastOrderDate = Field(@row, "OrderDate")
]%%
Date Formatting
%%[
SET @formattedDate = FormatDate(Now(), "dd MMM yyyy")
]%%

Build Dynamic URL with Parameters

Even something as straightforward as building a URL can introduce issues. If you simply concatenate a URL as a string and use it inside an email href, the link will not be tracked properly.

%%[
SET @url = Concat("https://example.com?email=", URLEncode(EmailAddress))
]%%
<a href="%%=v(@url)=%%">CTA</a>

To ensure tracking works as expected in Salesforce Marketing Cloud, you should use the built-in redirect function RedirectTo, which wraps the URL and enables click tracking.

RedirectTo(targetUrl)
%%[
SET @url = Concat("https://example.com?email=", URLEncode(EmailAddress))
]%%
<a href="%%=RedirectTo(@url)=%%">CTA</a>

Actually the RedirectTo or CloudPagesUrl is the only recommended way even when tracking is not needed as these functions will make sure your subscribers data or query parameters stay encruypted and only can be read by marketing cloud on cloud page or tracking servers

Even when tracking is not required, using RedirectTo() or CloudPagesURL() is still recommended. These functions ensure that links are properly handled by Marketing Cloud and, in the case of CloudPagesURL(), that query parameters are securely encrypted.

CloudPagesURL(pageId,
              parameterName1, parameterValue1,
              [parameterName2, parameterValue2] ... )

The CloudPagesURL() function generates a link with an encrypted query string, meaning subscriber data and parameters are not exposed in plain text and can only be read within Marketing Cloud (for example, via RequestParameter() on a CloudPage)

Example with a Data Extension lookup that prints dynamic (personalized) URLs based on the SubscriberKey.

%%[
VAR @rows, @row, @cntr, @product, @baseUrl, @finalUrl

SET @rows = LookupRows("Products_DE", "SubscriberKey", _subscriberKey)

FOR @cntr = 1 TO RowCount(@rows) DO

  SET @row = Row(@rows, @cntr)
  SET @product = Field(@row, "ProductName")
  SET @baseUrl = Field(@row, "ProductURL")

  /* build dynamic tracked URL with parameter */
  SET @finalUrl = Concat(@baseUrl, "?utm_source=email&utm_medium=sfmc")

]%%
  <a href="%%=RedirectTo(@finalUrl)=%%">%%=v(@product)=%%</a><br>
%%[
NEXT @cntr
]%%
Read encrypted CloudPages parameters

To extract encrypted subscirber’s information from url in the cloud page that salesforce passed from email along with any custom parameters you can simply use RequestParameter()

This function behaves the same way as the QueryParameter() function to preserve backward compatibility.

%%[
VAR @sk, @lang
SET @sk = RequestParameter("sk")
SET @lang = RequestParameter("lang")
]%%
UTM Fallback Logic
%%[
SET @utm = QueryParameter("utm_campaign")

IF EMPTY(@utm) THEN
  SET @utm = "default_campaign"
ENDIF
]%%
Clean email input from a form
%%[
VAR @email
SET @email = Lowercase(Trim(RequestParameter("email")))
]%%
Validate an email address
%%[
VAR @error
SET @error = ""

IF EMPTY(@email) OR NOT IsEmailAddress(@email) THEN
  SET @error = "Enter a valid email address."
ENDIF
]%%

IsEmailAddress() checks whether the value is well formed, which is exactly what you want at form-validation stage.

Mailbox-provider detection
%%[
VAR @email, @domain
SET @email = AttributeValue("EmailAddress")
SET @domain = Domain(@email)
IF @domin == "yopmail.com" THEN RaiseError("Yopmail domain supression", true) ENDIF
]%%
Process submitted form
%%[
VAR @email, @domain
SET @email = AttributeValue("EmailAddress")
SET @domain = Domain(@email)
IF @domin == "yopmail.com" THEN RaiseError("Yopmail domain supression", true) ENDIF
]%%
Parse a delimited interests list
%%[
VAR @interests, @rows, @i, @row
SET @interests = RequestParameter("interests")
SET @rows = BuildRowsetFromString(@interests, "|")

FOR @i = 1 TO RowCount(@rows) DO
  SET @row = Row(@rows, @i)
]%%
  <li>%%=v(Field(@row, 1, false))=%%</li>
%%[
NEXT @i
]%%
AB testing within the email template

I know there are other ways but why not to make it more interesting and use script to deliver random content to the subscriber within the template

%%[
SET @group = Random(1,2)

IF @group == 1 THEN
  /* Version A */
ELSE
  /* Version B */
ENDIF
]%%
First purchase check
%%[
VAR @orders, @orderCount
SET @orders = LookupRows("Orders_DE", "SubscriberKey", _subscriberKey)
SET @orderCount = RowCount(@orders)
]%%

%%[ IF @orderCount == 1 THEN ]%%
  <p>Thanks for your first order.</p>
%%[ ENDIF ]%%

Your verification code: %%=v(@code)=%%

<a href="%%=CloudPagesURL(123, 'code', @code, 'sk', @subscriberKey)=%%">
  Continue
</a>
Abandoned-cart loop
%%[
VAR @cartJson, @jsonRows, @rowCount, @i, @sku
VAR @productRows, @productRow

SET @cartJson = Lookup("Cart_DE", "CartJSON", "SubscriberKey", _subscriberKey)

/* Parse JSON array */
SET @jsonRows = BuildRowsetFromJSON(@cartJson, "$[*]", 1)
SET @rowCount = RowCount(@jsonRows)
]%%

<table width="100%" cellpadding="0" cellspacing="0" style="border-collapse:collapse;">
  <tr>
    <th align="left">Product</th>
    <th align="left">Price</th>
  </tr>

%%[
IF @rowCount > 0 THEN

  FOR @i = 1 TO @rowCount DO

    SET @sku = Field(Row(@jsonRows, @i), "Value")

    /* Lookup product */
    SET @productRows = LookupRows("Products_DE", "ProductID", @sku)

    IF RowCount(@productRows) > 0 THEN

      SET @productRow = Row(@productRows,1)

      SET @name  = Field(@productRow,"ProductName")
      SET @price = Field(@productRow,"Price")
]%%

  <tr>
    <td style="padding:8px 0;">%%=v(@name)=%%</td>
    <td style="padding:8px 0;">%%=FormatCurrency(@price,"en_GB")=%%</td>
  </tr>

%%[
    ENDIF

  NEXT @i

ENDIF
]%%

</table>
Conditional CTA Link
IF AttributeValue("IsCustomer") == "true" THEN
  SET @cta = "https://app.example.com"
ELSE
  SET @cta = "https://signup.example.com"
ENDIF
Format Currency

Formatting the order summary based on the country is another sign of a multi-currency, multi-language BU setup, and it can be very useful when tailoring content to the user’s country profile.

%%[
VAR @price, @country, @formattedPrice, @culture

SET @price = 1234.5
SET @country = LowerCase(AttributeValue("Country"))

IF EMPTY(@country) THEN SET @country = "us" ENDIF
/* Map country to culture (currency handled automatically) */
IF @country == "de" THEN
  SET @culture = "de_DE"

ELSEIF @country == "uz" THEN
  SET @culture = "en_US"

ELSEIF @country == "gb" THEN
  SET @culture = "en_GB"

ELSEIF @country == "sk" THEN
  SET @culture = "sk_SK"

ELSEIF @country == "pl" THEN
  SET @culture = "pl_PL"

ELSEIF @country == "hu" THEN
  SET @culture = "hu_HU"

ELSE
  SET @culture = "en_US"
ENDIF

/* Format as currency */
/* Order Total: $1,234.50 */
SET @formattedPrice = FormatNumber(@price, "C2", @culture) 
]%%

<p>Order Total: %%=v(@formattedPrice)=%%</p>
Parameters
  • number (required)
    The value to format. Can be a number or a string containing a number.
  • formatType (required)
    Defines how the number should be formatted. Common options:
    • C – Currency (e.g. $123.45)
    • D – Decimal
    • F – Fixed decimal (default 2 places)
    • N – Number with thousands separator
    • G – General (no separators)
    • P – Percentage
    • E – Scientific notation
    • X – Hexadecimal
    You can add precision, e.g. N2, C0.
  • cultureCode (optional)
    Locale format (e.g. en_US, de_DE) to apply regional formatting rules.
Birthday Check
%%[
VAR @birthdate, @birthday

SET @birthdate = AttributeValue("Birthdate")
SET @birthday = "false"

IF NOT EMPTY(@birthdate) THEN

  IF DatePart(@birthdate, "M") == DatePart(Now(), "M")
  AND DatePart(@birthdate, "D") == DatePart(Now(), "D") THEN

    SET @birthday = "true"

  ENDIF

ENDIF
]%%
Age Calculation
SET @age = DateDiff(AttributeValue("Birthdate"), Now(), "Y")
Suppression Logic
IF AttributeValue("DoNotEmail") == "true" THEN
  RaiseError("Suppressed user", true)
ENDIF
External CTA with URL-safe search text
<a href="%%=RedirectTo(Concat("https://example.com/search?q=", URLEncode(AttributeValue("SearchTerm"), true, true)))=%%">
  Continue browsing
</a>
Fetch promo fragment with status handling
%%[
VAR @status, @fragment
SET @status = 0
SET @fragment = HttpGet("https://content.example.com/email/promo-fragment", true, 0, @status)

IF @status != 0 THEN
  SET @fragment = "<p>Check the latest offers on our site.</p>"
ENDIF
]%%
%%=v(@fragment)=%%
Parsing Endpoint Responses

In many implementations, not all data lives inside Salesforce Marketing Cloud. Product recommendations, pricing, availability, or offers are often served from external APIs. AMPscript allows you to fetch this data at send time using HttpGet, parse it, and inject it directly into your email or CloudPage.

This approach is especially useful when you want to display fresh, dynamic content without preloading everything into Data Extensions.

Parse JSON returned by an endpoint
%%[
VAR @status, @json, @products, @rowCount, @i, @product

SET @status = 0

/* Fetch recommendations */
SET @json = HttpGet("https://api.example.com/recommendations?sk=" + _subscriberKey, true, 0, @status)

/* Parse JSON array */
SET @products = BuildRowsetFromJson(@json, "$.products[*]", false)
SET @rowCount = RowCount(@products)

/* Limit to 3 */
IF @rowCount > 3 THEN
  SET @rowCount = 3
ENDIF
]%%

<table width="100%" cellpadding="0" cellspacing="0">
  <tr>

%%[
IF @rowCount > 0 THEN

  FOR @i = 1 TO @rowCount DO

    SET @product = Row(@products, @i)

    SET @name  = Field(@product, "name")
    SET @price = Field(@product, "price")
    SET @image = Field(@product, "image")
    SET @url   = Field(@product, "url")
]%%

    <td align="center" width="33%" style="padding:10px;">
      <img src="%%=v(@image)=%%" width="150"><br>
      %%=v(@name)=%%<br>
      %%=FormatCurrency(@price, "en_GB")=%%<br>
      <a href="%%=RedirectTo(@url)=%%">View</a>
    </td>

%%[
  NEXT @i

ENDIF
]%%

  </tr>
</table>
 Parse XML returned by an endpoint
%%[
VAR @status, @xml, @offers, @offer
SET @status = 0
SET @xml = HttpGet("https://content.example.com/offers.xml", true, 0, @status)
SET @offers = BuildRowsetFromXml(@xml, "/offers/offer", false)

IF RowCount(@offers) > 0 THEN
  SET @offer = Row(@offers, 1)
]%%
  <p>%%=v(Field(@offer, "title", false))=%%</p>
%%[
ENDIF
]%%

This is the cleaner modern XML pattern, and the docs explicitly recommend BuildRowsetFromXml() as the preferred approach over older XML transformation workflows where possible.

POST a webhook with an auth header
%%[
VAR @status, @payload, @responseBody, @apiToken
SET @apiToken = "YOUR_API_TOKEN"
SET @payload = Concat('{"subscriberKey":"', _subscriberKey, '","event":"preference_update"}')

SET @responseBody = HttpPost(
  "https://hooks.example.com/subscription",
  "application/json",
  @payload,
  @status,
  "Authorization", Concat("Bearer ", @apiToken)
)
]%%
Premium voucher assignment with a safe fallback
%%[
VAR @segment, @voucherCode, @defaultCode


SET @segment = Uppercase(AttributeValue("Segment"))
SET @defaultCode = "GET10BACK"
IF EMPTY(@segment) THEN
  SET @segment = "STANDARD"
ENDIF

IF @segment == "VIP" THEN
  SET @voucherCode = ClaimRowValue(
    "Vouchers_VIP",
    "VoucherCode",
    "IsClaimed",
    @defaultCode,
    "SubscriberKey",
    _subscriberKey
  )
ELSE
  SET @voucherCode = ClaimRowValue(
    "Vouchers_STANDARD",
    "VoucherCode",
    "IsClaimed",
    @defaultCode,
    "SubscriberKey",
    _subscriberKey
  )
ENDIF
]%%
Your voucher: %%=v(@voucherCode)=%%
Generating and Validating One-Time Codes in SFMC

Most examples with AMPscript stop at personalization. You fetch a name, maybe a product, and call it a day. But AMPscript can go much further. It can generate data, store it, and drive full interaction flows between emails and CloudPages.

This example shows exactly that. You are not just displaying content, you are building a simple verification system. The email generates a unique identifier and a one-time code, stores both in a Data Extension, and passes control to a CloudPage where the user completes the flow.

Email with one-time code
%%[
VAR @guid, @code, @email, @insertStatus, @link

SET @email = EmailAddress

/* generate unique identifier */
SET @guid = GUID()

/* generate 6-digit verification code */
SET @code = Random(100000,999999)

/* store into DE */
SET @insertStatus = InsertDE(
  "VerificationCodes_DE",
  "GUID", @guid,
  "Email", @email,
  "Code", @code,
  "CreatedDate", Now()
)

/* build secure CloudPage link (only GUID exposed) */
SET @link = CloudPagesURL(12345, "guid", @guid)
]%%

Your verification code: %%=v(@code)=%%

<a href="%%=RedirectTo(@link)=%%">Verify your email</a>
Cloud page validation of one-time code
%%[
VAR @guid, @inputCode, @rows, @row, @storedCode, @message

SET @guid = RequestParameter("guid")
SET @inputCode = RequestParameter("code")

/* fetch stored record */
SET @rows = LookupRows("VerificationCodes_DE","GUID",@guid)

IF RowCount(@rows) == 1 THEN

  SET @row = Row(@rows,1)
  SET @storedCode = Field(@row,"Code")

  IF @inputCode == @storedCode THEN

    SET @message = "Verification successful"

    /* optional: mark as used */
    UpdateDE(
      "VerificationCodes_DE",
      1,
      "GUID", @guid,
      "IsUsed", "true"
    )

  ELSE
    SET @message = "Invalid code"
  ENDIF

ELSE
  SET @message = "Invalid or expired request"
ENDIF
]%%

<form method="post">
  Enter code: <input type="text" name="code" />
  <input type="hidden" name="guid" value="%%=v(@guid)=%%" />
  <button type="submit">Verify</button>
</form>

<p>%%=v(@message)=%%</p>
Honeypot Protection on CloudPage Form

Forms in Salesforce Marketing Cloud are easy to build, but also easy to abuse. Bots can submit them repeatedly, creating fake leads, triggering automations, or polluting your data.

Before jumping into heavier solutions like reCAPTCHA, a simple and effective first layer is a honeypot field. It’s an invisible input that real users never interact with, but bots often fill automatically. If that field contains a value, you can safely assume the submission is not human.

Honeypot fields don’t work because bots are stupid, they work because most bots are lazy

This approach adds almost no friction to the user experience, yet filters out a large portion of automated submissions.

The idea behind honeypot protection is to add extra fields to your HTML form that remain invisible to users but are still present in the underlying code, where bots can detect and interact with them.

<style>
  .x9a2-message{
    position: absolute;
    left: -9999px;
    width: 1px;
    height: 1px;
    overflow: hidden;
  }
</style>

<form id="f_92kx1" method="post">

  <!-- Real fields -->
  <label for="f_name_91x">Your Name</label>
  <input type="text" id="f_name_91x" name="f_name_91x" required maxlength="100">

  <label for="f_mail_77z">Your Email</label>
  <input type="email" id="f_mail_77z" name="f_mail_77z" required>

  <!-- Honeypot (obfuscated) -->
  <div class="x9a2-message" aria-hidden="true">
    
    <label for="f_phone_ext_44"></label>
    <input 
      type="text"
      id="f_phone_ext_44"
      name="f_phone_ext_44"
      autocomplete="off"
      tabindex="-1"
    >

    <label for="f_secondary_email_88"></label>
    <input 
      type="email"
      id="f_secondary_email_88"
      name="f_secondary_email_88"
      autocomplete="off"
      tabindex="-1"
    >

  </div>

  <button type="submit">Submit</button>

</form>
%%[
VAR @email, @hp1, @hp2, @message

SET @email = RequestParameter("f_mail_77z")

/* honeypot fields */
SET @hp1 = RequestParameter("f_phone_ext_44")
SET @hp2 = RequestParameter("f_secondary_email_88")

IF NOT EMPTY(@hp1) OR NOT EMPTY(@hp2) THEN

  /* bot detected */
  SET @message = "Invalid submission"

  InsertDE(
    "Spam_Log_DE",
    "Email", @email,
    "Reason", "Honeypot triggered",
    "CreatedDate", Now()
  )

ELSE

  InsertDE(
    "Leads_DE",
    "Email", @email,
    "CreatedDate", Now()
  )

  SET @message = "Success"

ENDIF
]%%
Rate Limiting Submissions

Sometimes you want to limit submissions for a user email in lead capture forms. The simplest approach is to check if the email already exists in the submissions table.

%%[
SET @rows = LookupRows("Form_Log_DE","Email",@email)

IF RowCount(@rows) > 5 THEN
  RaiseError("Too many submissions", true)
ENDIF
]%%
Data Extension Upsert Pattern
%%[
SET @rows = LookupRows("Leads_DE","Email",@email)

IF RowCount(@rows) > 0 THEN

  UpdateData(
    "Leads_DE",
    1,
    "Email", @email,
    "Status", "Updated",
    "UpdatedDate", Now()
  )

ELSE

  InsertData(
    "Leads_DE",
    "Email", @email,
    "Status", "New",
    "CreatedDate", Now()
  )

ENDIF
]%%

InsertDe() or UpdateDe() use these functions to insert or update data into a data extension from emails.

Secure cloud pages

You can use AMPscript to secure your CloudPages from unwanted visits. The first step is to disable indexing and possibly avoid using a personalized domain. On top of that, you can secure your pages with a simple AMPscript check.

%%[
SET @token= RequestParameter("token")

IF @token != "my-secret-access-code" THEN 
   RaiseError()
ENDIF
]%%

Along with advanced options to secure CloudPages, you can also ask support to add your page under “menu items,” which will lock the resource behind an SFMC login.

Advanced voucher assignment based of the subscriber loyalty tier

When assigning unique vouchers, ClaimRow() ensures each code is used only once by locking the record after retrieval.

%%[
VAR @segment, @voucherRow, @voucherCode

/* get subscriber segment */
SET @segment = AttributeValue("Segment")

IF EMPTY(@segment) THEN
  SET @segment = "STANDARD"
ENDIF

/* assign voucher from correct pool */
IF @segment == "VIP" THEN

  SET @voucherRow = ClaimRow(
    "Vouchers_VIP",
    "IsClaimed",
    "SubscriberKey",
    _subscriberkey
  )

ELSE

  SET @voucherRow = ClaimRow(
    "Vouchers_STANDARD",
    "IsClaimed",
    "SubscriberKey",
    _subscriberkey
  )

ENDIF

/* handle result */
IF EMPTY(@voucherRow) THEN

  SET @voucherCode = "NO-CODE"

ELSE

  SET @voucherCode = Field(@voucherRow, "VoucherCode")

ENDIF
]%%

Your voucher: %%=v(@voucherCode)=%%

Similar to ClaimRowValue(), but instead of returning a fallback, this function throws an error when no unclaimed rows are available.

Handle form submissions

Here we will need to cheat a little bit as we would switch to SSJS only to get request method value.

<script runat=server>
    Platform.Load("Core", "1.1.1");
    //Variable.SetValue('@ip', Platform.Request.ClientIP); to give you more ideas :P
    Variable.SetValue('@request', Platform.Request.Method); 
</script>
%%[
SET @errorPage = 1111
SET @thankYouPage = 2222
SET @error = false

IF @request=="POST" THEN
	SET @email = RequestParameter("email")
	/*raise error when email is empty*/
	IF EMPTY(@email) THEN Redirect(CloudPagesURL(@errorPage,'message','email should not be empty')) ENDIF
]%%
//do your thing
%%[ENDIF]%%
Generate SubscriberKey using MD5
%%[
VAR @email, @subscriberKey

SET @email = Lowercase(Trim(EmailAddress))

/* generate deterministic subscriber key */
SET @subscriberKey = MD5(@email)
]%%
Content Rendering from Stored HTML
%%[
SET @htmlBlock = Lookup("Content_DE","HTML","Key","promo_1")
]%%
%%=TreatAsContent(@htmlBlock)=%%
Reusable Content with ContentBlockByKey

A good practice, based on experience, is to use the ContentBlockByKey() function when adding code snippets to your emails and, most importantly, assign meaningful names to your content blocks.

%%[
SET @content = ContentBlockByKey("promoBlock")
]%%
%%=TreatAsContent(@content)=%%
Disable tracking for particular link

Sometimes you may be asked to disable tracking for a specific link. A practical solution is to render the entire href attribute from a variable. This prevents Salesforce Marketing Cloud from detecting the link before personalization, so it won’t be tracked.

%%[
SET @urlHtml = '<a href="%=v(@somelink_with_queryPramms_and_hashtag)=%"> 
  Hello I'm hashtag link and won't tell anybody you clicked on me
</a>'
]%%
%%=TreatAsContent(@urlHtml)=%%
Prevent ClaimRow allocating vouchers in Preview

ClaimRow() runs even in preview mode and can consume real vouchers. To prevent this, use the _messagecontext variable to return a dummy value when the context is PREVIEW.

%%[
IF _messagecontext == "PREVIEW" THEN
  SET @code = "TEST-CODE"
ELSE

  SET @row = ClaimRow(
    "Coupons_DE",
    "IsClaimed",
    "SubscriberKey",
    _subscriberkey
  )

  SET @code = Field(@row,"CouponCode")

ENDIF
]%%
Mixing AMPscript with GTL Data Sources

In some advanced email templates, especially older or hybrid setups, you might see AMPscript used together with Guide Template Language (GTL). This allows you to loop through structured data (like JSON) and then pass values into AMPscript for further processing.

I have not used this pattern extensively myself, but I’ve seen it used in the past when working with dynamic data sources inside Content Builder.

{{.datasource products type=variable source=@products maxrows=5}}
  {{.data}}

    %%[
    SET @name = TreatAsContent('{{products.name}}')
    SET @price = TreatAsContent('{{products.price}}')
    ]%%

    <p>
      Product: %%=v(@name)=%%<br>
      Price: %%=v(@price)=%%
    </p>

  {{/data}}
{{/datasource}}
Why This Exists
  • GTL is better for looping and structured data
  • AMPscript is better for logic and personalization
  • TreatAsContent() acts as a bridge between the two
Error Handling with SSJS Try/Catch Around AMPscript

There is no native error handling in AMPscript, but SSJS comes to the rescue with try/catch blocks, which turn vague “An error occurred” messages into something more useful to work with.

<script runat="server">
Platform.Load("Core","1.1.1");
try {
</script>
%%[
RaiseError("This is error man")
]%%
<script runat="server">
} catch(e) {
  Write(Stringify(e))
}
</script>

Adding error handling will give us

{"message":"This is error man","description":"ExactTarget.OMM.AMPScriptRaiseErrorException: This is error man - from Jint\r\n\r\n"}

Without

An error occurred
Filtering Data Using Prebuilt Data Filters

AMPscript has limited filtering capabilities, but this can be solved by creating a filtered Data Extension and retrieving its data using AMPscript.

%%[
VAR @rows, @row, @count, @i
/* external key of your Data Filter */
SET @rows = ExecuteFilter("HighValueCustomers_Filter")
SET @count = RowCount(@rows)
IF @count > 0 THEN
  FOR @i = 1 TO @count DO
    SET @row = Row(@rows,@i)
    SET @name = Field(@row,"FirstName")
    SET @points = Field(@row,"Points")
]%%
    <p>%%=v(@name)=%% - %%=v(@points)=%% points</p>
%%[
  NEXT @i
ELSE
]%%
  <p>No matching records found</p>
%%[
ENDIF
]%%

make your data extension name equal to external key

Now a more real-life scenario: show top customers based of engagement scoring

%%[
VAR @rows, @row, @i

/* get top 3 customers by points */
SET @rows = ExecuteFilterOrderedRows(
  "HighValueCustomers_Filter",
  3,
  "Points DESC"
)

FOR @i = 1 TO RowCount(@rows) DO

  SET @row = Row(@rows,@i)

  SET @name = Field(@row,"FirstName")
  SET @points = Field(@row,"Points")

]%%
  <p>#%%=v(@i)=%% %%=v(@name)=%% - %%=v(@points)=%% points</p>
%%[
NEXT @i
]%%
Encryption and Decryption in AMPscript

MD5 is useful for hashing, but it’s one-way only. Sometimes you need to encrypt data and later decrypt it, for example when passing sensitive values between emails and CloudPages.

AMPscript provides EncryptSymmetric() and DecryptSymmetric() for this.

<script runat="server">
Platform.Load("Core","1.1.1");
try {
</script>
%%[
VAR @value, @enc, @dec

SET @value = "hello"

/* encrypt */
SET @enc = EncryptSymmetric(
  @value,
  "aes",
  @null,
  "password123",
  @null,
  "A1B2C3D4E5F60708",
  @null,
  "00112233445566778899AABBCCDDEEFF"
)

/* decrypt */
SET @dec = DecryptSymmetric(
  @enc,
  "aes",
  @null,
  "password123",
  @null,
  "A1B2C3D4E5F60708",
  @null,
  "00112233445566778899AABBCCDDEEFF"
)
]%%

Encrypted: %%=v(@enc)=%%<br>
Decrypted: %%=v(@dec)=%%
<script runat="server">
} catch(e) {
  Write(Stringify(e))
}
</script>
Updating Salesforce Records Directly from AMPscript

Sometimes you don’t want to store data only in Marketing Cloud. Instead, you want to update records directly in Salesforce, for example when a user submits a form or updates preferences.

AMPscript provides the UpdateSingleSalesforceObject() function, which allows you to update a single record in Sales Cloud or Service Cloud using Marketing Cloud Connect.

%%[
VAR @contactId, @result

SET @contactId = RequestParameter("id")

IF NOT EMPTY(@contactId) THEN

  SET @result = UpdateSingleSalesforceObject(
    "Contact",
    @contactId,
    "HasOptedOutOfEmail",
    "true"
  )

ENDIF
]%%

Updating Salesforce objects can introduce noticeable delays. During this time, users, even on gigabit connections, may start wondering if they actually clicked the submit button and end up submitting the form multiple times, causing duplicate updates. A better approach is to log changes in a Data Extension first and then process them asynchronously using an automation to update Salesforce.

Unsubscribe with Error Handling using LogUnsubEvent

When handling unsubscribes in a custom preference center, you need to inform Salesforce Marketing Cloud that the subscriber has unsubscribed. Instead of a simple update, you must perform a set of operations required for a proper contact unsubscribe, make the LogUnsubEvent call.

<script runat="server">
Platform.Load("Core","1.1.1");

try {
</script>

%%[
/* Declare variables */
VAR @subscriberKey, @jobId, @listId, @batchId, @reason
VAR @request, @prop, @statusCode, @overallStatus, @requestId
VAR @responseRow, @statusMessage, @errorCode

/* Get context values */
SET @subscriberKey = _subscriberkey
SET @jobId = RequestParameter("jobid")
SET @listId = RequestParameter("listid")
SET @batchId = RequestParameter("batchid")

/* Reason for unsubscribe */
SET @reason = "One-click unsubscribe via CloudPage"

/* Create API request */
SET @request = CreateObject("ExecuteRequest")
SetObjectProperty(@request, "Name", "LogUnsubEvent")

/* Add SubscriberKey */
SET @prop = CreateObject("APIProperty")
SetObjectProperty(@prop, "Name", "SubscriberKey")
SetObjectProperty(@prop, "Value", @subscriberKey)
AddObjectArrayItem(@request, "Parameters", @prop)

/* Add JobID */
SET @prop = CreateObject("APIProperty")
SetObjectProperty(@prop, "Name", "JobID")
SetObjectProperty(@prop, "Value", @jobId)
AddObjectArrayItem(@request, "Parameters", @prop)

/* Add ListID */
SET @prop = CreateObject("APIProperty")
SetObjectProperty(@prop, "Name", "ListID")
SetObjectProperty(@prop, "Value", @listId)
AddObjectArrayItem(@request, "Parameters", @prop)

/* Add BatchID */
SET @prop = CreateObject("APIProperty")
SetObjectProperty(@prop, "Name", "BatchID")
SetObjectProperty(@prop, "Value", @batchId)
AddObjectArrayItem(@request, "Parameters", @prop)

/* Add unsubscribe reason */
SET @prop = CreateObject("APIProperty")
SetObjectProperty(@prop, "Name", "Reason")
SetObjectProperty(@prop, "Value", @reason)
AddObjectArrayItem(@request, "Parameters", @prop)

/* Execute API call */
SET @statusCode = InvokeExecute(@request, @overallStatus, @requestId)

/* Parse response */
SET @responseRow = Row(@statusCode, 1)
SET @statusMessage = Field(@responseRow, "StatusMessage")
SET @errorCode = Field(@responseRow, "ErrorCode")
]%%

<script runat="server">
} catch(e) {

  /* Output error for debugging */
  Write("<b>Error:</b> " + Stringify(e));

}
</script>

<!-- Debug output -->
Response Row: %%=v(@responseRow)=%%<br>
Status: %%=v(@statusMessage)=%%<br>
Error Code: %%=v(@errorCode)=%%
Send-Time vs View-Time Content Handling

AMPscript executes at send time, but content can also be viewed later in different contexts like “View as Web Page” or forwarded emails. In those cases, you may want to control whether the user sees the original send-time content or the latest available data.

This example shows how to use send logging and context checks to display the correct version of content depending on where it is viewed.

%%[
VAR @subscriberId, @jobId, @batchId
VAR @sendLogRow, @content, @context

/* Identify send context */
SET @context = _messagecontext

/* Capture identifiers */
SET @subscriberId = _subscriberid
SET @jobId = jobid
SET @batchId = batchid

/* Default content (latest version) */
SET @content = "This is the latest version of the content."

/* If not email send, try to fetch send-time snapshot */
IF @context != "SEND" THEN

  /* Lookup send log to get original content */
  SET @sendLogRow = LookupRows(
    "SendLog_DE",
    "SubscriberID", @subscriberId,
    "JobID", @jobId,
    "BatchID", @batchId
  )

  IF RowCount(@sendLogRow) > 0 THEN
    SET @content = Field(Row(@sendLogRow,1),"EmailContent")
  ENDIF

ENDIF
]%%

<p>%%=v(@content)=%%</p>

This type of content switch is often used when segments change frequently. In such cases, your VAWP (View as Web Page) can render incorrectly or display unexpected content.

Dynamic RSS Feed Content in Email

Sometimes you don’t want to store content in a Data Extension or CMS. Instead, you can pull the latest articles directly from an RSS feed at send time. This ensures your email always contains the most up-to-date content without manual updates.

%%[
VAR @xml, @items, @rowCount, @row, @i
VAR @title, @link, @desc

/* fetch RSS feed */
SET @xml = HTTPGet("https://example.com/rss.xml")

/* parse items */
SET @items = BuildRowsetFromXML(@xml, "/rss/channel/item", 0)
SET @rowCount = RowCount(@items)

/* limit to top 5 */
IF @rowCount > 5 THEN
  SET @rowCount = 5
ENDIF

/* loop through articles */
FOR @i = 1 TO @rowCount DO

  SET @row = Row(@items, @i)

  SET @title = Field(BuildRowsetFromXML(@xml, Concat("/rss/channel/item[",@i,"]/title"),1),1)
  SET @link  = Field(BuildRowsetFromXML(@xml, Concat("/rss/channel/item[",@i,"]/link"),1),1)
  SET @desc  = Field(BuildRowsetFromXML(@xml, Concat("/rss/channel/item[",@i,"]/description"),1),1)

]%%

  <p>
    <strong>%%=v(@title)=%%</strong><br>
    %%=v(@desc)=%%<br>
    <a href="%%=RedirectTo(@link)=%%">Read more</a>
  </p>

%%[
NEXT @i
]%%

AMPscript allows you to fetch and parse XML feeds using HTTPGet() and BuildRowsetFromXML().

Add copyright info to email footers

This is a really simple trick, but it’s very helpful in cases where your templates previously had the copyright year hardcoded and you had to go and fix every single one of them. Here’s a better way if you want to automate things a bit by adding a copyright line with a dynamically changing year.

<p>© %%=Format(Now(),'yyyy')=%% All rights reserved.</p>
<!-- OR -->
<p>© %%xtyear%% All rights reserved.</p> 
Query shared data extensions


This is not possible in SSJS by any method, fo

🔒 Premium Subscriber Content

Please log in to preview content. Log in or Register

You must log in and have a Premium Subscriber account to preview the content.

When upgrading, please use the same email address as your WordPress account so we can correctly link your Premium membership.

Please allow us a little time to process and upgrade your account after the purchase. If you need faster access or encounter any issues, feel free to contact us at info@martechnotes.com or through any other available channel.

To join the Discord community, please also provide your Discord username after subscribing, or reach out to us directly for access.

You can subscribe even before creating a WordPress account — your subscription will be linked to the email address used during checkout.

Premium Subscriber

29,99 € / Year

  • Free e-book with all revisions - 101 Adobe Campaign Classic (SFMC 101 in progress)
  • All Premium Subscriber Benefits - Exclusive blog content, weekly insights, and Discord community access
  • Lock in Your Price for a Full Year - Avoid future price increases
  • Limited Seats at This Price - Lock in early before it goes up
  • Monthly 15-Minute Call - Discuss any topic directly

AMPscript vs SSJS

Marcel Szimonisz
Table of contents: Programing languages

The main difference between AMPscript and SSJS in Salesforce Marketing Cloud Engagement is that AMPscript is built for personalization, while SSJS is better suited for complex server-side logic, integrations, and data processing. For most email personalization use cases, AMPscript is the preferred choice because it is tightly integrated with the email rendering engine and typically requires less overhead than SSJS. When personalization logic is straightforward and does not involve complex array manipulation, object processing, or API interactions, AMPscript generally provides a simpler and more efficient solution.

AMPscript vs SSJS at a practical level

AMPscript follows a language model based on functions, variables, statements, and inline or block delimiters, which is why it fits naturally inside email HTML and dynamic content blocks. It is designed around rendering output as part of the message itself, so it feels close to the content layer.

SSJS runs as server-side JavaScript inside Marketing Cloud with platform-specific libraries, so it feels closer to application scripting than template decoration. What typically happens is that developers prefer SSJS when the problem involves arrays, objects, longer logic branches, or interactions that look more like programming than personalization markup.

Area AMPscript SSJS
Best fitInline personalization and outputHeavier logic and structured processing
Code style Short expressions inside contentScript-oriented JavaScript blocks
Strength Fast to embed in email markupEasier to manage complex logic
Common pain point Becomes messy when logic growsBecomes verbose for simple content output
Typical owner Email builder or SFMC specialistDeveloper or technical consultant

When AMPscript is the better fit

AMPscript is usually the better choice when the content itself is the main thing you are changing. That is why personalizing messages with subscriber data, conditions, and lookup-driven content tends to be faster in AMPscript than in SSJS. If the requirement is “show this block for one audience, pull a field from a data extension, and output a line of text,” AMPscript is normally the shortest path.

Typical AMPscript scenarios

In real world of daily marketing automation consultant AMPscript works well for tasks like:

  • Simple email personalization i.e. Greeting a subscriber by name with fallback
  • Showing different copy by segment or language
  • Looking up a loyalty tier, offer code or assigned agent contact information
  • Switching a hero block based on profile data
  • Outputting simple calculations directly inside a template
  • Email language switch

The key advantage is proximity. The logic sits close to the HTML it affects, so a content block can stay readable when the rules are still small. A marketer or campaign builder who knows Marketing Cloud well can usually follow the logic without reading a large script file.

Where AMPscript starts to break down

A common issue is that AMPscript becomes harder to manage when business logic expands beyond straightforward personalization. Once you have nested conditions, repeated lookups, string parsing, working with objects (arrays) or multiple layers of fallback logic, many teams end up following a practical split between AMPscript for presentation and SSJS for heavier logic. AMPscript still works, but the code often becomes dense enough that small edits carry more risk than they should.

When SSJS is the better fit

SSJS becomes more attractive when the job looks like programming rather than message decoration. It is more comfortable for JSON parsing, looping, object handling, HTTP requests, and programmatic data extension work than AMPscript, especially when the input data is not already shaped for direct output.

Typical SSJS scenarios

What typically happens is that SSJS gets chosen for tasks such as:

  • Transforming a payload before rendering content
  • Iterating over larger sets of data with clearer loop logic
  • Calling external endpoints and processing the response
  • Building reusable logic for several content variations
  • Handling structured data that would be awkward in AMPscript

SSJS is usually easier to read when you need variables, arrays, helper functions, and multi-step processing. The syntax is also more familiar to developers who work outside Marketing Cloud.

Where SSJS becomes awkward

SSJS is not automatically better just because it is JavaScript. A common issue is that simple personalization becomes more verbose when you push everything into SSJS. If all you need is a short conditional output inside an email block, writing a full script section can feel heavier than the requirement deserves.

That trade-off matters in email production. When a template needs frequent copy edits, campaign-level tweaks, or last-minute content swaps, AMPscript often keeps the markup more approachable. SSJS can solve the problem, but it may leave the content layer feeling more technical than necessary.

Platform behavior differences that matter in production

Rendering inside email content

AMPscript is rendering-first. It is comfortable when logic and output need to live side by side in the same content block. You can switch between HTML and personalization quickly, which keeps simple templates compact.

SSJS is script-first. It is usually cleaner when you need to prepare data before outputting anything. In practice, that means AMPscript often wins at local content decisions, while SSJS wins when the content depends on a small processing pipeline.

Data structures and transformation complexity

One limitation of AMPscript is that it becomes awkward once personalization depends on data preparation rather than direct display. That is where heavier JavaScript-based preparation before final rendering starts to make more sense. If a personalization rule depends on transforming a list, reshaping a payload, or walking through nested data, SSJS is usually easier to reason about.

This is one of the clearest differences between the two languages in Salesforce Marketing Cloud Engagement:

  • AMPscript is efficient when the data is already easy to use
  • SSJS is stronger when the data needs work before it becomes presentable

That distinction matters more than syntax preference. Most real implementation pain comes from data shape, not from the language itself.

Debugging and testing

A common issue is debugging, especially in email contexts where output is rendered during preview or send processes and mistakes are not always obvious. In practice, testing AMPscript and SSJS in a page context with visible output and isolated scripts gives faster feedback than trying to troubleshoot everything from inside a final email.

This usually benefits SSJS more than AMPscript because longer scripts need clearer inspection points. With AMPscript, the failures are often tied to output or lookup behavior. With SSJS, the failures are more likely to come from processing steps, variable state, or response handling, so a more controlled test setup becomes important.

Maintainability across teams

Maintainability is where the difference becomes very practical.

If the people maintaining the asset are mostly email specialists, AMPscript is often easier to support because the logic stays close to the content. If the code will be maintained by developers or technical marketing automation teams, SSJS usually ages better once the logic becomes more procedural.

What typically happens in larger programs is not that one language replaces the other. It is that teams stop using AMPscript for tasks it handles poorly and stop using SSJS for tasks that are really just inline content decisions.

A practical way to choose between AMPscript and SSJS in Salesforce Marketing Cloud Engagement

Use AMPscript when the output is the main job

AMPscript is usually the better fit when you need to:

  • Personalize copy directly in email content
  • Show or hide blocks based on profile or audience rules
  • Pull a few fields from sendable data
  • Keep logic close to the markup for easier content edits
  • Build quick dynamic variations without heavy preprocessing

This is the common pattern for day-to-day email personalization. The code stays shorter, and the intent is usually obvious from the template itself.

Use SSJS when processing is the main job

SSJS is usually the better fit when you need to:

  • Work through multi-step logic before rendering content
  • Transform structured data into a usable format
  • Handle arrays, objects, or JSON-style payloads
  • Make server-side calls or manage more technical workflows
  • Keep complex business logic readable over time

In practice, the switch to SSJS often happens when a personalization request starts sounding like an application rule instead of a content rule.

Split responsibilities when a single template needs both

The cleanest setup is often to let SSJS do the preparation and let AMPscript or plain HTML handle the final presentation. That pattern keeps the computational work in a scripting model that is easier to manage, while the visible message stays readable for the people editing content.

A common issue is forcing one language to do everything. When AMPscript is stretched into heavy transformation logic, templates become fragile. When SSJS is used for every minor output decision, simple content starts looking more technical than it needs to. Keeping each language in the role it handles best usually leads to cleaner builds and fewer production surprises.

Test SSJS and AMPscript

Marcel Szimonisz
Table of contents: Programing languages

One skill every Salesforce Marketing Cloud consultant should posses is the ability to quickly test SSJS and AMPscript snippets and receive real, actionable feedback instead of guessing what went wrong.

For this recipe, you will need:

  • One CloudPage
  • One Content Block

Cloud page

Create cloud page that its only content will be:

%%=TreatAsContent(ContentBlockByKey("external_key"))=%%

Content block

Create content block with you desired content for cloud page or any script that you want to test before you plug it into automation.

What are the benefits?

Cloud pages

Cashed content of cloud page is basically simple ampscript referenceing content block so for cloud page itself nothing changes the trick comes into where

Automation scripts

You can quickly test you script outside of automation and do not need to wait for it to start. You get results immediatelly

Good practice

For those that this seems to be simple stuff lets add some tips t

🔒 Premium Subscriber Content

Please log in to preview content. Log in or Register

You must log in and have a Premium Subscriber account to preview the content.

When upgrading, please use the same email address as your WordPress account so we can correctly link your Premium membership.

Please allow us a little time to process and upgrade your account after the purchase. If you need faster access or encounter any issues, feel free to contact us at info@martechnotes.com or through any other available channel.

To join the Discord community, please also provide your Discord username after subscribing, or reach out to us directly for access.

You can subscribe even before creating a WordPress account — your subscription will be linked to the email address used during checkout.

Premium Subscriber

29,99 € / Year

  • Free e-book with all revisions - 101 Adobe Campaign Classic (SFMC 101 in progress)
  • All Premium Subscriber Benefits - Exclusive blog content, weekly insights, and Discord community access
  • Lock in Your Price for a Full Year - Avoid future price increases
  • Limited Seats at This Price - Lock in early before it goes up
  • Monthly 15-Minute Call - Discuss any topic directly

Marketing Cloud Connect and APIs

Introduction to Marketing Cloud Connect

Marcel Szimonisz
Table of contents: Marketing Cloud Connect and APIs

Marketing Cloud Connect is the native Salesforce integration that links Salesforce Marketing Cloud (SFMC) with Salesforce Sales Cloud and Service Cloud so your CRM data, audiences, and engagement tracking can move between platforms with fewer custom pipelines. Practically, it’s what makes common operational workflows possible: syncing CRM Leads/Contacts to SFMC, sending triggered messages from Salesforce records, using Salesforce data in SFMC segmentation, and writing email tracking data back to Salesforce for reporting and sales follow-up. Salesforce frames it as the connector that enables cross-cloud features like Salesforce Data entry events, synchronized data sources, and tracking between the two systems through a managed configuration rather than a ground-up custom build (native integration features between Marketing Cloud and Salesforce CRM).

What Marketing Cloud Connect actually is (and what it is not)

Marketing Cloud Connect is not “just an API connection.” In practice, it’s a package + configuration + security model that lights up specific integration capabilities across both platforms, including:

  • Synchronized Data Sources (CRM objects available inside SFMC for segmentation and automation)
  • Salesforce Data entry events (Automation Studio triggers based on CRM record changes)
  • Send from Salesforce (send emails to CRM report/campaign members using SFMC sending infrastructure)
  • Tracking back to Salesforce (email sends, opens, clicks, unsubscribes written into CRM tracking objects)

Those feature buckets are the reason teams implement MCC instead of rolling their own integration, because they map directly to business workflows (sales follow-up, service notifications, nurture journeys, operational alerts) rather than raw data movement. That scope is laid out in Salesforce’s MCC enablement overview, including the idea that MCC is designed to share data and tracking in a controlled, supported pattern (supported cross-cloud features enabled by Marketing Cloud Connect).

How Marketing Cloud Connect works under the hood

The connection model: one “bridge,” two security contexts

What typically happens is:

  • You install/configure MCC on the Salesforce side (Sales/Service Cloud org).
  • You configure the SFMC side (your SFMC Business Unit), including the connected app/auth settings MCC requires.
  • You choose which data and features to enable (sync objects, tracking, send from Salesforce, etc.).

A common issue is assuming “sync” means real-time. MCC’s synchronized data model is designed around replication into SFMC, which is incredibly useful for segmentation at scale, but it introduces timing considerations (sync cadence, refresh behavior, and downstream automation dependencies). The practical implication: if your Journey entry criteria depends on a field updated five minutes ago in CRM, MCC sync timing can be the difference between a clean automation and a silent miss.

SalesforceBen’s MCC breakdown is helpful here because it emphasizes MCC as a purpose-built integration layer that enables common CRM-driven marketing workflows (send from CRM, CRM data in SFMC, tracking back) without requiring a bespoke integration for each use case (practical CRM to Marketing Cloud integration use cases enabled by MCC).

Data flow basics: CRM objects to SFMC, and tracking back to CRM

Think of MCC as two directional paths:

  • CRM to SFMC (operational data path): Contacts, Leads, Campaign Members, and other enabled objects become available in SFMC for segmentation and automation.
  • SFMC to CRM (engagement path): Marketing engagement (sends, opens, clicks, bounces, unsubscribes) can be written back so Sales or Service teams can see it in context.

That second path is where teams often get immediate value: sales reps can prioritize follow-up based on engagement, and service teams can avoid outreach conflicts (for example, not sending a renewal email to someone in an active support escalation). MCC is designed specifically to unlock those “marketing meets CRM” experiences rather than acting as a general ETL tool.

Key MCC features you’ll actually use in day-to-day builds

Synchronized Data Sources: segmentation that uses CRM fields

In practice, synchronized data is the bridge that lets SFMC act like a marketing execution layer while CRM remains the system of record. You pull CRM attributes into SFMC and then build:

  • Audience filters (SQL, Data Filters, Journey entry logic)
  • Suppression logic
  • Data-driven personalization (with caveats, covered below)

The real work is not “turn sync on.” The real work is modeling: deciding which objects and fields matter, how you’ll handle deletes, and how you’ll align identifiers so every subscriber has a stable key.

Salesforce Data entry events: automations triggered by CRM changes

If you want an email when a Case changes status, when an Opportunity moves stages, or when a Lead hits MQL, data entry events are often the cleanest native trigger mechanism. They’re powerful, but they also create operational questions: what counts as a “change,” what happens on bulk updates, and what throttling or processing delays might show up at scale.

Send from Salesforce: when non-marketers need to send controlled emails

“Send from Salesforce” is built for scenarios where users live in CRM and still need to send approved templates through SFMC’s infrastructure. The benefit is governance: central templates, standardized tracking, and a predictable unsubscribe model.

Real implementation considerations (the stuff that bites later)

Identity strategy: Subscriber Key is not an afterthought

The hardest MCC problems are usually identity problems. If Subscriber Key is inconsistent (email in one place, ContactId somewhere else), you’ll see:

  • Duplicate subscribers
  • Broken suppression rules
  • Journeys that re-enter people unexpectedly
  • Tracking that’s hard to reconcile back to CRM

The Salesforce Certified Marketing Cloud Consultant guide explicitly positions data model and subscriber identity decisions as core consultant responsibilities, reinforcing that correct key strategy and data design are foundational, not optional (consultant-level expectations around data modeling and subscriber identity).

Data freshness and segmentation: plan for sync timing

If your build assumes instantaneous CRM updates, you’ll spend a lot of time debugging “why didn’t they enter the Journey?” A stable pattern is:

  • Use MCC sync for broad segmentation and recurring batches.
  • Use event-based triggers (data entry events) where timing is critical.
  • Log and monitor entry counts and filter logic so you can quickly confirm whether the issue is data, timing, or logic.
Skills reality check: MCC helps, but you still need SFMC craft

MCC reduces custom integration work, but it doesn’t remove the need for strong SFMC fundamentals: SQL segmentation, data extension hygiene, Journey Builder patterns, and personalization constraints. Practitioners discussing SFMC career growth consistently highlight that advancement comes from mastering the practical execution layer (data, automation, debugging) not just knowing which checkbox enables a connector (practitioner perspective on which SFMC skills actually drive growth).

Using MCC data inside SFMC: practical querying and automation patterns

SQL against synchronized data: common patterns that scale

Once MCC data lands in SFMC, SQL becomes your workhorse for segmentation and orchestration. Real-world patterns include:

  • “Active customers with open Cases”
  • “Opportunities in negotiation stage with no email engagement in 14 days”
  • “Leads created in the last 24 hours, excluding existing Contacts”

MartechNotes’ SQL examples are useful because they reflect day-to-day SFMC querying reality: joining tables, deduping, and shaping data into sendable structures (often a purpose-built Data Extension) rather than trying to send directly from raw synced tables (practical SFMC SQL patterns for segmentation and data shaping).

When you need “just enough” scripting: SSJS and AMPscript with Data Extensions

MCC doesn’t eliminate the need to look up attributes, validate data, or enrich personalization at send time. A common implementation pattern is:

  • Use SQL to build a send audience Data Extension.
  • Use AMPscript for straightforward personalization (greetings, conditional content).
  • Use SSJS when you need programmatic lookups, transformations, or multi-step logic.

MartechNotes shows a pragmatic approach to pulling records from Data Extensions using SSJS and AMPscript together, which maps well to MCC builds where synchronized data is staged into campaign-specific Data Extensions before sending (practical techniques to retrieve Data Extension data via SSJS and AMPscript).

Here’s a realistic example: you sync CRM data, build a “Send_Audience” DE via SQL, then personalize with AMPscript.

%%[
/<em> Use ContactId (or LeadId) as SubscriberKey for MCC-aligned identity </em>/
SET @sk = _subscriberkey
SET @tier = Lookup("Send_Audience", "LoyaltyTier", "SubscriberKey", @sk)

IF Empty(@tier) THEN
 SET @tier = "Member"
ENDIF
]%%
Your status: %%=v(@tier)=%%
Bridging AMPscript and SSJS: reuse logic without duplicating everything

In practice, teams end up with mixed stacks: AMPscript in emails, SSJS in CloudPages, and SQL in automation. A subtle but useful technique is calling AMPscript functions from SSJS to keep logic consistent (for example, formatting dates or reusing lookup behaviors). MartechNotes demonstrates how SSJS can execute AMPscript functions, which helps when MCC-driven campaigns reuse the same formatting and rules across channels (using AMPscript functions inside SSJS to keep logic consistent).

Heavy personalization: where MCC data helps, but rendering limits still apply

MCC makes CRM attributes available, but it doesn’t magically make “infinite dynamic content” easy. A common issue is trying to do complex per-subscriber computation purely in AMPscript inside an email, then hitting maintainability and performance pain.

MartechNotes highlights a practical workaround: offload heavy logic to JavaScript when AMPscript becomes unwieldy, especially when the personalization rules are complex or require more structured code patterns (patterns for handling complex personalization when AMPscript becomes limiting). That insight matters in MCC programs because CRM-driven personalization often expands quickly from “first name” into tiering, product rules, and service-status-aware messaging.

Common MCC use cases (and what usually goes wrong)

Sales-aligned nurture: opportunities and engagement in one place

Typical build: sync Opportunities and Contacts, segment by stage, send a Journey, write engagement back to CRM so reps can see activity.

Common failure: poor deduping and key mismatches cause multiple subscriber records, which leads to messy tracking and inconsistent suppression.

Service notifications: operational messaging triggered by Case changes

Typical build: data entry event on Case updates, send email/SMS with contextual fields.

Common failure: sync timing assumptions cause the message to pull stale values unless you design the journey to reference the correct, up-to-date data source.

Multi-step automation: personalization plus governance

Marketing automation is where MCC shines because it connects CRM changes to orchestrated messaging. MartechNotes’ personalization and automation guidance emphasizes a practical reality: automated personalization only works when the underlying data is structured and reliably updated, otherwise the automation scales bad content just as efficiently as good content (practical constraints of personalization when it’s tied to marketing automation). MCC helps with access to CRM attributes, but the operational discipline around data quality and timing still determines whether it performs.

How to think about MCC in a modern stack

Marketing Cloud Connect is best treated as your default integration layer for Salesforce CRM to SFMC workflows, not a universal data warehouse or a replacement for governance. Use it to:

  • Activate CRM data inside SFMC without overbuilding integrations.
  • Standardize triggered and CRM-driven communications.
  • Return engagement signals to CRM where sales and service teams actually work.

Then fill gaps with purpose-built patterns: SQL staging tables for performance and clarity, controlled scripting for personalization, and clear identity rules so tracking remains coherent over time.

Synchronize CRM data

Marcel Szimonisz
Table of contents: Marketing Cloud Connect and APIs

Syncing data between Salesforce CRM and Salesforce Marketing Cloud is the difference between “we sent an email” and true lifecycle marketing. When Sales and Service Cloud data flows into Marketing Cloud reliably, you can trigger journeys off real events, personalize content with accurate attributes, and keep reporting consistent across systems. When it does not, you get duplicate contacts, stale segmentation, and automation that breaks silently.

This guide focuses on real implementation details: what actually syncs with Marketing Cloud Connect, how the Marketing Cloud contact model affects identity, when to use synchronized data sources vs API vs SQL, and how to build segments and personalization that survive messy CRM data.

Understand the core sync options (and pick the right one)

Marketing Cloud Connect: the “native” bridge for Sales/Service Cloud data

Marketing Cloud Connect is the standard way to connect Salesforce CRM (Sales Cloud or Service Cloud) with Marketing Cloud. The practical value is that it unlocks shared capabilities across products, including using CRM data in Marketing Cloud and enabling cross-product features like sending triggered communications based on CRM context. Salesforce positions Connect as the supported integration path to link the apps and enable data and feature interoperability through the installed package and configuration steps described in the guided setup for Marketing Cloud Connect.

In practice, Connect is the right default when:

  • CRM is your system of record for leads, contacts, accounts, cases, or custom objects
  • Your marketing ops team wants less custom code and more admin-managed sync
  • You need CRM-driven targeting and reporting without building a full integration layer

A common issue is assuming Connect means “real-time everywhere.” What typically happens is you get strong platform-level integration, but you still need to design for how Marketing Cloud stores and keys contacts (more on that next), and you still need to decide where the data lands in Marketing Cloud so automations can use it.

Data Cloud (and identity resolution) when “one person” has many identifiers

If your biggest pain is identity, not transport, Data Cloud can become the upstream unifier. Salesforce highlights that identity resolution is designed to reconcile and link records using rules and match logic, so different source identifiers can map to a more consistent view of a customer when you activate downstream audiences. The practical implication is you can reduce duplicate “people” before data ever hits a marketing audience, using the approach described in Salesforce’s discussion of identity resolution and unification behavior.

This matters when:

  • The same person exists as Lead and Contact, or across multiple business units
  • Email changes frequently, but you still want consistent journey state
  • You are trying to control suppression and frequency across brands

Get the Marketing Cloud contact model right before you sync anything

Marketing Cloud does not behave like CRM objects. It’s closer to a “contact database plus channels plus attributes” model. The critical implementation detail is that Marketing Cloud ties channel addresses (like email) and profile attributes to a contact identity, and your key choice has downstream impact on deduplication, subscription handling, and journey eligibility. Salesforce’s explanation of how contacts and attributes are organized in the contact model makes the key point: your contact identity is central, and multiple pieces of data relate back to it.

In practice:

  • If you key contacts by Email Address, you will eventually create duplicates when people change email.
  • If you key by CRM ContactId/LeadId, you reduce duplicates, but you must manage “one person across Lead and Contact” explicitly.
  • If you use custom keys, you must enforce them consistently across every import, API upsert, and data extension relationship.

A common issue is implementing a sync first, then discovering Journeys split because two records represent the same person with different keys. Fixing that later can mean contact deletion, re-keying, or rebuilding Data Extensions and automations.

Marketing Cloud Connect: what it actually gives you (and what it does not)

Marketing Cloud Connect is often described as “sync CRM data into Marketing Cloud,” but the more useful way to think about it is: it enables supported access patterns to Salesforce data within Marketing Cloud, plus CRM-aware features and tracking.

One of the clearer field-level perspectives is the breakdown of what Connect unlocks operationally, including access to Salesforce objects and the ability to leverage the integration in day-to-day marketing workflows discussed in a practical overview of what Marketing Cloud Connect enables. The takeaway to apply is that Connect is a capability layer, but your data design still determines whether automations are stable and segmentation is fast.

What typically happens in real implementations:

  • Teams sync too many objects, then struggle with performance and unclear ownership of fields.
  • Teams sync too little, then end up rebuilding the same data through ad hoc imports or APIs.
  • Fields get renamed, picklists change, and suddenly segmentation breaks.

Treat your sync scope like an API contract: explicit, documented, and versioned.

A practical data-sync blueprint (that avoids the usual pitfalls)

Step 1: Define a canonical customer key

Pick one key to represent a person in Marketing Cloud and enforce it everywhere.

Patterns that work:

  • CRM ContactId for contacts, CRM LeadId for leads, plus a unification strategy (Data Cloud or custom mapping table).
  • An enterprise customer ID if you already have one across systems.

Patterns that usually hurt:

  • Email as the primary key (fine for quick starts, fragile at scale).
Step 2: Decide where synced data lands in Marketing Cloud

Marketing Cloud data lives in Data Extensions, and most segmentation and automation runs on those tables. Even if data is accessible from CRM via Connect, teams often materialize “working” Data Extensions for performance, history, and auditability.

Step 3: Establish refresh rules and latency expectations

Journeys and personalization fail when your team assumes “near real time” but the data refresh is periodic or event-driven.

Tie each use case to a requirement:

  • “Abandoned quote” email might need near real-time updates.
  • “Weekly upsell list” can tolerate batch refresh.

Querying and shaping synced data with SQL (the workhorse approach)

In Marketing Cloud, SQL Query Activities are the practical way to transform raw synced data into campaign-ready segments.

A very common pattern is building “latest record wins” logic, exclusion sets, and joins across multiple Data Extensions. If you need a solid set of proven patterns, the collection of real SQL patterns for Data Extensions is useful because it emphasizes the day-to-day realities: building segments, deduping rows, and shaping datasets for sends rather than trying to model a perfect relational database.

Example: Deduplicate to one row per ContactKey
SELECT
 ContactKey,
 MAX(LastModifiedDate) AS LastModifiedDate,
 MAX(EmailAddress) AS EmailAddress
FROM Raw_CRM_Contacts
GROUP BY ContactKey
Example: Build an “eligible audience” segment with suppression
SELECT a.ContactKey, a.EmailAddress
FROM Audience_Base a
LEFT JOIN Suppression_All s
 ON a.ContactKey = s.ContactKey
WHERE s.ContactKey IS NULL
 AND a.EmailAddress IS NOT NULL

In practice, the biggest win is separating:

  • Raw synced staging tables (wide, messy, close to source)
  • Curated sendable tables (narrow, stable schema, enforced keys)
  • Suppression and consent tables (owned and audited)

When SQL is not enough: server-side personalization and dynamic data access

Query Data Extensions with SSJS and AMPscript (and why it matters for sync)

Segmentation is not the only place sync shows up. A common issue is that a send uses the right audience, but the content still pulls the wrong or stale attribute. Many teams solve this by looking up the latest values at send time using AMPscript or SSJS, rather than relying only on the sendable Data Extension columns.

The practical technique of querying Data Extensions from scripts is laid out in hands-on examples of script-based Data Extension queries, which is especially useful when CRM sync latency exists but you still want to resolve a value dynamically (for example, “preferred store” or “last case status”) from the freshest curated table.

Example: AMPscript lookup by ContactKey
%%[
SET @ck = AttributeValue("ContactKey")
SET @tier = Lookup("DE_Loyalty","Tier","ContactKey",@ck)
]%%
Your tier: %%=v(@tier)=%%
Heavy personalization: when AMPscript becomes hard to manage

When personalization rules get large, nested, or data-driven, you can hit maintainability limits quickly. A pragmatic workaround is moving complex decisioning into SSJS so you can structure logic, reuse functions, and manage JSON more cleanly. That tradeoff is described in a deep dive into why JavaScript is often the escape hatch for complex personalization.

In practice, this matters when your CRM sync creates many optional attributes:

  • Multiple products owned
  • Multiple store affiliations
  • Multiple service entitlements

…and you need deterministic, testable logic to pick the “right” message.

Bridging AMPscript and SSJS (so your personalization can reuse the same logic)

A common issue is teams duplicating logic: AMPscript for email, SSJS for CloudPages, and the rules drift over time. One useful pattern is calling AMPscript functions from SSJS or standardizing lookups behind a shared abstraction. The practical technique of invoking AMPscript capabilities from SSJS helps reduce duplication when you already have battle-tested AMPscript snippets and want to reuse them rather than rewrite everything.

Example: SSJS calling AMPscript-style formatting
<script runat="server">
Platform.Load("core","1");
var raw = "2026-04-14";
var formatted = Platform.Function.FormatDate(raw, "MMMM d, yyyy");
Write(formatted);
</script>

API-based sync and troubleshooting: what you can and cannot pull from “objects”

Many teams eventually supplement Marketing Cloud Connect with API sync, especially for custom apps, preference centers, or near real-time events. A common misunderstanding is expecting “Marketing Cloud objects” to behave like queryable CRM objects. In practice, access depends on the API surface area, and some data retrieval requires specific SOAP objects or REST endpoints rather than ad hoc querying.

That nuance shows up clearly in a technical discussion of constraints when attempting to pull Marketing Cloud data via API, where the key implementation insight is: you need to align your approach to what the platform exposes, rather than assuming a single generic query mechanism exists for every internal entity.

Practical guidance:

  • Use APIs to upsert into Data Extensions when you need external systems to push updates.
  • Use SQL/Automation Studio to shape and validate those updates before activation.
  • Keep a “sync audit” Data Extension (timestamp, source, row counts, error codes) so you can prove freshness.

Making synced data usable in automation (Journeys, triggers, and consistency)

Sync is only valuable when it reliably drives automation.

A practical way to think about this is “data readiness” for activation:

  • Does the record have a stable ContactKey?
  • Is consent present and up to date?
  • Are required attributes populated?
  • Is the dataset shaped to avoid one-to-many explosions?

The marketing automation perspective in a consultant-style breakdown of how automation and personalization interact reinforces an important point: personalization is not just copy changes, it is a dependency chain where data quality and timing directly affect whether the customer sees the right experience.

In practice, stable activations come from a few habits:

  • Curate a sendable “golden” Data Extension per use case, not one mega table for everything.
  • Build suppression as a first-class dataset, not an afterthought.
  • Treat contact identity as a design constraint, not a configuration detail.

Common real-world failure modes (and how to avoid them)

Duplicate contacts and broken journey state

Root cause is usually inconsistent keys across imports, API upserts, and Connect-synced datasets. Fix by enforcing ContactKey rules and mapping Lead vs Contact intentionally.

Stale segmentation

Root cause is assuming data refresh cadence matches business needs. Fix by documenting latency per dataset and building automation schedules accordingly.

Personalization pulling the “wrong” value

Root cause is having multiple sources of truth inside Marketing Cloud. Fix by centralizing lookups to one curated DE and using send-time lookups selectively for truly dynamic fields.

Performance issues with wide tables

Root cause is syncing everything “just in case.” Fix by syncing only required fields, then materializing campaign-specific extracts.

A simple implementation pattern that scales

1) CRM sync via Marketing Cloud Connect for core objects and attributes you trust and need broadly, following the supported Connect configuration path.

2) Curated Data Extensions built with SQL for each activation purpose, using proven patterns like those in the SQL segmentation examples.

3) Selective send-time enrichment using AMPscript/SSJS lookups based on the scripted DE query approach when latency or attribute volatility makes batch enrichment risky.

4) Identity strategy aligned to the contact model constraints, with Data Cloud identity resolution where duplicates and multi-IDs are the main business blocker, as described in Salesforce’s identity resolution guidance.

This combination keeps the system maintainable: admins can operate the integration, developers can extend it safely, and marketers can build journeys and personalization on datasets that behave predictably.

Marketing Cloud Connect best practices

Marcel Szimonisz
Table of contents: Marketing Cloud Connect and APIs

Marketing Cloud Connect links Salesforce Sales or Service Cloud with Marketing Cloud Engagement, allowing teams to use CRM data for segmentation, personalization, campaign execution, and engagement tracking. A successful integration requires more than simply installing the connector – it needs clear ownership, controlled data, and consistent governance.

Set up synchronized data extensions as non sendable

Define Your Data and Lead-Management Strategy

Marketing Cloud Connect can support different data flows, so decide where a person should first become known to your business.

Marketing Cloud Engagement first

A form can write data directly to Marketing Cloud Engagement, usually into a data extension. Marketing Cloud Engagement can then nurture the person through a journey using email engagement, form submissions, website behavior, and scoring. Once the person reaches a defined qualification threshold, the qualified data can be sent to Salesforce as a Lead or Contact.

This model is useful when marketing wants to:

  • Start nurturing prospects before creating CRM records
  • Keep Salesforce free from unqualified or incomplete leads
  • Test campaigns and forms quickly
  • Let marketing manage early-stage communication independently

However, the process must include clear rules for consent, duplicate prevention, identity matching, and when a prospect is transferred to Salesforce.

Salesforce or Data 360 first

A form can also create or update a Salesforce record first. The data can then be synchronized to Marketing Cloud Engagement for segmentation, personalization, and nurturing.

This model is useful when the business needs to:

  • Give Sales immediate visibility of new inquiries
  • Apply Salesforce assignment rules and lead routing
  • Match the person to an existing Account, Contact, or Lead
  • Use CRM validation, deduplication, and compliance processes
  • Combine form data with sales, service, and customer history
  • Maintain Salesforce as the central customer and consent record

If Data 360 is part of the architecture, incoming data can also be unified with information from multiple sources before it is activated in Marketing Cloud. This supports more complete profiles, better segmentation, and more accurate personalization. Salesforce describes Data 360 as a platform for unifying and activating customer data from multiple sources. Salesforce Data 360 overview

Where do Salesforce Prospects fit?

Salesforce Marketing Cloud Next introduces a Prospect record for people who are not yet qualified as Leads. Prospects can be imported, nurtured, scored, and converted to Leads or Contacts when they meet defined engagement or qualification criteria. Working with Prospects

This is different from a standard Marketing Cloud Engagement data extension record. If the organization uses Marketing Cloud Next and Data 360, the Prospect object can support a formal pre-lead lifecycle. If it uses Marketing Cloud Engagement with Marketing Cloud Connect, the same business process may instead be implemented with data extensions, scoring rules, and a controlled handoff to Salesforce Leads.

The important principle is to define one clear lifecycle:

Form submission → Prospect or marketing record → Nurture → Qualification → Salesforce Lead or Contact

Document which system owns each field, how consent is synchronized, what qualifies a person for sales follow-up, and how engagement history is transferred between platforms.

Synchronize Only the Data You Need

A principle often repeated by marketing automation consultants is: bring only the data you need into the marketing platform.

This is important because Marketing Cloud Engagement does not count only people who receive emails. The current licensing metric is generally based on the Total Distinct Contacts Count, which is calculated using unique Contact Keys. The official number should be checked in the Contacts Counts report in Analytics Builder. Salesforce contact-count guidance

Marketing Cloud Connect can automatically register Salesforce Leads, Contacts, and Users as Marketing Cloud contacts when their records are synchronized. They can be added to All Contacts even if they do not have an email address, phone number, or active subscription. These records can therefore contribute to contact usage before any message is sent. Salesforce contact definition

The following can contribute to the billable contact count:

  • Records in All Contacts
  • Contacts in populations
  • Contacts stored in triggered-send hidden lists
  • Salesforce Leads, Contacts, and Users synchronized through Marketing Cloud Connect
  • Contacts added through imports, APIs, message sends, or Journey Builder
  • Contacts without a channel address, such as an email address or mobile number

Contacts are deduplicated by Contact Key. However, the same person can be counted more than once if different Contact Keys are used, for example, if the same email address exists under separate Salesforce IDs or subscriber keys.

It is also important to distinguish Subscribers from Contacts. All email subscribers are contacts, but not all contacts are subscribers. All Subscribers represents the email channel, while All Contacts can include email, SMS, MobilePush, synchronized CRM records, and contacts that have not yet been assigned to a channel.

For this reason, use Marketing Cloud Connect synchronization filters to bring in only records that are required. Many organizations create a Salesforce field such as Sync_to_MCE__c, which is set to true only when the record meets the agreed business rules—for example:

  • The record has a valid email address or mobile number
  • The record has the required marketing consent – HasOptedOutEmail, HasOptedOutPhone fields
  • The Lead is active and has not been converted
  • The record belongs to the relevant market or business unit
  • Test, internal, deleted, or inactive records are excluded
  • Salesforce Users are synchronized only when they are genuinely needed

Filtering must happen before records enter Marketing Cloud Engagement. For example, a Journey Builder entry filter is not enough to prevent contact creation: Salesforce states that a person can be counted as a contact as soon as they reach the journey entry source, before the entry filter is evaluated.

Synchronize only eligible records, use a consistent Contact Key, and monitor the Total Distinct Contacts Count, not only the All Subscribers number.

Create a Master Audience Data Extension

Create a reusable Master Audience Data Extension that combines eligible Leads, Contacts, and other approved audience records into one standardized structure. Include fields such as ContactKey, 18-digit Salesforce ID, record type, email address, mobile number, consent status, lifecycle stage, language, region, and business unit.

This data extension can be used to build reusable segments and send one email to a combined audience instead of creating separate sends for Leads and Contacts. Use a consistent Contact Key and apply deduplication rules before loading records. Do not include Salesforce Users unless they are genuinely part of the marketing audience, because synchronized CRM Users can also contribute to Marketing Cloud contact usage.

The Master Audience Data Extension should support segmentation and ad hoc sends. It should not normally be used directly as the entry source for every Journey.

Use Separate Data Extensions for Journeys

For each Journey, create a separate journey-specific Data Extension that contains the final audience snapshot and the fields required by that Journey. Populate it from the master audience using a scheduled query or automation.

This approach has several benefits:

  1. View As Web Page reliability
    The Journey Data Extension remains available after the segment is refreshed. This helps preserve the data needed to render View As Web Page links. Salesforce notes that a View As Web Page link can break if the original send Data Extension is cleared or deleted.
  2. Journey history
    The Data Extension provides a record of exactly which people entered the Journey at that time. This is more reliable than depending on a segment that changes later.
  3. Template preview and testing
    A stable send Data Extension makes it easier to preview personalization, test email rendering, and validate that the required fields are available before activation.

A common setup is to refresh the master audience or segment twice per day, then copy the eligible records into separate Journey Data Extensions. Apply a suitable retention policy so the Journey audience history remains available for the required reporting period. Salesforce recommends configuring retention policies for Data Extensions according to the business need.

Clean Up Contacts That Are No Longer Eligible

Changing a Salesforce synchronization filter does not automatically delete records that were previously synchronized to Marketing Cloud Engagement.

Create a regular cleanup process for contacts whose Salesforce record is:

  • Deactivated or deleted
  • Converted from a Lead
  • No longer covered by the Sync_to_MCE__c rule
  • Missing the required consent or contact details
  • No longer relevant to the marketing audience

Before deleting a contact, check that it is not active in a Journey, used in a current send, or required for reporting, consent, or compliance. Then remove it according to the organization’s retention policy.

Contact deletion in Marketing Cloud Engagement is irreversible and can remove associated tracking history and preferences. Also, if the Salesforce synchronization remains active, deleted contacts can be added back during the next synchronization cycle. Salesforce recommends reviewing synchronization filters and the Contacts Counts report when contact totals increase unexpectedly. Salesforce contact-count guidance

Excluding a record from synchronization prevents future updates, but it does not remove the existing Marketing Cloud contact.

Data Cleanup: Pause Synchronization for Contacts, Leads, and Users

Before deleting contacts from Marketing Cloud Engagement, pause the relevant Marketing Cloud Connect synchronization and review the synchronization filters. Updating a filter does not remove records that were already synchronized, and deleting contacts while synchronization remains active may cause them to be recreated during the next sync cycle. To prevent duplicate or unnecessary records, confirm that the contacts are no longer needed for active journeys, sends, reporting, consent, or compliance before completing the cleanup.

Consent Synchronization

You need to keep in mind that when a contact unsubscribes in Marketing Cloud Engagement, it will not automatically be reflected in Salesforce CRM. Most likely, unless configured otherwise, the HasOptedOutOfEmail flag will be used. This is even recommended not to use something else and will show you later on.

To properly synchronize consent in both systems, the Preference Center on the Marketing Cloud side will need to synchronize these unsubscribe records back to Salesforce CRM.

If a CRM user manually changes the Email Opt Out (HasOptedOutOfEmail) field in Salesforce CRM, this change is not automatically synchronized with the subscriber status in Marketing Cloud Engagement.

Marketing Cloud Connect provides Marketing Cloud Unsubscribe and Marketing Cloud Resubscribe links on Contact, Lead, and Person Account records to manage the status in both systems. Using Marketing Cloud Unsubscribe changes the subscriber status from Active to Unsubscribed in Marketing Cloud Engagement and enables the Email Opt Out field in Salesforce CRM. Similarly, using Marketing Cloud Resubscribe disables the Email Opt Out field in Salesforce CRM and changes the subscriber status back to Active in the Marketing Cloud All Subscribers list.

Therefore, simply checking or unchecking HasOptedOutOfEmail in Salesforce CRM should not be used to manage Marketing Cloud subscriber status. The corresponding Marketing Cloud Connect Unsubscribe or Resubscribe action should be used to keep both systems synchronized.

The same synchronization limitation also exists in the opposite direction. If a Marketing Cloud user manually unsubscribes a subscriber directly in Marketing Cloud Engagement, the subscriber will be prevented from receiving Marketing Cloud emails, but the Email Opt Out field in Salesforce CRM will not automatically be updated.

But there is more..

What happens when a subscriber clicks the one-click unsubscribe link? These unsubscribes are simila

🔒 Premium Subscriber Content

Please log in to preview content. Log in or Register

You must log in and have a Premium Subscriber account to preview the content.

When upgrading, please use the same email address as your WordPress account so we can correctly link your Premium membership.

Please allow us a little time to process and upgrade your account after the purchase. If you need faster access or encounter any issues, feel free to contact us at info@martechnotes.com or through any other available channel.

To join the Discord community, please also provide your Discord username after subscribing, or reach out to us directly for access.

You can subscribe even before creating a WordPress account — your subscription will be linked to the email address used during checkout.

Premium Subscriber

29,99 € / Year

  • Free e-book with all revisions - 101 Adobe Campaign Classic (SFMC 101 in progress)
  • All Premium Subscriber Benefits - Exclusive blog content, weekly insights, and Discord community access
  • Lock in Your Price for a Full Year - Avoid future price increases
  • Limited Seats at This Price - Lock in early before it goes up
  • Monthly 15-Minute Call - Discuss any topic directly

Synchronize consent

Marcel Szimonisz
Table of contents: Marketing Cloud Connect and APIs

Consent updates should be treated as events rather than simple field changes. A reliable process captures each consent action, records it, and synchronizes it with Salesforce asynchronously. This approach improves response times, supports error handling, and creates a clear audit trail for compliance.

Consent updates should be treated as events rather than simple field changes.

Why direct consent updates can be unreliable with MC Connect

A CloudPage should not wait for a direct update to a Salesforce Lead or Contact to complete. The request may trigger Salesforce Flows, validation rules, Apex code, or other automation, which can slow the response or cause it to fail. Imagine clicking “Save Preferences” and waiting 10 seconds or more to reach the thank-you page. Nobody likes that – especially in an era of gigabit internet connections.

Instead, Marketing Cloud Engagement should capture the consent event and place it in a processing queue. The user can then receive an immediate confirmation while the update is handled in the background.

Recommended consent-synchronization process

A reliable implementation can follow these steps:

  1. Capture the consent event in Marketing Cloud Engagement.
  2. Store the event in a consent queue data extension.
  3. Return a successful response to the user immediately.
  4. Use Automation Studio to process pending events at regular intervals.
  5. Update Salesforce in controlled batches.
  6. Retry failed updates and record unresolved errors in a separate exception data extension.

The consent queue should include the Contact Key, Salesforce record ID, consent type, updated status, timestamp, source, processing status, retry count, and error message. Each event should also have a unique event ID to prevent the same consent change from being processed more than once.

Handling unsubscribes

Unsubscribe events require special attention. When a subscriber opts out of all email communication, Marketing Cloud Engagement should record the master unsubscribe immediately. The corresponding Salesforce update can be completed afterward through the queued synchronization process, but the subscriber must remain suppressed in Marketing Cloud while the CRM update is pending.

When a subscriber uses the standard unsubscribe link or Profile Center, Marketing Cloud Connect changes the subscriber status to Unsubscribed and updates Salesforce’s Email Opt Out field. However, changing only the Email Opt Out field directly in Salesforce does not synchronize the unsubscribe status back to Marketing Cloud Engagement. When an unsubscribe is initiated in Salesforce, use the Marketing Cloud Unsubscribe action to ensure that both systems remain aligned.

It is also important to distinguish between different types of consent:

  • A master unsubscribe blocks general email communication.
  • A publication-list unsubscribe removes the subscriber from a specific communication type.
  • A channel-specific preference applies to a particular channel, such as SMS.

These consent types should be stored and processed separately so that a subscriber’s preferences are not applied too broadly.

Logging, retries, and monitoring

Every consent event should be logged with its source, timestamp, affected subscription, and processing status. This audit trail helps demonstrate compliance and prevents a later CRM update from accidentally reactivating a subscriber who has already opted out.

For reliable operation, define a maximum number of retry attempts, configure failure alerts, and create a manual review process for events that cannot be synchronized automatically. Records that exceed the retry limit should be moved to an exception data extension with enough information for an administrator to investigate and resolve the issue.

By treating consent changes as queued events instead of synchronous field updates, organizations can improve reliability, reduce delays, preserve consent history, and maintain better alignment between Marketing Cloud Engagement and Salesforce.

MCE Automation to Push consent to Connected Salesforce Org

🔒 Premium Subscriber Content

Please log in to preview content. Log in or Register

You must log in and have a Premium Subscriber account to preview the content.

When upgrading, please use the same email address as your WordPress account so we can correctly link your Premium membership.

Please allow us a little time to process and upgrade your account after the purchase. If you need faster access or encounter any issues, feel free to contact us at info@martechnotes.com or through any other available channel.

To join the Discord community, please also provide your Discord username after subscribing, or reach out to us directly for access.

You can subscribe even before creating a WordPress account — your subscription will be linked to the email address used during checkout.

Premium Subscriber

29,99 € / Year

  • Free e-book with all revisions - 101 Adobe Campaign Classic (SFMC 101 in progress)
  • All Premium Subscriber Benefits - Exclusive blog content, weekly insights, and Discord community access
  • Lock in Your Price for a Full Year - Avoid future price increases
  • Limited Seats at This Price - Lock in early before it goes up
  • Monthly 15-Minute Call - Discuss any topic directly

Introduction to the REST API

Marcel Szimonisz
Table of contents: Marketing Cloud Connect and APIs

Salesforce Marketing Cloud Engagement’s REST API is the fastest way to automate the work you normally do by clicking around Email Studio, MobileConnect, Journey Builder, and Contact Builder. If you need to trigger sends, create or update Data Extension rows, retrieve tracking data, or orchestrate Journey entry from an external app, the REST API is the integration surface you’ll touch most often. Salesforce groups Marketing Cloud APIs into REST and SOAP and recommends REST for most modern integration patterns, while SOAP still shows up for some legacy objects and enterprise workflows – so knowing where REST fits (and where it doesn’t) prevents a lot of dead ends and rework how Marketing Cloud splits capabilities across REST and SOAP.

REST API in Marketing Cloud Engagement: what it covers (and what it doesn’t)

In practice, REST API work in Marketing Cloud Engagement falls into a few buckets:

  • Auth and security: getting an access token, handling expiry, scoping to the right Business Unit.
  • Data operations: CRUD-like interactions for Data Extensions and other data endpoints.
  • Messaging and orchestration: triggering sends, injecting contacts into Journeys, managing assets where supported.
  • Tracking and reporting: pulling event data and send outcomes.

Salesforce’s REST API overview makes a key point that shows up immediately when you build: you authenticate with installed packages and OAuth 2.0, then call REST resources using the base REST endpoint for your stack and tenant how Marketing Cloud REST endpoints are accessed after OAuth. That sounds simple, but it drives several real implementation decisions: where you store secrets, how you refresh tokens, and how you prevent “works in DEV, fails in PROD” surprises caused by wrong subdomain or Business Unit context.

Set up API access the way production systems expect

Create an Installed Package and choose scopes deliberately

A common issue is over-scoping during early testing, then later trying to lock things down and breaking calls. Trailhead’s API module walks through the practical model: an Installed Package represents your integration, and you add an API component (typically Server-to-Server) to get credentials and define permissions how Installed Packages define API permissions for integrations.

What typically happens in real teams:

  • Developers request broad permissions “to move fast”.
  • Security later asks for least-privilege.
  • You discover which endpoints actually need which scopes only after you’ve wired the app.

So treat scopes as a design artifact. Document them alongside the endpoints you call.

Pick the right auth flow (Server-to-Server for most backend jobs)

Most backend services use Server-to-Server (client credentials) because it’s stable for scheduled jobs and middleware, while web-based user delegation patterns are a different fit why Server-to-Server is the typical Marketing Cloud API auth choice. That guidance matches what you see in production: nightly data syncs, triggered sends from order systems, and event-driven updates rarely want a human login in the middle.

Authenticate with OAuth 2.0 (and don’t ignore token lifecycle)

Marketing Cloud’s REST APIs start with an access token. The exact URL and payload depend on your tenant, but the mechanics are consistent: you exchange client credentials for a bearer token, then include that token in subsequent calls.

Example: request an access token (Server-to-Server)
curl --request POST 
 --url "https://YOUR_SUBDOMAIN.auth.marketingcloudapis.com/v2/token" 
 --header "Content-Type: application/json" 
 --data '{
 "grant_type":"client_credentials",
 "client_id":"YOUR_CLIENT_ID",
 "client_secret":"YOUR_CLIENT_SECRET",
 "account_id":"YOUR_MID_OR_BU_ID"
 }'

Implementation notes that save time:

  • Store `expires_in` and refresh before it lapses. Don’t wait for a 401 in the middle of a batch.
  • Tie `account_id` strategy to your Business Unit model. If your integration writes to multiple BUs, you need a clear mapping.

Work with Data Extensions via REST (the integration “workhorse”)

If you do any serious Marketing Cloud integration, Data Extensions become your interchange format. The REST API is usually how external systems push customer attributes, event data, and segmentation inputs.

Practical pattern: upsert rows for event-driven personalization

A typical flow:

  • Commerce or product app posts an event (cart updated, subscription changed).
  • Middleware upserts a row in a Data Extension.
  • Journey Builder reads the updated data when evaluating entry or decision splits.

To keep this stable:

  • Use a deterministic primary key (SubscriberKey, ContactKey, or an internal ID).
  • Maintain a strict schema contract (data types matter).
  • Validate payload size and encoding.
Debugging reality: the platform won’t always tell you the “real” error

When calls fail, you’ll often end up searching community threads and patterns. The Marketing Cloud tag on Stack Overflow is full of cases where the API responds with a generic authorization or validation error, but the root cause is scope mismatch, wrong MID, or incorrect endpoint path for the tenant stack real-world troubleshooting patterns for Marketing Cloud API errors. In practice, build logging that captures:

  • Full request URL (minus secrets)
  • MID/account_id used
  • Response body
  • Correlation IDs if provided

It’s the difference between a 10 minute fix and a half day guessing session.

Trigger messaging and Journeys from REST without building fragile workarounds

Many teams start by “just calling the send endpoint” and then realize they also need:

  • Idempotency (avoid double-sends)
  • Proper audience qualification
  • Personalization that matches what the email expects at send time

Marketing Cloud has multiple ways to initiate messaging. REST is excellent for system-to-system triggers, but the message content itself still depends on how you built the email, the data model, and the scripting runtime.

Personalization nuance: API payload vs send-time rendering

A frequent misconception is that pushing more data in the API call automatically makes the email smarter. In reality, your email’s personalization is usually evaluated at send time using subscriber attributes and Data Extension lookups, and the “right” place to compute logic depends on complexity and performance.

When AMPscript logic becomes too heavy, moving parts of personalization into JavaScript (SSJS) can handle more complex transformations while still running inside Marketing Cloud’s execution context why SSJS is used when AMPscript personalization gets too complex. Practically, that means your REST API can focus on sending clean, normalized data, and your template layer can compute advanced presentation logic without requiring upstream systems to assemble every string.

Combine REST API + SSJS + AMPscript for safer automation

A lot of real implementations end up hybrid:

  • REST API pushes raw event data into a Data Extension.
  • A Journey activity or script activity normalizes/enriches.
  • AMPscript and SSJS render the final content.

A very practical approach is calling AMPscript functions from SSJS so you can reuse existing AMPscript logic while still benefiting from JavaScript control flow and error handling how SSJS can invoke AMPscript for reusable personalization logic. This is especially helpful when your REST API integration is stable, but the business keeps changing content rules weekly. You keep the integration steady and iterate in the template/runtime layer.

Example pattern: write event rows via API, then render with lookups at send time

Inside an email, you might do something like:

%%[
/* Example: lookup the latest preference or event flag */
SET @pref = Lookup("DE_Preferences","PreferenceValue","SubscriberKey", _subscriberkey)
IF Empty(@pref) THEN
 SET @pref = "default"
ENDIF
]%%

If you need to dynamically include reusable blocks (like legal text or modular product snippets), fetching stored snippets with AMPscript is a workable technique when you want centralized control without rebuilding emails using AMPscript to retrieve reusable code snippets at send time. That’s a clean complement to REST: the API updates the underlying data, and content stays modular.

Use SQL in Automation Studio to prep data the REST API shouldn’t compute

Teams often overuse the API for transformations that are cheaper inside Marketing Cloud. If you’re reshaping or filtering large datasets, SQL Query Activities are usually the right tool.

MartechNotes’ library of SQL examples reflects common Marketing Cloud patterns like deduping, selecting latest records, and joining Data Extensions to build targetable tables for journeys and sends practical SQL patterns for shaping Data Extension data. In practice, this lets your REST integration stay lean:

  • API writes raw facts (events, preferences, statuses).
  • SQL builds curated segments and “send-ready” tables.
  • Journeys reference the curated tables.

That separation tends to reduce API call volume, lower latency sensitivity, and make failures easier to recover from.

Common REST API implementation pitfalls (and how to avoid them)

1) Confusing SOAP vs REST ownership of features

Salesforce is explicit that Marketing Cloud exposes functionality across REST and SOAP, and the split is not always intuitive if you come from core Salesforce APIs which API style covers which Marketing Cloud capabilities. When an endpoint you expect “should exist” doesn’t, confirm whether it’s SOAP-only or requires a different object model.

2) Treating personalization as an API-only concern

Personalization works best when data, automation, and content are designed together, not bolted on at the end why personalization depends on coordinated data and automation design.

Don’t jam computed content strings into your API payload if the template can compute them reliably from normalized attributes.

3) Underestimating monitoring and replay

Because REST calls often sit between systems, you need replayable, idempotent operations. Use an external event ID and store it in your Data Extension so you can detect duplicates. If a job retries after a timeout, you should not create multiple journey entries or send multiple messages.

4) Debugging without capturing tenant context

A large percentage of “it worked yesterday” failures are tenant or BU context problems: wrong subdomain, wrong account_id, or a package installed in one BU but used against another. Salesforce’s REST overview is clear that REST access is tied to the correct endpoints and auth context how OAuth context determines which REST resources you can access. Log the auth target and the REST base URL every time.

A practical blueprint: from external event to personalized email

Here’s a pattern that holds up under real load:

  • External system emits event (order shipped, trial expiring, preference updated).
  • Middleware authenticates using Server-to-Server and writes the event to a raw DE.
  • Automation Studio SQL transforms raw into “latest state” and audience tables.
  • Journey Builder listens to the curated DE or API-triggered entry.
  • Email template uses AMPscript for straightforward lookups and SSJS for heavier conditional logic, calling AMPscript functions from SSJS where it keeps code reusable a hybrid approach to personalization logic inside Marketing Cloud.

That division of labor keeps the REST API doing what it’s good at: reliable data movement and orchestration, not brittle content assembly.

Trigger a journey through the API

Marcel Szimonisz
Table of contents: Marketing Cloud Connect and APIs

Triggering a Journey Builder journey via API is the cleanest way to turn Salesforce Marketing Cloud Engagement into an event-driven orchestration layer. Instead of waiting for scheduled automations or manual imports, you post a real-time event (purchase, lead created, appointment booked) and immediately inject a contact into a journey. In practice, this is how teams close the gap between operational systems and Marketing Cloud while keeping Journey Builder logic as the single place where branching, waits, and messaging rules live. The key is understanding which Journey Builder entry source supports API injection, what payload the API expects, and where data model decisions (Contact Key, Event Definition fields, Data Extensions) can quietly break the flow.

Know what “API-triggered Journey Builder” actually means in Marketing Cloud

Journey Builder can start contacts from multiple entry sources, but only specific entry sources are meant to accept inbound events. The API pattern is built around Journey Builder event definitions: you define an event, bind it to a journey as the entry source, and then inject contacts by posting event data to the Journey Builder API endpoint described in the Journey Builder API overview and event model.

What typically trips people up is assuming “starting a journey” is the same as “sending an email.” With Journey Builder, the API doesn’t trigger an email directly. It creates an entry event and hands the contact to the journey canvas. From there, the journey’s activities (decision splits, waits, messages) control the experience.

Preconditions that must be right before any API call will work

The journey must be published and using the correct entry source

API injection only works when the journey is configured to listen for the event definition you’re posting to. If the journey isn’t published, or if it’s listening to a different event definition, calls can succeed at the API layer but still result in no one entering the journey.

The most reliable way to avoid mismatch is to start from the Journey Builder side: create the event definition, attach it to the journey entry, then publish. The official setup flow is laid out in the “get started” steps for Journey Builder API event entry.

Your Contact Key strategy must be consistent

Marketing Cloud journeys identify people by Contact Key. If upstream systems send different identifiers (email for some events, CRM ID for others), you will see duplicates, unexpected re-entry blocking, or contacts entering but failing downstream personalization because the wrong key is being used.

Journey Builder’s basics also reinforce that entry and decisioning are contact-centric, which is why Contact Key hygiene matters more than people expect: Journey Builder contact and entry concepts.

Permissions and installed packages are not “nice to have”

API-triggered journeys require API access and the correct installed package setup. A common issue is getting a token successfully, then hitting authorization failures on the event endpoint because the integration doesn’t have the right scope/permissions for Journey Builder event injection.

The API pattern: define the event, then inject contacts with an event payload

Step 1: Create an Event Definition in Journey Builder

In practice, the Event Definition is your contract between external systems and Journey Builder. It defines which fields you can send and how Journey Builder interprets the event. Once created, Journey Builder gives you the identifiers the API needs (you’ll use these in the payload and URL).

One limitation is that teams often change field names later in their upstream payload, but forget to update the event definition. The API call still goes through, but the journey may behave like key attributes are missing.

Step 2: Post the event data to inject the contact

Once the event definition is tied to the journey entry and the journey is published, your application posts event data to the Journey Builder API endpoint. This injects the contact (Contact Key) plus the event attributes you want available for splits, personalization, or downstream lookups.

The operational view of Journey Builder helps frame why the payload matters: a journey is effectively a rules-and-flow engine that reacts to entry data and then executes activities over time, not a one-shot send mechanism. That’s the same mental model described in a practical breakdown of Journey Builder components like entry sources, activities, and decisioning.

Payload design: what to send now vs what to look up later

When event payload should carry the data

Event payload is best for attributes that are needed immediately on entry, such as:

  • Routing data for a Decision Split (country, product line, customer type)
  • A transactional reference you’ll use later (orderId, caseId)
  • A short-lived personalization value (store name, appointment time)

A common issue is sending too much. Large payloads make debugging harder and increase the chance of mismatched field names or upstream changes breaking the journey.

When a Data Extension lookup is safer

If the data is large, changes frequently, or needs normalization, it’s often better to send a stable key (like orderId) and do lookups inside the journey (or in the email) against Data Extensions.

This is where SQL and Automation Studio commonly support the pattern: stage or normalize data into a Journey-friendly Data Extension keyed by Contact Key or a business ID. For practical query patterns (deduping, latest-record selection, joining, segmentation), the examples in real-world Marketing Cloud SQL query templates for Data Extensions map well to “event in, enrich later” architectures.

Using AMPscript and SSJS to operationalize event-driven personalization

AMPscript: good for “render-time” lookups and simple rules

In emails sent by a journey, AMPscript is commonly used to fetch enrichment data from Data Extensions using keys you injected on entry (Contact Key, orderId). In practice, it’s fast to implement, but you have to be disciplined about fallback behavior when no row is returned.

If you need to pull reusable content blocks (for example, a snippet keyed by locale or product), the pattern of retrieving and rendering snippets is shown in an AMPscript approach to fetching a stored code snippet and rendering it dynamically. That’s especially useful when your Journey Builder API event only sends minimal attributes and the email decides what to show at send time.

SSJS: better when personalization logic becomes heavy or multi-step

AMPscript can get unwieldy when you need loops, complex branching, API calls, or more defensive error handling. A common workaround is combining SSJS with AMPscript so you can use AMPscript functions from JavaScript and still leverage familiar Marketing Cloud functions and personalization primitives.

The technique of calling AMPscript functions from SSJS is covered in a practical SSJS pattern for executing AMPscript functions, which is useful when your event-driven journey needs richer logic but you want to keep data access and personalization consistent.

When JavaScript is the only sane option

Some journeys start simple and then accumulate requirements: nested personalization rules, complex product logic, dynamic JSON parsing, or heavy conditional content. At that point, AMPscript alone often becomes fragile and hard to debug.

The trade-offs and patterns for moving to JavaScript-heavy personalization are outlined in practical notes on handling heavy personalization with JavaScript in Marketing Cloud. For API-triggered journeys, this comes up when upstream systems can only send a compact payload, and you have to compute the final content rules at send time.

Operational realities: data latency, contact behavior, and debugging

Data freshness is usually the hidden failure mode

What typically happens is the event arrives, the contact enters the journey, and the first email renders before enrichment tables are updated. The result is blank sections, missing product data, or incorrect routing.

One reliable pattern is to insert an intentional wait step after entry (even 5-15 minutes) when enrichment is written asynchronously by another system. Another is to put enrichment in the event payload when it’s truly required for the first touch.

Broader personalization patterns that depend on automation timing, enrichment cadence, and send-time rendering are discussed in implementation-focused notes on personalization in marketing automation flows, and they map directly to Journey Builder event entry.

Re-entry settings can make “nothing happens” look like an API problem

If your journey is configured to prevent re-entry, an event for an existing in-journey contact won’t create a second entry. That’s correct behavior, but it often gets misdiagnosed as an API failure.

The fix is rarely code. It’s usually a Journey Builder decision: should the same Contact Key be allowed to enter again, and under what conditions?

Debugging: separate API success from journey processing

When troubleshooting, treat the system as three layers:

  • Authentication and API call success
  • Event definition mapping and acceptance
  • Journey processing (entry, splits, waits, message activities)

If you only validate layer 1 (token + 2xx response), you can miss that the journey is unpublished, bound to a different event definition, or blocked by re-entry rules.

Community debugging threads can help sanity-check edge cases and common errors, especially when error messages are vague or behavior differs by configuration. The breadth of real-world issues and fixes is visible in Salesforce Marketing Cloud questions and troubleshooting patterns from practitioners.

Practical implementation checklist that prevents most production issues

Align the data model before writing code
  • Pick a single Contact Key strategy and enforce it across event producers.
  • Decide which fields are entry-time critical (payload) vs enrich-later (Data Extensions).
  • Define stable field names early and version your event contract when it changes.
Design for failure and fallbacks inside messages

In practice, send-time personalization should assume enrichment can be missing:

  • Default values for missing lookups
  • Guardrails around empty result sets
  • Logging strategy if SSJS is used for complex personalization
Keep Journey Builder logic responsible for orchestration

Use the API to inject events, not to encode your entire customer experience in the calling system. The journey should remain the source of truth for branching, suppression logic, and timing so marketers can maintain it without redeploying application code.

Send transactional emails through the API

Marcel Szimonisz
Table of contents: Marketing Cloud Connect and APIs

Transactional emails are not your typical marketing blasts. They are personalized messages sent in response to specific user actions, such as confirming a purchase or resetting a password. Unlike promotional emails, which aim to drive sales, transactional emails focus on delivering essential information. This distinction is crucial for businesses aiming to maintain a clear line of communication with their customers.

The Power of APIs in Sending Transactional Emails

Salesforce Marketing Cloud offers a robust REST API designed for sending transactional emails. This API simplifies the process for developers, allowing them to send emails to individual recipients with ease. Here’s a basic example of how to send a transactional email using the API:

Send single message to recipient

To send a single transactional message to a recipient, we need to implement the provided API.
POST https://{subdomain}.rest.marketingcloudapis.com/messaging/v1/email/messages/{messageKey}

{
  "definitionKey": "DEFINITION_KEY",
  "recipient": {
    "contactKey": "CONTACTKEY",
    "to": "recipient@example.com",
    "attributes": {
      "RequestAttribute_1": "value_1",
      "RequestAttribute_2": "value_2"
    }
  }
}

The definition key is taken from your transactional journey API Event.

 Setting up transactional journey in salesforce marketing cloud

If you don’t want to use transactional journeys, you will need to use the API to create definition keys manually.
POST https://{subdomain}.rest.marketingcloudapis.com/messaging/v1/email/definitions

Implement the API call in your CloudPage lead-capture form

When building a lead-capture flow on a CloudPage, you often need more than just storing data in a Data Extension. In many cases, you also want to trigger a transactional message. The good news is that when you implement a transactional API call, saving the data into a Data Extension becomes a byproduct – as long as the Data Extension is selected in the transactional journey.

<script runat=server>
    Platform.Load("core","1.1.1");
    //amended helper functions from https://www.ssjsdocs.xyz/email-studio/triggeredsends/send.html
    var getToken = function(setup) {
        var config = {
            url : setup.authBaseURI + "v2/token",
            contentType : "application/json",
            payload : {
                "client_id": setup.clientId,
                "client_secret": setup.clientSecret,
                "grant_type": "client_credentials"
            }
        }
        var req = HTTP.Post(config.url, config.contentType, Stringify(config.payload));
        if (req.StatusCode == 200) {
            var res = Platform.Function.ParseJSON(req.Response[0]);
            return res.access_token;
        } else {
            return false;
        }
    },
    triggerEvent =  function(token, setup, data) {
        var config = {
            url : setup.restBaseURI + "messaging/v1/email/messages/" + setup.guid,
            contentType : "application/json",
            headerName : ["Authorization"],
            headerValue : ["Bearer " + token],
            payload : {
                definitionKey: setup.eventDefinitionKey,
                recipient: data
            }
        }
        var req =   HTTP.Post(config.url, config.contentType, Stringify(config.payload), config.headerName, config.headerValue);
        if (req.StatusCode == 202) {
            var res = Platform.Function.ParseJSON(req["Response"][0]);
            if (res && res.errorcode == 0) return true;
        } else {
            return false;
        }
    },
    sha1 = function(str) {
      var script = "%%[ SET @result = SHA1('" + str + "') ]%%%%=v(@result)=%%";
      return Platform.Function.TreatAsContent(script);
    },
    getFingerprint = function () {
      function safe(v) {
          try { return (v || v === 0) ? v : ""; } catch(e){ return ""; }
      }

       collectServerAttrs = () {
          var a = {};
          try {
              //a.IsSSL        = safe(Platform.Request.IsSSL);
              //a.Method       = safe(Platform.Request.Method);
              //a.Browser      = safe(Platform.Request.Browser); // showing always different version number
              //a.Version      = safe(Platform.Request.Version); // empty
              //a.MajorVersion = safe(Platform.Request.MajorVersion);  // empty
              //a.MinorVersion = safe(Platform.Request.MinorVersion);  // empty
              a.UserAgent    = safe(Platform.Request.UserAgent); 
          } catch(e) {
              Write("<!-- Error collecting request data: " + e.message + " -->");
          }
          return a;
      }

      function getSortedKeys(obj) {
          var keys = [];
          for (var k in obj) { if (obj.hasOwnProperty(k)) keys[keys.length] = k; }
          var swapped = true;
          while (swapped) {
              swapped = false;
              for (var i=0; i<keys.length-1; i++) {
                  if (keys[i] > keys[i+1]) {
                      var tmp = keys[i];
                      keys[i] = keys[i+1];
                      keys[i+1] = tmp;
                      swapped = true;
                  }
              }
          }
          return keys;
      }

      function computeFingerprint(attrs) {
          try {
              var keys = getSortedKeys(attrs);
              var raw = "";
              for (var i=0; i<keys.length; i++) {
                  raw += keys[i] + "=" + attrs[keys[i]];
                  if (i < keys.length - 1) raw += "|";
              }
              var digest = sha1(raw);
              return { id: digest, serialized: raw, attrs: attrs };
          } catch(e) {
              Write("<!-- Hash error: " + e.message + " -->");
              return { id: "error", serialized: "", attrs: attrs };
          }
      }
      try {
          var attrs = collectServerAttrs();
          return computeFingerprint(attrs);
      } catch(e) {
          Write("<!-- Fingerprint error: " + e.message + " -->");
          return { id: "error", serialized: "", attrs: {} };
      }
},
getHoursLessEST = function(hoursLess) {
  var hoursLess = hoursLess || 1;           
  var jsDate = new Date();
  jsDate.setHours(jsDate.getHours() - hoursLess);
  Variable.SetValue("@date", jsDate);
  var result = Platform.Function.TreatAsContent(
    "%%=FormatDate(@date, 'yyyy-MM-dd','hh:mm:ss')=%%"
  );
  return result;
}

  //capture browser information and fingerprint
  Variable.SetValue('@ip', Platform.Request.ClientIP);
  Variable.SetValue('@request', Platform.Request.Method); 
  Variable.SetValue('@source', Platform.Request.RequestURL);
  Variable.SetValue('@fingerprint', sha1(getFingerprint().id + Platform.Request.ClientIP))
</script>%%[IF @request=="POST" THEN
    /* user form data */
    SET @thankyouPage = 1111 /* Cloud page ID to redirect after submission */
    SET @email = Lowercase(RequestParameter("email"))
    SET @firstname = RequestParameter("firstname")
    SET @lastname = RequestParameter("lastname")
    SET @token = RequestParameter("token")
    SET @emailMd5 = Uppercase(MD5(@email,"UTF-16"))
    
    
    /* default values */
    SET @error = false
    SET @rows = LookupRows("LEAD_FORM_LOGGING", "token", @token)
    IF NOT EMPTY(@token) AND RowCount(@rows) == 1 THEN
        SET @row = Row(@rows, 1)
        SET @dateCreated = Field(@row, "date")
        SET @dateSubmitted = Field(@row, "date_submitted")
        SET @guid =  Field(@row, "guid")
        IF NOT EMPTY(@dateCreated) AND EMPTY(@dateSubmitted) THEN
            SET @now = Now()   
            /* Update record */
            UpdateData(
                "LEAD_FORM_LOGGING",
                1,
                "token", @token,
                "date_submitted",@now,
                "email", @email,
                "name", @firstname,
                "lastname", @lastname,
                "segment", @segment
            )
]%%
<script runat="server">
  Platform.Load("Core","1");

  // Pull AMPscript variables into SSJS
  var dateCreatedStr = Variable.GetValue("@dateCreated");
  var nowStr = Variable.GetValue("@now");

  if (dateCreatedStr && nowStr) {
    var dateCreated = new Date(dateCreatedStr);
    var now = new Date(nowStr);

    // Calculate time difference in seconds
    var diffMs = now - dateCreated;
    var diffSec = diffMs / 1000;

    // Expose back to AMPscript if needed
    Variable.SetValue("@diffSeconds", diffSec);
  } else {
    Variable.SetValue("@diffSeconds", -1);
  }
// --- Settings ---

var deName = "LEAD_FORM_LOGGING",
    fingerprint = Variable.GetValue("fingerprint"),
    ipHash = Variable.GetValue("ipHash"),
    source = Variable.GetValue("source"),
    hoursLessEST = getHoursLessEST(1);
// --- DE reference ---
var de = DataExtension.Init(deName);

// --- Build SSJS Filter ---
var filter = {
  LeftOperand: {
    Property: "visitor_id",
      SimpleOperator: "equals",
      Value: fingerprint
  },
  LogicalOperator: "AND",
  RightOperand: {
    LeftOperand: {
     Property: "date",
    SimpleOperator: "greaterThan",
    Value: hoursLessEST
    },
    LogicalOperator: "AND",
    RightOperand: {
      Property: "source",
      SimpleOperator: "equals",
      Value: source
    }
  }
};
    
var rows = de.Rows.Retrieve(filter);
Variable.SetValue("@submissionCount", rows ? rows.length : 0);
%%[


/* spam traps */
IF 
  EMPTY(RegExMatch(@FirstName, "(https?|www\.)", 0)) AND
  EMPTY(RegExMatch(@LastName, "(https?|www\.)", 0)) AND
  @submissionCount == 1 AND
  @diffSeconds > 2
THEN
]%%<script runat="server" language="JavaScript">
    Platform.Load("core", "1.1.1");
    try {
        var eventName = Variable.GetValue("@eventName");
        if (!eventName) throw ''
        var setup = {
            authBaseURI: "https://xxx.auth.marketingcloudapis.com/",
            restBaseURI: "https://xxx.rest.marketingcloudapis.com/",
            clientId: '<client_id>',
            clientSecret: '<client_secret>',
            eventDefinitionKey: eventName// in case we have multiple newsletter services
        }
        if (Variable.GetValue("@mid"))
            setup.mid = Variable.GetValue("@mid");
        setup.guid = Variable.GetValue("@guid")
        var source = Variable.GetValue("@source") ? Variable.GetValue("@source") : false; 
          
        var token = getToken(setup);
        var attributes = {
          "FirstName": Variable.GetValue("@firstname"),
          "LastName": Variable.GetValue("@lastname"),
          "EmailAddress": Variable.GetValue("@email"),
          "Segment": Variable.GetValue("@segment"),
          "Locale": Variable.GetValue("@locale"),
          "Guid": Variable.GetValue("@guid"),
          "AlreadyRegistered": Variable.GetValue("@alreadyRegistered")
        }
        var additionalFields = Variable.GetValue("@additionalFields");
      
        if (source)
          attributes.source = source;
        if (!isNullOrEmpty(additionalFields)){
          var i = 0,
              additionalFieldsArray = additionalFields.split(",");
          /* Get additional fields from FORM DATA */
          for (i;i<additionalFieldsArray.length;i++)
            attributes[additionalFieldsArray[i]] = Platform.Request.GetFormField(additionalFieldsArray[i]);
          //throw Platform.Function.Stringify(attributes);
        }
        
        var recipient = {
            "contactKey": Variable.GetValue("@emailMd5"),
            "to": Variable.GetValue("@email"),
            "attributes": attributes
        }
        if (token) success = triggerEvent(token, setup, recipient)
        if (success) Platform.Function.UpdateData("LEAD_FORM_LOGGING",["guid"], [Variable.GetValue("@guid")],["email_sent"],["True"])
    } catch (e) {
        // log error 
    }
</script>%%[    
/*after email sent*/
      ENDIF
    ENDIF
  ENDIF 
    /* after form submitted redirect to confirm email page*/
    Redirect(CloudPagesURL(@thankyouPage, "email", @email, "locale",concat(@country, "-", @language),'settings',@settings))
   
ELSE

 SET @ipHash = SHA1(@ip)
 SET @guid = GUID()
 SET @token = SHA1(@guid)    
 SET @insertStatus = InsertDE(
      "LEAD_FORM_LOGGING",
      "visitor_id", @fingerprint,
      "ip_hash", @ipHash,
      "guid", @guid,
      "source", @source,
      "token", @token
    )

ENDIF
]%%

<form>
  <input type="text" name="firstname">
  <input type="text" name="lastname">
  <!-- insert token to hidden field -->
  <input type="hidden" name="token" value="%%=v(@token)=%%">
  <input type="submit">
</form>

Now that we have our helper functions in place we can continue with our transactional API implementation.

Process form with AMPscript
%%[IF @request=="POST" THEN
    /* global unique id for link generation */
    SET @guid = GUID()

    /* user form data */
    SET @email = Lowercase(RequestParameter("email"))
    SET @firstname = RequestParameter("firstname")
    SET @lastname = RequestParameter("lastname")
    /* assign contact key */
    SET @emailMd5 = Uppercase(MD5(@email,"UTF-16")) 
]%%
Process form with SSJS
<script runat="server">
Platform.Load("Core", "1");

// only run when POST
if (Request.Method == "POST") {

    // global unique id for link generation
    var guid = Platform.Function.GUID();

    // user form data
    var email = Request.GetFormField("email");
    email = email ? email.toLowerCase() : "";

    var firstname = Request.GetFormField("firstname");
    var lastname  = Request.GetFormField("lastname");

    // assign contact key (MD5 UTF-16)
    var emailMd5 = Platform.Function.MD5(email, "UTF-16").toUpperCase();

    // you can now use guid, email, firstname, lastname, emailMd5
}
</script>
Send transactional email in SSJS
<script runat="server" language="JavaScript">
    Platform.Load("core", "1.1.1");
    var eventName = '<event_definition_key>';// in case this is dynamically populated add you logic here
    try {
        var setup = {
            authBaseURI: "https://xxx.auth.marketingcloudapis.com/",
            restBaseURI: "https://xxx.rest.marketingcloudapis.com/",
            clientId: <client_id>
            clientSecret: <client_secret>,
            eventDefinitionKey: eventName// in case we have multiple newsletter services
        }
          
        var token = getToken(setup);
        var attributes = {
          "FirstName": Variable.GetValue("@firstname"), //or firstname when SSJS is used to process form 
          "LastName": Variable.GetValue("@lastname"), //or lastname when SSJS is used to process form 
          "EmailAddress": Variable.GetValue("@email"), //or email when SSJS is used to process form 
          "Guid": Variable.GetValue("@guid"), //or guid when SSJS is used to process form 
        }
     
        
        var recipient = {
            "contactKey": Variable.GetValue("@emailMd5"), //or guid when SSJS is used to process form 
            "to": Variable.GetValue("@email"),//or email when SSJS is used to process form 
            "attributes": attributes
        }
        var success = false;
        if (token) success = triggerEvent(token, setup, recipient)
        if (!success) {
            // handle emails that were not sent here
        }
          
       
    } catch (e) {
        //handle errors here
    }
</script>

Personalization and Dynamic Content

One of the standout features of using the Salesforce API for transactional emails is the ability to incorporate personalization and dynamic content. By tailoring messages to individual recipients, businesses can enhance engagement and improve customer satisfaction. For example, including the recipient’s name or specific order details can make the email feel more relevant and personal. You can include any fields for personalization in the attributes payload, and these fields then become automatically available in the email template – just as they are when using a Data Extension as the source for your marketing campaigns.

Integrating Double Opt-In Processes

To further enhance user engagement, businesses can implement a double opt-in process alongside their transactional emails. This ensures that users have explicitly consented to receive communications, fostering trust and compliance with regulations. By integrating Service Cloud with Marketing Cloud, companies can manage user consent effectively, ensuring that transactional emails are sent only to those who have opted in.

Practical Takeaways

  • Utilize APIs: Leverage the Salesforce Marketing Cloud API to automate the sending of transactional emails.
  • Focus on Personalization: Use dynamic content to tailor messages to individual recipients, enhancing engagement.
  • Implement Double Opt-In: Ensure user consent through a double opt-in process, integrating with Service Cloud for better management.
  • Implement spam protection: Make sure you add spam protection to your forms as soon as possible. Without it, double opt-in forms can be abused to send malicious content to users.

Implement spam protection

To add a simple layer of protection

🔒 Premium Subscriber Content

Please log in to preview content. Log in or Register

You must log in and have a Premium Subscriber account to preview the content.

When upgrading, please use the same email address as your WordPress account so we can correctly link your Premium membership.

Please allow us a little time to process and upgrade your account after the purchase. If you need faster access or encounter any issues, feel free to contact us at info@martechnotes.com or through any other available channel.

To join the Discord community, please also provide your Discord username after subscribing, or reach out to us directly for access.

You can subscribe even before creating a WordPress account — your subscription will be linked to the email address used during checkout.

Premium Subscriber

29,99 € / Year

  • Free e-book with all revisions - 101 Adobe Campaign Classic (SFMC 101 in progress)
  • All Premium Subscriber Benefits - Exclusive blog content, weekly insights, and Discord community access
  • Lock in Your Price for a Full Year - Avoid future price increases
  • Limited Seats at This Price - Lock in early before it goes up
  • Monthly 15-Minute Call - Discuss any topic directly

Manage client secret expiration

Marcel Szimonisz
Table of contents: Marketing Cloud Connect and APIs

Salesforce Marketing Cloud Engagement integrations fail in a very specific, very avoidable way: the OAuth client secret expires, token requests start returning 401s, and anything downstream that depends on API calls silently stops syncing. The tricky part is that nothing in your SOAP/REST code “changed” – the credential simply aged out. Salesforce has now formalized secret expiration for Marketing Cloud Engagement installed packages, which means teams need a real rotation plan, not a one-time setup. Salesforce’s own guidance is to rotate secrets before the deadline and to treat rotation as a standard operational process rather than a fire drill, especially for automations and middleware that run unattended like ETL jobs, event ingestion, and triggered messaging Salesforce’s OAuth2 secret rotation guidance for Marketing Cloud.

Why Marketing Cloud Engagement client secrets expire (and why Salesforce made this change)

Client secrets are not “forever credentials.” They’re shared secrets that can leak through logs, screenshots, ticket attachments, CI/CD variables, or vendor handoffs. Expiration forces periodic replacement, reducing the blast radius of any secret that was unknowingly exposed months ago.

Marketing Cloud implements this through Installed Packages (the modern way to provision API access). In practice, your integration authenticates by exchanging `client_id` + `client_secret` for an access token via `/v2/token`. Once the secret is past its validity window, the token exchange fails even if your endpoint and payload are correct.

Salesforce frames Installed Packages as the object that holds API integration configuration and permissions, which is why the secret lifecycle is tied to the package rather than to “a user” or “an app server” how Installed Packages encapsulate API access and permissions. That design is helpful because it centralizes access control, but it also means rotation is unavoidable once expiration is enabled.

The deadline risk: why this breaks “stable” integrations overnight

What typically happens is boring and brutal:

  • Your integration runs fine for months.
  • The client secret reaches its expiration date.
  • Token calls begin failing.
  • The integration retries, queues back up, then operations teams notice missing data or missing sends.

A key operational detail is that this change is not theoretical. One rollout note making the rounds in the Marketing Cloud community is a hard cutoff date: teams are being urged to rotate their API credentials before September 30, 2026 to avoid production disruption the September 30, 2026 rotation deadline and its impact on Marketing Cloud integrations. If you’re running long-lived integrations (MuleSoft, Boomi, Azure Functions, custom Node/Java services), this is exactly the kind of date that slips past until something breaks at 2 a.m.

Medium’s practitioner write-up on the same change highlights the practical implication: secrets that used to sit unchanged in configuration now require a rotation habit, because “set and forget” credentials are no longer a safe assumption for Marketing Cloud Engagement API connections how secret expiration changes day-to-day integration maintenance.

Installed Packages nuance: package types affect how you should rotate

Rotation strategy depends on what kind of package you’re using and how it’s wired into your environment.

Salesforce distinguishes package types (for example, server-to-server vs web app patterns). That matters because a server-to-server integration typically stores the secret in backend infrastructure (vault, parameter store), while a web app pattern may involve additional redirect/security constraints and environments how Installed Package types map to different authentication patterns.

In real builds, most Marketing Cloud Engagement API automations are server-to-server. That’s good news: you can rotate without user interaction. It’s also bad news: nobody “clicks login” to reveal the breakage early. If a nightly job fails quietly, you find out later via business symptoms.

How to identify the credentials that are at risk

You need an inventory, not guesswork. Start by mapping every system that calls Marketing Cloud:

  • Middleware (MuleSoft, Boomi, Workato, custom ETL)
  • Data warehouse sync jobs
  • Preference center services
  • Triggered messaging services
  • Landing page scripts that call APIs indirectly
  • Internal tools used by ops teams

Then, for each integration, capture:

  • Business owner
  • Technical owner
  • Installed Package name
  • Client ID
  • Where the secret is stored (vault path, parameter key)
  • Runtime environments impacted (dev, QA, prod)
  • Retry and alerting behavior

If you’re rusty on where these values live inside Marketing Cloud Setup, the step-by-step process is straightforward: locate the Installed Package, open the component, and copy the Client ID and Client Secret from the package configuration where to retrieve Client ID and Client Secret in Marketing Cloud Setup. The important operational note is to treat that screen as “break glass,” not as a normal workflow. Pull secrets from a secure store wherever possible, not from someone’s browser history.

What “rotation” really means in Marketing Cloud Engagement (not just generating a new string)

Rotation is two coordinated changes:

  • Generate a new secret in Marketing Cloud for the Installed Package component.
  • Update every dependent system to use the new secret for token generation before the old one expires (or immediately, if you’re doing an emergency cutover).

Salesforce’s rotation procedure emphasizes that you can rotate without redesigning the integration, but you must update the external systems that request tokens and validate the new secret works end-to-end the required steps to rotate a Marketing Cloud OAuth2 secret safely. That’s where most teams stumble: the Marketing Cloud side is easy; chasing every consumer of the secret is the real work.

A practical zero-downtime rotation pattern

If your integration stack allows it, use a “dual secret” deployment pattern even if Marketing Cloud itself only shows one active secret at a time:

  • Add a new secret value to your vault under a versioned key.
  • Deploy application changes that can read the latest version (or a config flag).
  • Flip the vault reference and restart services in a controlled window.
  • Confirm token calls succeed and key API transactions succeed.
  • Remove any old secret material from lower environments and shared notes.

Even if you cannot run both secrets simultaneously, you can still stage the change: pre-deploy code that supports a quick secret swap, then rotate in Marketing Cloud and flip config immediately after.

Token call example (REST)

Most server-to-server integrations do some version of this:

curl -sS <a href="https://YOUR_SUBDOMAIN.auth.marketingcloudapis.com/v2/token" target="_blank" rel="noopener noreferrer">https://YOUR_SUBDOMAIN.auth.marketingcloudapis.com/v2/token</a> 
 -H "Content-Type: application/json" 
 -d '{
 "grant_type":"client_credentials",
 "client_id":"YOUR_CLIENT_ID",
 "client_secret":"YOUR_CLIENT_SECRET"
 }'

When the secret expires, this call is the first domino. Monitoring it directly is the simplest early-warning system.

Monitoring: catch expiration before the business notices

You want alerts on “auth is failing,” not on “campaign revenue is down.”

Minimum viable monitoring:

  • Synthetic token check every 5-15 minutes from each environment
  • Alert on non-200 responses and on latency spikes (timeouts often precede larger failures)
  • Dashboard that maps failing checks to Installed Package owners

If you already log API errors, make sure you’re explicitly tracking token endpoint failures separately from general REST/SOAP failures. Auth failures are a different class of incident: they often require credential updates, not code changes.

Hidden blast radius: secrets expiring can break personalization and content processes too

It’s easy to think “this only affects APIs.” In practice, a lot of “email stuff” depends on upstream API-fed data.

A common issue is a Data Extension sync that feeds personalization attributes. If the sync stops because the token can’t be issued, your email still sends, but personalization degrades. Teams often detect it only after QA spots default values in production.

This is where Marketing Cloud’s scripting ecosystem makes the pain visible. For example, teams frequently use SSJS to query Data Extensions for dynamic content decisions, and those queries assume data is current. When upstream integrations stop updating tables, SSJS-driven decisions quietly shift because the data isn’t there anymore how SSJS and AMPscript pull Data Extension data at send time. The credential problem is “API auth,” but the symptom shows up as content logic behaving oddly.

If you mix AMPscript and SSJS, another subtle failure mode appears: you might still render email content correctly, but API-triggered updates that were supposed to run before send do not happen. Many implementations pass values between AMPscript and SSJS to keep complex logic maintainable, which makes data freshness even more important practical techniques for sharing logic between AMPscript and SSJS.

And if you’ve built “heavy personalization” with JavaScript because AMPscript alone wasn’t enough, your dependency on upstream data consistency is even higher. Complex server-side JavaScript patterns tend to amplify the impact of stale data, because the script branches depend on multiple attributes that are often populated by API jobs why advanced SSJS personalization patterns depend on reliable data pipelines.

Governance that actually works: align rotation with automation ownership

The operational fix is not “remember to rotate.” It’s governance:

  • A credential inventory tied to service owners
  • A rotation calendar aligned to release windows
  • Automated monitoring on token issuance
  • A change process that includes all consumers of the secret

Marketing automation teams usually already run scheduled processes with strict dependencies. The same discipline applies here: when automations are chained (data load, segmentation, send, post-send updates), a single upstream failure breaks the whole sequence or worse, produces partial outputs that look “successful” until someone audits results how marketing automation dependencies can silently impact personalization quality.

Operational checklist: what to do 30 days before expiration

Use this as a real runbook, not a slide:

1) Confirm which Installed Package is used by each integration

Document the package name and the business process it supports. Teams often discover multiple packages created over time, where only one is actually used.

2) Validate who owns the integration end-to-end

If a vendor built it, confirm who can deploy the secret change. If your internal platform team owns it, confirm who can update vault variables and restart services.

3) Rotate in a lower environment first

Even if the token request is straightforward, downstream endpoints, IP allowlists, and config parsing issues show up fast in non-prod.

4) Test more than “token returns 200”

Run one representative business transaction:

  • Insert/update a Data Extension row
  • Trigger a send (if applicable)
  • Pull tracking data (if your integration uses it)
5) Update monitoring thresholds and alert routing

Auth failures should page the team that can rotate or deploy config, not just the email developer on call.

Common implementation mistakes (and how to avoid them)

Hardcoding secrets in scripts and legacy automations

If any part of your stack still embeds secrets in code or in Automation Studio activities, rotation becomes a redeploy emergency. It’s also a security risk.

Even “internal-only” code ages badly. Marketing Cloud teams frequently inherit scripts without clear ownership, and rotating secrets becomes difficult when nobody knows what uses what. This is why interview and hiring guides for SFMC roles often stress real troubleshooting experience, not just knowing features, because production failures tend to be configuration and integration related, not “how do I create an email” the real-world troubleshooting skills expected in Salesforce Marketing Cloud roles.

Rotating the secret but missing one consumer

This is the classic. One batch job gets updated, another microservice still uses the old secret, and you end up with partial data movement. The fix is inventory plus a controlled cutover window.

Treating expiration as a one-time project

Secret expiration is a recurring operational requirement now. Once you’ve done the first rotation, turn it into a repeatable process: calendar, runbook, monitoring, ownership. That’s what keeps Marketing Cloud Engagement integrations stable even as credentials age out on schedule.

Operations and troubleshooting

Troubleshoot automations

Marcel Szimonisz
Table of contents: Operations and troubleshooting

Another series of troubleshooting automations in Salesforce Marketing Cloud. I will regurarly add any new additions that I have already resolved and spend great deal of time and life energy. So hope it will help resolve someones issues.

I will try to add, throughout my daily life as an SFMC consultant, all the errors that I have experienced and resolved. Many resolutions can be found on the Salesforce help page. For those not listed there, I’ll make a point to list them out, sharing my hands-on experiences and solutions to help others facing similar challenges.

The value is too long to store into a data type.

This error often lacks specific information about which field to examine, and even Salesforce support may not provide a direct answer initially. However, they usually identify the issue upon further investigation. The error could arise from two main scenarios: when attempting to save records to the database or due to a problem in your SQL query or code.

Attempting to save records to the database

It seems like the field values you have selected are out of range for their corresponding fields in the database. To resolve this, try adding restrictions to fields or increasing field lengths or their types that you think may cause this issue. In my case, the issue was with the language field, which was set to accept only two characters, but often we received language values that were more than two characters in length.

Another issue I recently encountered was when I tried to save a numeric string into a number field in a data extension. This numeric string was outside the integer boundaries, causing an syntax error. In such cases, it’s important to ensure that the data types and their limits in the data extension match the actual data being inputted.

#for any field string that is of lenght 255 to make sure we will save the same lenght
LEFT(255)
Problem in your SQL query or code.

This occurred directly in my SQL query, where I was creating a compound field out of an integer and a numeric string, and somehow it was interpreted as a number that was way beyond the length of the integer field.

It’s likely due to the way SQL handles data types in operations. When you try to create a compound field using an integer and a numeric string, SQL might automatically attempt to convert all operands to a common data type. If this common type is a numeric type and the resulting value exceeds the maximum size that can be stored in that type, it results in a data overflow error or a syntax error. By explicitly converting the number to a string, you can control the data type and avoid these errors.

SELECT CAST(your_integer_column AS VARCHAR) AS converted_string
FROM your_table;

Common automation failures

Marcel Szimonisz
Table of contents: Operations and troubleshooting

Marketing automation workflows are designed to run silently in the background. Once configured, they are supposed to move data, trigger messages, and orchestrate campaigns without constant supervision.

At least in theory.

In reality, every marketing automation consultant eventually experiences the moment when an automation suddenly fails, a workflow stops mid-execution, or a scheduled job throws an unexpected error.

Here are the most common errors that you can experience with working with automation studio.

Activity timeout error in automation studio

One of the most common automation failures you will eventually encounter is a timeout error. This usually happens when a SQL query or automation step takes too long to execute and the platform simply stops the process.

In Salesforce Marketing Cloud, SQL Query Activities typically have a 30 minute execution limit. If your query processes a very large dataset, performs heavy joins, or uses inefficient filtering, it may exceed this limit and fail.

Typical causes include:

  • Querying extremely large Data Extensions
  • Missing indexes or filtering conditions
  • Using multiple complex joins
  • Performing expensive string functions on large datasets
  • Processing historical data in a single query

The best solution is usually to break the query into smaller steps. Splitting large loads across multiple queries or staging Data Extensions can significantly reduce execution time.

If you work with very large datasets, one useful technique is splitting loads based on partitions or object keys.

Another possible solution is to ask Salesforce support to increase the activity timeout for your business unit.

Field length mismatch (data truncation)

Another common failure happens when the value returned by your query is longer than the size of the target field in the Data Extension.

In this case the automation will fail with an error similar to:

Error: Query failed during execution. Error: String or binary data would be truncated in table 'Target_DataExtension', column 'FirstName'.

This means that the query attempted to insert a value that does not fit into the destination field.

A typical scenario looks like this:

  • Source field contains a value longer than expected
  • Target Data Extension has a smaller field size defined
  • During insertion the platform refuses to truncate the value automatically

Example situation:

  • Source value: Asociaciones Y Colectivos De Mujeres De La Comarca
  • Target field length: 50
  • Result: query activity fails

Fortunately this error message usually tells you exactly which column caused the issue, making it easier to troubleshoot.

Common fixes include:

  • Increasing the field length in the target Data Extension
  • Truncating the value inside the SQL query using LEFT()
  • Cleaning the source data before loading it

Example workaround in SQL:

SELECT
    SubscriberKey,
    LEFT(FirstName, 50) AS FirstName
FROM Source_DE

Violation of PRIMARY KEY constraint. Cannot insert duplicate key.

Another classic automation failure is the primary key violation error.

This happens when a query attempts to insert duplicate records into a Data Extension where a field is marked as a Primary Key.

Example scenario:

Your target Data Extension has:

SubscriberKey (Primary Key)

If your SQL query returns multiple rows with the same SubscriberKey, the insert will fail because primary keys must remain unique.

Typical causes include:

  • Missing DISTINCT in the query
  • Incorrect joins producing duplicate rows
  • Aggregations returning multiple rows per key
  • Using SELECT * from a dataset that already contains duplicates

Common ways to solve this include:

  • Using SELECT DISTINCT
  • Aggregating records with GROUP BY
  • Using ROW_NUMBER() to keep only the latest record
  • Deduplicating data in a staging Data Extension before loading the final one
SELECT
    SubscriberKey,
    EmailAddress
FROM (
    SELECT
        SubscriberKey,
        EmailAddress,
        ROW_NUMBER() OVER (PARTITION BY SubscriberKey ORDER BY LastModifiedDate DESC) AS rn
    FROM Master_DE
) x
WHERE rn = 1

Primary key violations are usually easy to identify because the error message explicitly mentions the key constraint.

Automation failed due to system error

Another frustrating error message you may encounter is:

“Automation failed due to system error.”

Salesforce Marketing Cloud Engagement: Automation activity failed due to system error

Unfortunately this message is extremely vague and does not tell you much about the real problem. There are several scenarios where this error can appear.

Temporary platform issues

Sometimes the failure simply happens on the Salesforce side. Platform resources might be temporarily unavailable or an internal process might fail.

When this happens there is usually nothing you can fix. The best solution is simply to rerun the automation, and it will often succeed on the second attempt.

Query activities not refreshed after schema changes

Another very common cause is when the structure of a Data Extension changes but the Query Activity was not resaved afterwards.

For example:

  • A field name in the target Data Extension was changed
  • A field was removed or renamed
  • The target Data Extension itself was replaced

Even though the query still appears correct, the underlying schema reference is outdated. In this case you simply need to open the Query Activity, save it again, and rerun the automation.

Cannot insert a NULL value into a non-nullable column

Another error you may encounter in Automation Studio SQL Query Activities is:

Cannot insert a NULL value into a non-nullable column.
Salesforce Marketing Cloud Engagement: Automation activity failed due to null value in non nullable column

This error occurs when the query attempts to insert a NULL value into a field that does not allow NULL values in the target Data Extension.

In Salesforce Marketing Cloud, fields can be defined as required (non-nullable). When a query returns NULL for such a field, the insert operation fails and the activity stops.

Typical scenarios include:

  • The query does not return a value for a required field
  • A field used in the SELECT statement contains NULL values in the source Data Extension
  • A join removes records that normally populate the required column
  • A transformation or calculation results in NULL

For example, if the target Data Extension requires SubscriberKey but the query returns NULL for some rows, the query activity will fail during insertion.

How to mitigate

There are several ways to prevent this error.

1. Filter out NULL values

The simplest approach is to exclude records where the required field is NULL.

SELECT
    SubscriberKey,
    EmailAddress
FROM Source_DE
WHERE SubscriberKey IS NOT NULL
2. Provide a fallback value

You can replace NULL values using functions such as ISNULL().

SELECT
    ISNULL(SubscriberKey, 'UNKNOWN') AS SubscriberKey,
    EmailAddress
FROM Source_DE
3. Check joins carefully

Sometimes joins unintentionally create NULL values. For example, a LEFT JOIN may return NULL values when there is no matching record.

Review your join logic to ensure required fields are always populated.

4. Review Data Extension settings

If the field does not actually need to be required, you may also consider modifying the target Data Extension and allowing NULL values.

In practice, this error is usually easy to troubleshoot because it clearly indicates that a required field in the target Data Extension is receiving NULL values from the query.

Delete synchronized contacts

Marcel Szimonisz
Table of contents: Operations and troubleshooting

Deleting contacts from Marketing Cloud Engagement can create unexpected results when Marketing Cloud Connect synchronization is active.

If a contact is deleted in Marketing Cloud while the synchronized data source is still running, the contact may be re-created in All Contacts with a system-generated GUID or UUID as its Contact Key. This can lead to duplicate contacts, incorrect subscriber relationships, and unnecessary records in your account.

Why are GUID contacts created?

Marketing Cloud Connect synchronizes Contact, Lead, and other Salesforce records with Marketing Cloud Engagement.

When a contact is deleted from Marketing Cloud Engagement, Salesforce may still contain the original record. If the synchronized data source runs before the contact deletion process is complete, Marketing Cloud can interpret the record as a new contact and create it again.

The re-created contact may contain:

  • The Salesforce record ID in the ID field
  • A system-generated UUID in the _ContactKey field
  • A new record in All Contacts

Salesforce recommends deleting the record from Salesforce first, followed by deleting the corresponding contact from Marketing Cloud Engagement. This prevents the synchronization process from reintroducing the contact with a GUID-based Contact Key. Salesforce Contact Deletion Guidance

Recommended deletion process

Follow this sequence whenever possible:

  1. Delete or exclude the contact from the Salesforce source.
  2. Allow Marketing Cloud Connect to synchronize the change.
  3. Confirm that the contact is no longer eligible for synchronization.
  4. Submit the contact for deletion in Marketing Cloud Engagement.
  5. Monitor the deletion process until it is fully complete.

Deleting the Salesforce record alone does not delete the contact from Marketing Cloud Engagement. The contact must also be removed using Contact Delete in Marketing Cloud. Salesforce Contact Delete Considerations

When should you pause synchronization?

If you cannot delete the Salesforce record first, pause the specific synchronized data source before starting the Marketing Cloud contact deletion.

In Contact Builder:

  1. Go to Data Sources.
  2. Select Synchronized.
  3. Open the relevant Salesforce object.
  4. Click Pause Sync.
  5. Submit the contacts for deletion in Marketing Cloud Engagement.
  6. Wait until the Contact Delete process is complete.
  7. Click Resume Sync.

Pausing synchronization prevents the records from being re-created while the deletion is still processing. Do not resume synchronization too early. If the sync is resumed while the contacts are still in a suppressed or pending-deletion state, the GUID-based records can be introduced again. Salesforce GUID Contact Key Guidance

What if GUID contacts already exist?

If GUID-based contacts have already been created:

  1. Extract the affected contacts and their Contact Keys.
  2. Pause the synchronized data source.
  3. Submit the GUID-based contacts for Contact Delete.
  4. Wait until the deletion process is complete.
  5. Resume synchronization.
  6. Perform a full refresh of the synchronized object if the GUID values remain in the synchronized data extension.

A full refresh clears and repopulates the synchronized data extension, which can help restore the correct Salesforce ID as the Contact Key. Schedule the refresh carefully because the synchronized data extension may temporarily contain no data during the process. Salesforce Synchronized Data Source Best Practices

Additional best practices

Before deleting contacts, always:

  • Export the contact list and Contact Keys for auditing.
  • Confirm that the contacts are not active in important journeys.
  • Check whether the contacts exist in other business units.
  • Avoid deleting large volumes in parallel.
  • Make sure the deletion criteria use the correct Contact Key or Salesforce ID.
  • Test the process with a small number of records first.
  • Do not rely on deleting a synchronized data extension to remove contacts from All Contacts.

Pausing a synchronized data source only stops new updates from arriving. It does not delete existing contacts from Marketing Cloud Engagement. To remove the contacts completely, you must submit a Contact Delete request.

Final recommendation

For Salesforce-synced contacts, the safest approach is:

Delete or exclude the record in Salesforce first, then delete the contact in Marketing Cloud Engagement.

If that sequence is not possible, pause the relevant synchronization before starting the deletion and resume it only after the Contact Delete process has finished. This simple step helps prevent duplicate records and unwanted GUID-based Contact Keys.

Mobile channels

Introduction to Mobile Studio

Marcel Szimonisz
Table of contents: Mobile channels

Mobile Studio in Salesforce Marketing Cloud Engagement is the mobile messaging workspace used to manage SMS, push notifications, and supported chat-style messaging. It matters because mobile campaigns are not just smaller versions of email – setup, consent, delivery, and reporting behave differently by channel. In practice, Mobile Studio works best when it is treated as one part of the wider Engagement stack, not as a standalone sending tool.

How Mobile Studio fits inside Salesforce Marketing Cloud Engagement

Within the broader Engagement platform of studios, builders, data, and automation, Mobile Studio is the channel layer for mobile communication. It sits alongside other channel tools, while the platform’s builders and data features handle orchestration, audience logic, and automation.

The mobile messaging workspace in Marketing Cloud Engagement brings the main mobile capabilities into one area, but it does not replace the rest of the platform. A common issue is assuming the place where a message is created is also where identity, decisioning, and reporting are fully managed. What typically happens instead is that Mobile Studio depends heavily on data model quality, subscriber status, and journey logic elsewhere in the account.

What tools are included in Mobile Studio

In practice, an umbrella layer rather than a single standalone app is the simplest way to think about Mobile Studio. The name usually refers to a set of mobile-specific tools that support different delivery methods rather than one universal messaging engine.

MobileConnect

The MobileConnect, MobilePush, and GroupConnect toolset makes the split clear. MobileConnect is the SMS-focused part of Mobile Studio, typically used for text-based campaigns, alerts, reminders, and other programs where the phone number is the key contact point.

In practice, SMS work almost always forces teams to think harder about subscriber status than they expected. A common issue is assuming an existing marketing contact is already ready for text messaging. What typically happens is that SMS programs need their own consent handling, audience readiness checks, and message timing rules before they are safe to scale.

MobilePush

MobilePush handles app-based notifications. This is the part of Mobile Studio that depends on a mobile app experience, not just a marketing database.

One limitation is that the visible work in Marketing Cloud is only part of the implementation. Push delivery depends on app setup, device registration, and whether the audience has actually enabled notifications. What typically happens is the marketing team can build the message quickly, while the real blocker sits in the mobile app release process or SDK configuration.

GroupConnect

GroupConnect covers supported messaging apps rather than standard SMS or app push. In real-world use, it is usually a more targeted channel choice.

A common issue is expecting it to behave like a universal replacement for SMS. In practice, group or chat messaging is more dependent on channel availability, account setup, and whether the target audience already uses that messaging environment. That makes it useful in the right context, but narrower in scope than plain text messaging.

What Mobile Studio is used for in practice

The platform is designed for SMS, push, and chat-based mobile engagement across both promotional and operational use cases. What typically happens is teams use SMS when immediacy matters, push when they want to re-engage app users, and supported messaging apps when the brand already has a relevant conversational use case.

That channel mix is why Mobile Studio often becomes part of more than just campaign execution. It can support onboarding, reminders, event-triggered notifications, service-adjacent communications, and retention programs. In practice, the difference between a good and bad setup is rarely the message copy. It is whether the team has the right identifier, the right permission state, and the right delivery channel for that moment.

How Mobile Studio works with Journey Builder

Mobile Studio handles the mobile channel, but Journey Builder provides the orchestration layer for cross-channel journeys. That separation matters because lifecycle logic does not live inside the mobile tool itself. Entry criteria, branching, waits, and sequencing belong to the journey, while Mobile Studio provides the actual channel execution capability.

What typically happens is a contact enters from a data event or selected audience and moves through the entry-source and activity execution model used by Journey Builder. When the flow reaches an SMS or push activity, the journey relies on the Mobile Studio channel setup already configured in the account. A common issue is expecting Mobile Studio alone to control suppression, fallback logic, or cross-channel timing. In practice, those decisions usually depend on journey design and the underlying data available at send time.

Channel behavior differences that affect implementation

SMS is direct, but setup is more operational

SMS usually feels straightforward to non-technical stakeholders because the output is simple. The setup is not always simple. A common issue is treating SMS like a fast-launch channel and discovering late that subscription handling, sender setup, or inbound response planning still needs work.

In practice, SMS becomes operational very quickly. Message timing, contact readiness, and opt-in state matter more than teams often expect. If those are not aligned early, the campaign build can finish before the program is actually deployable.

Push depends on the app more than the message

Push notifications often look easier in the UI than they are in production. One limitation is that MobilePush only works well when the mobile app side is already healthy.

What typically happens is that marketing builds a push campaign on schedule, but the reachable audience is smaller than expected because app adoption, device registration, or permission settings are not where they need to be. That is why push projects often depend on close coordination between marketing and mobile product teams.

Messaging apps are selective by design

Supported chat-style messaging can be very effective when there is a clear customer behavior pattern behind it. In practice, it is usually not the default mobile channel for every program.

A common issue is trying to standardize all mobile communication into one channel. What typically works better is matching the message type to the channel’s real usage pattern – urgent notices for SMS, app-driven moments for push, and conversational or market-specific interactions for supported messaging apps.

Data model and reporting considerations

Mobile Studio becomes much easier to manage when mobile identifiers are tied cleanly to the contact model. If the account stores phone numbers, device relationships, and subscriber status in disconnected places, personalization and suppression quickly become unreliable.

For reporting, the system data views used for SQL-based tracking and reporting are often where troubleshooting becomes practical. Native channel tracking helps, but it rarely answers every operational question on its own. In practice, teams usually need to connect send activity, subscriber context, and journey context to understand who qualified, who was sent a message, and where a process failed.

One limitation is that mobile reporting is not always as uniform as teams expect. A common issue is looking for one clean report that explains every result across channels. What typically happens is that mobile analysis requires a mix of channel-specific tracking, journey logic, and SQL-based investigation.

Common trade-offs and limitations

One trade-off with Mobile Studio is that it gives strong channel execution, but the channels do not behave the same way. SMS, push, and messaging apps differ in audience readiness, delivery dependencies, and how performance is interpreted. In practice, that means the same campaign strategy rarely ports cleanly from one mobile channel to another.

Another limitation is testing. Email can often be validated with relatively simple seed-list workflows, but mobile programs depend on real subscriptions, real devices, app state, and working channel setup. What typically happens is that QA takes longer than expected, especially for push and any program tied to live app behavior.

A common issue is ownership. Mobile Studio campaigns often touch marketing operations, compliance, CRM data, and app teams at the same time. When one of those pieces is late, the interface may look ready long before the channel actually is.