


How to Create and Customize List Views in Salesforce
Salesforce list views are one of the simplest but most powerful productivity features available to users. Instead of searching through hundreds or thousands of records, list views allow users to create filtered lists that show only the data relevant to their work.
Whether you are working with Leads, Contacts, Accounts, Opportunities, Cases, or custom objects, list views help you quickly access records, apply filters, edit data in bulk, and improve daily efficiency.
What Is a List View in Salesforce?
A list view is a filtered display of records from a Salesforce object. Rather than showing every record, a list view displays only records that meet specific criteria.
For example, a sales representative might create list views for:
- My Open Opportunities
- Leads Created This Month
- Accounts in Slovakia
- Opportunities Closing This Quarter
List views allow users to focus on the records that matter most without needing to build reports.
Why Use List Views?
List views provide several benefits:
- Quickly find relevant records
- Reduce time spent searching
- Create personalized views for different teams
- Perform inline editing
- Update records in bulk
- Improve user productivity
For many day-to-day tasks, a list view is faster than creating and running a report.
Creating a New List View
Creating a custom list view allows users to focus on a specific subset of records rather than browsing every record in an object. List views are often created around business processes such as open opportunities, active leads, high-priority cases, or accounts owned by a particular team. By creating dedicated list views, users can reduce the time spent searching and quickly access the records they work with most frequently.
To create a new list view:
- Navigate to an object such as Leads, Accounts, or Opportunities.
- Click the List View Controls icon.
- Select New.
- Enter a List Name.
- Choose who can access the list view:
- Only I can see this list view
- All users can see this list view
- Share list view with groups of users
- Click Save.
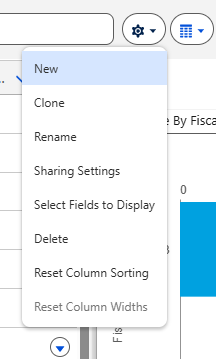
Your new list view is now available.
Adding Filters to a List View
Filters are the foundation of every list view. Without filters, a list view would simply display every record in an object. Filters allow users to narrow the results based on field values, ownership, dates, statuses, or custom criteria. The more accurately filters are configured, the more useful the list view becomes for daily operations.
Filters determine which records appear.
To add filters:
- Open the list view.
- Click the Filter panel.
- Select Add Filter.
- Choose a field.
- Select an operator.
- Enter a value.
- Save the filter.
Example
Show opportunities that:
- Stage = Proposal
- Amount > 10,000
- Close Date = Current Quarter
Only records matching all conditions will appear.
Using Filter Logic
Standard filters are combined using AND conditions, which means every condition must be true for a record to appear. Filter Logic allows administrators and users to build more sophisticated criteria using AND, OR, and parentheses. This makes it possible to create a single list view that covers multiple business scenarios without maintaining several nearly identical views.
Salesforce supports advanced filter logic.
Example:
1 AND (2 OR 3)Where:
- Stage = Proposal
- Country = Slovakia
- Country = Czech Republic
This allows users to build more flexible views without creating multiple list views.
Selecting Visible Columns
The records shown in a list view are only part of the experience. The columns determine which information users can evaluate at a glance. Well-designed column layouts reduce unnecessary clicks and allow users to make decisions directly from the list view. A cluttered list view with too many columns often becomes difficult to read and maintain.
To customize columns:
- Open the list view.
- Click List View Controls.
- Select Select Fields to Display.
- Move fields between Available Fields and Visible Fields.
- Save.
Good column selection improves readability and reduces scrolling.
Example Opportunity Columns
- Opportunity Name
- Account Name
- Amount
- Stage
- Close Date
- Owner
Reordering Columns
Column order can significantly affect usability. Fields that are referenced most frequently should appear first, while supporting information can be positioned later in the list. A logical column order helps users scan records more efficiently and reduces horizontal scrolling.
Columns can be reordered by moving fields up or down in the visible field list.Place the most important information near the beginning of the view to improve usability.
Pinning a List View
Many users spend most of their day working from a single list view. Pinning allows Salesforce to remember a preferred view and automatically open it when the user returns to the object. This small productivity feature can eliminate repetitive navigation throughout the day.
Users can pin their favorite list view. When pinned, Salesforce automatically opens that list view each time the object is accessed. This is particularly useful for users who work primarily with a single filtered view.
Sharing List Views
While list views can be personal, many organizations use shared list views to standardize how teams manage records. Shared views ensure that users are working from the same filtered data and reduce the need for every individual to create their own version of the same list.
List views can be shared with:
- Individual users
- Roles
- Public Groups
- Territories
- All users
Sharing allows teams to standardize how records are viewed and managed.
Examples include:
- SDR lead queues
- Customer support case lists
- Regional account views
Inline Editing from List Views
One of the most valuable productivity features of Salesforce list views is inline editing. Instead of opening each record individually, users can update information directly within the list. This capability is especially useful when managing large volumes of records that require minor changes.
Many fields can be edited directly from a list view.
Users can:
- Click a field
- Modify the value
- Save changes
This eliminates the need to open individual records.
Inline editing can significantly speed up maintenance tasks.
Mass Updating Records
Combined with inline editing, list views become a lightweight data management tool. Users can quickly review records, identify gaps or inconsistencies, and update multiple records in a fraction of the time required through individual record pages.
Users can update multiple records at once using list views and inline editing.
Common examples include:
- Updating lead status
- Assigning record owners
- Updating account classifications
- Changing opportunity stages
This feature can save hours of manual work.
List Views vs Reports
Many new Salesforce users wonder when to use list views and when to use reports.
Use List Views When:
- You need quick access to records
- You want simple filtering
- You plan to update records
- You need day-to-day operational views
Use Reports When:
- You need aggregations
- You need charts
- You need dashboards
- You need historical analysis
- You need grouped data
List views are operational tools, while reports are analytical tools.
Common List View Examples
Different departments use list views for different operational purposes. Sales teams often focus on pipeline management, marketers on lead qualification, and service teams on case resolution. The examples below demonstrate some common use cases across departments.
Sales Team
- My Open Opportunities
- Opportunities Closing This Month
- Stalled Opportunities
Marketing Team
- New Leads This Week
- Leads Without Email Address
- MQL Leads
Service Team
- Open Cases
- High Priority Cases
- Cases Waiting for Customer Response
Best Practices
A poorly designed list view can become difficult to maintain and confusing for users. Following a few simple best practices helps ensure that list views remain useful as the organization grows and new fields, processes, and teams are introduced.
Follow these recommendations when creating list views:
- Keep filters simple
- Display only necessary columns
- Use meaningful names
- Share common views with teams
- Remove unused list views periodically
- Use pinned views for frequently accessed data
A well-designed list view helps users work faster and improves overall Salesforce adoption.
Create a List View Chart
While list views are excellent for reviewing individual records, charts provide a quick visual summary of the same data. List View Charts allow users to identify trends, distributions, and concentrations without building reports or dashboards. Because charts are based on the current list view, they automatically reflect the same filters and record set displayed to the user.
To create a List View Chart:
- Navigate to the object you want to visualize.
- Select the desired list view.
- Click the List View Charts icon.
- In the Charts panel, click the chart settings icon and select New Chart.
- Configure the chart:
- Enter a chart name.
- Select a chart type.
- Choose an aggregate type (Count, Sum, or Average).
- Select the aggregate field.
- Select the grouping field.
- Click Save.
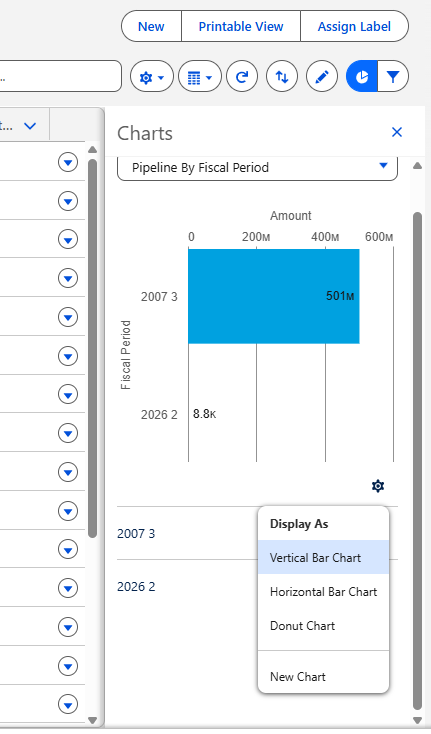
Once saved, the chart appears alongside the list view and provides a visual summary of the records currently displayed.
Understanding Chart Configuration
Chart Type
Determines how the data is visualized. Salesforce supports chart types such as Donut, Vertical Bar, and Horizontal Bar charts.
Aggregate Type
Defines how Salesforce calculates the data:
- Count
- Sum
- Average
Aggregate Field
Specifies which field is used in the calculation.
Grouping Field
Determines how records are grouped within the chart.
List View Charts are useful when users need quick visual insights directly from operational data without the additional complexity of building reports and dashboards.
Share With Others
 Platinum