74 Salesforce Marketing Cloud Engagement What Is Server-Side JavaScript (SSJS) in Salesforce Marketing Cloud Engagement?
178 Salesforce Marketing Cloud Engagement How to Delete Query Activities in Bulk Using SSJS in Salesforce Marketing CloudPremium
437 Salesforce Marketing Cloud Engagement What is AMPscript? How to Personalize Your Marketing Cloud EmailsPremium
232 Salesforce Marketing Cloud Engagement SELECT TOP with GROUP BY in Query Studio Returns Wrong Results
359 Salesforce Marketing Cloud Engagement How to Test SSJS & AMPscript in Salesforce Marketing CloudPremium
561 Salesforce Marketing Cloud Engagement How to query shared data extensions in salesforce marketing cloudPremium
> 999 Salesforce Marketing Cloud Engagement Send Transactional Email via API in Salesforce Marketing CloudPremium
> 999 Salesforce Marketing Cloud Engagement Understanding SSJS Request Methods in Salesforce Marketing Cloud
903 Salesforce Marketing Cloud Engagement How to Use AMPscript AttributeValue in Salesforce Marketing CloudPremium
936 Salesforce Marketing Cloud Engagement When AMPscript Isn’t Enough: Heavy Personalization with JavaScript in Salesforce Marketing CloudPremium
74 Salesforce Marketing Cloud Engagement What Is Server-Side JavaScript (SSJS) in Salesforce Marketing Cloud Engagement?
241 Salesforce Marketing Cloud Engagement What Is a Cloud Page in Salesforce Marketing Cloud Engagement?
178 Salesforce Marketing Cloud Engagement How to Delete Query Activities in Bulk Using SSJS in Salesforce Marketing CloudPremium
266 Salesforce Marketing Cloud Engagement How to Generate Barcodes and QR Codes in Salesforce Marketing Cloud EngagementPremium
359 Salesforce Marketing Cloud Engagement How to Test SSJS & AMPscript in Salesforce Marketing CloudPremium
561 Salesforce Marketing Cloud Engagement How to query shared data extensions in salesforce marketing cloudPremium
> 999 Salesforce Marketing Cloud Engagement Send Transactional Email via API in Salesforce Marketing CloudPremium
> 999 Salesforce Marketing Cloud Engagement Understanding SSJS Request Methods in Salesforce Marketing Cloud
> 999 Salesforce Marketing Cloud Engagement How to delete data extensions using SSJS in Salesforce Marketing Cloud
74 Salesforce Marketing Cloud Engagement What Is Server-Side JavaScript (SSJS) in Salesforce Marketing Cloud Engagement?
178 Salesforce Marketing Cloud Engagement How to Delete Query Activities in Bulk Using SSJS in Salesforce Marketing CloudPremium
> 999 Salesforce Marketing Cloud Engagement Send Transactional Email via API in Salesforce Marketing CloudPremium
> 999 Salesforce Marketing Cloud Engagement Understanding SSJS Request Methods in Salesforce Marketing Cloud
936 Salesforce Marketing Cloud Engagement When AMPscript Isn’t Enough: Heavy Personalization with JavaScript in Salesforce Marketing CloudPremium
> 999 Adobe Campaign Classic How to Create a Custom Workflow Activity in Adobe Campaign ClassicPremium
241 Salesforce Marketing Cloud Engagement What Is a Cloud Page in Salesforce Marketing Cloud Engagement?
266 Salesforce Marketing Cloud Engagement How to Generate Barcodes and QR Codes in Salesforce Marketing Cloud EngagementPremium
437 Salesforce Marketing Cloud Engagement What is AMPscript? How to Personalize Your Marketing Cloud EmailsPremium
359 Salesforce Marketing Cloud Engagement How to Test SSJS & AMPscript in Salesforce Marketing CloudPremium
561 Salesforce Marketing Cloud Engagement How to query shared data extensions in salesforce marketing cloudPremium
> 999 Salesforce Marketing Cloud Engagement Send Transactional Email via API in Salesforce Marketing CloudPremium
> 999 Salesforce Marketing Cloud Engagement Understanding SSJS Request Methods in Salesforce Marketing Cloud
903 Salesforce Marketing Cloud Engagement How to Use AMPscript AttributeValue in Salesforce Marketing CloudPremium
936 Salesforce Marketing Cloud Engagement When AMPscript Isn’t Enough: Heavy Personalization with JavaScript in Salesforce Marketing CloudPremium
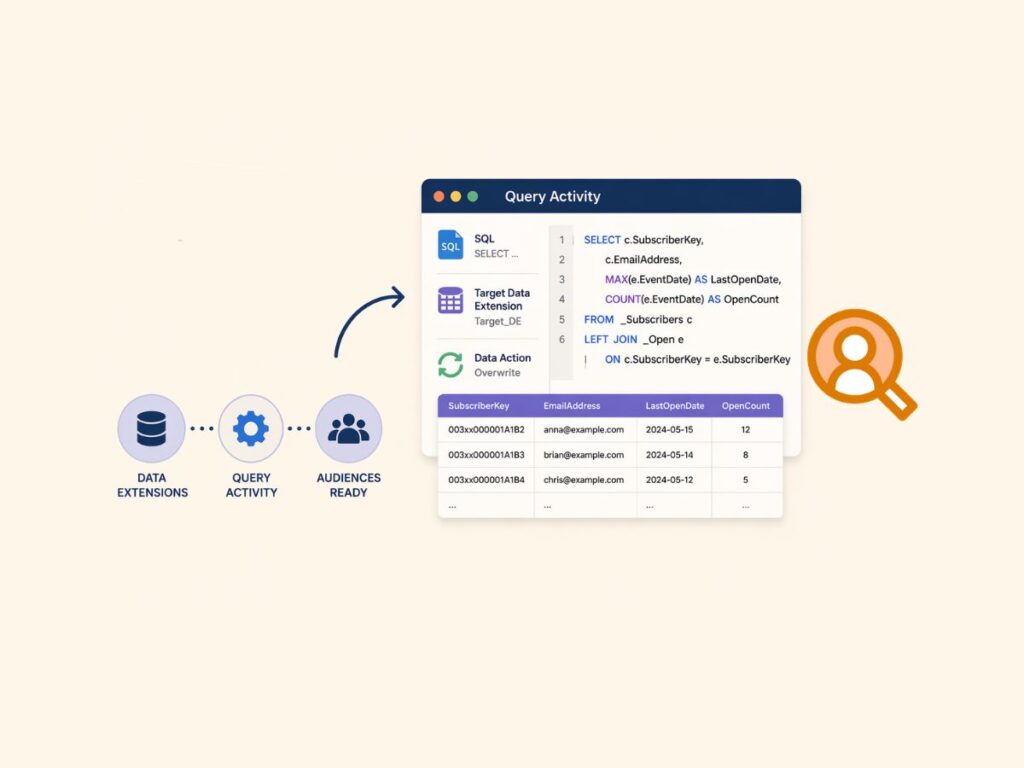
216 Salesforce Marketing Cloud Engagement What Is a Query Activity in Salesforce Marketing Cloud Engagement?Premium
178 Salesforce Marketing Cloud Engagement How to Delete Query Activities in Bulk Using SSJS in Salesforce Marketing CloudPremium
220 Salesforce Marketing Cloud Engagement What Are Data Views in Salesforce Marketing Cloud Engagement?
364 Salesforce Marketing Cloud Engagement 5 Reasons Why Salesforce Marketing Automation can end in error
232 Salesforce Marketing Cloud Engagement SELECT TOP with GROUP BY in Query Studio Returns Wrong Results
894 Adobe Campaign Classic Managing Primary Key Exhaustion and Index Rotation in Adobe Campaign ClassicPremium
> 999 Salesforce Marketing Cloud Engagement How to Create SQL Query Activities in Bulk Using SSJS in SFMCPremium
923 Adobe Campaign Classic Error When Deleting Data from List in Adobe Campaign Classic (ExecSQL Rights Required)