


Export data with no access to sftp
There might be situations where you need to extract data in Adobe Campaign, but you don’t have access to SFTP or the application server itself to fetch the file. In such cases, I’ll guide you through what we can do.
Original question has been posted on experience league where various options were mentioned from which I like the most are explained in detail in this blog post.
Send file as email attachment
You can extract a file as usual with the Extract activity and then attach the extracted file to an email for sending it to yourself. For enhanced security, you can also encrypt the file if your server has the 7zip or zip command installed. Alternatively, you can use the GPG command to encrypt files with digital signatures using keys.
Encrypt and archive files with password
All examples shown here are based on a Linux operating system. Additionally, you must have administrative rights, and your instance should be on-premises. In that case, you can use execCommand() in any script activity to encrypt and archive your files.
7z a -pYourPassword -mhe -t7z archive.7z your_directory
Replace YourPassword with the password you want to set, archive.7z with the desired name for your 7z archive, and your_directory with the directory you want to compress and encrypt.
In this example, the options used are:
-pYourPassword: Sets the password for the archive. ReplaceYourPasswordwith your actual password.-mhe: Encrypts file names in the archive.-t7z: Specifies the archive type as 7z.
Please note that handling passwords in commands may pose security risks, and it’s generally better to enter passwords interactively. As this cannot be prompted during the encription of the file within the Adobe Campaign workflow we stick with this option. Also, keep in mind that 7z uses strong AES-256 encryption for protecting the contents of the archive.
zip -e -r --encrypt AES256 -P your_password encrypted_archive.zip your_directory
zip: The command-line utility for creating and managing ZIP archives.-e: Specifies that the archive should be encrypted.-r: Recursively includes all files and directories within the specified directory (your_directory) into the archive.--encrypt AES256: Specifies the encryption method to be used. In this case, AES256 (Advanced Encryption Standard with a 256-bit key) is used. AES256 is a strong encryption algorithm widely considered secure.-P your_password: Sets the password for the encrypted ZIP file. Replaceyour_passwordwith the actual password you want to use. Note that specifying passwords in commands can have security implications, and it’s often better to enter passwords interactively.encrypted_archive.zip: Specifies the name of the ZIP archive that will be created. You can replace this with your desired name.your_directory: Specifies the directory to be compressed and included in the ZIP archive.
So, in summary, the command is creating a ZIP archive (encrypted_archive.zip) that is password-protected and encrypted using AES256, containing all files and directories within your_directory. The password for the encryption is set using the -P option. After running this command, you’ll be prompted to enter the password.
Manual export
You might already be familiar with displaying the population of your workflow. Simply leave your transition disconnected, then right-click on it and choose “Display the target.”
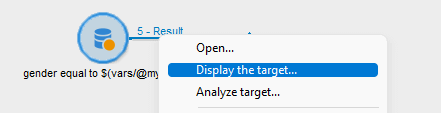
You might have done this thousands of times, but there’s a good chance you haven’t realized there’s an export feature lurking under the right-click menu.
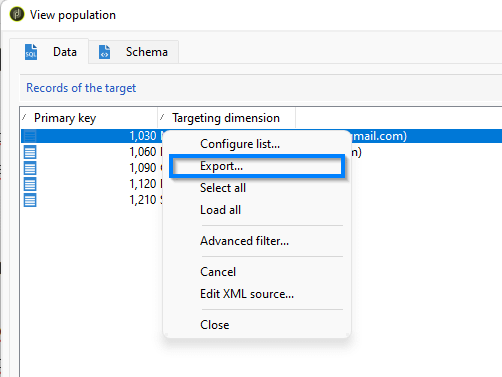
Here we follow the same steps as with the extract activity in workflow.
Automated export
Yes, you heard it right – even without having access to SFTP or the server, you can automatically export the file. Here’s how: use the extract activity to pull out the file, and then simply publish the extracted file as a public resource. You can bypass loops for a single-file publish, and the filename along with its path will be stored under the variable vars.filename, created by the extract activity.
When creating public resources, keep in mind that such files are open to the public, even if the URL is MD5 encoded and challenging to guess. It is a good practice to remove such files after you are done working with them. However, a problem arises – deleting a file from the public resource folder doesn’t remove the file from the actual location but rather from your console. If you host your frontend servers on-premises, ensure that if the file is not removed, you set up a process to delete files. For those using hybrid hosting and midsourcing, it is advisable to check with Adobe Support to confirm if the files have been removed.