


How to redo hot clicks report in workflow
In the world of email marketing, tracking recipient activity is essential to understanding the effectiveness of your campaigns. One valuable report that marketers often rely on is the “Hot Clicks Report,” which provides insights into recipient interactions, such as email clicks.
The report is included with the Adobe Campaign Classic installation, and you can simply click on any delivery report to open it.
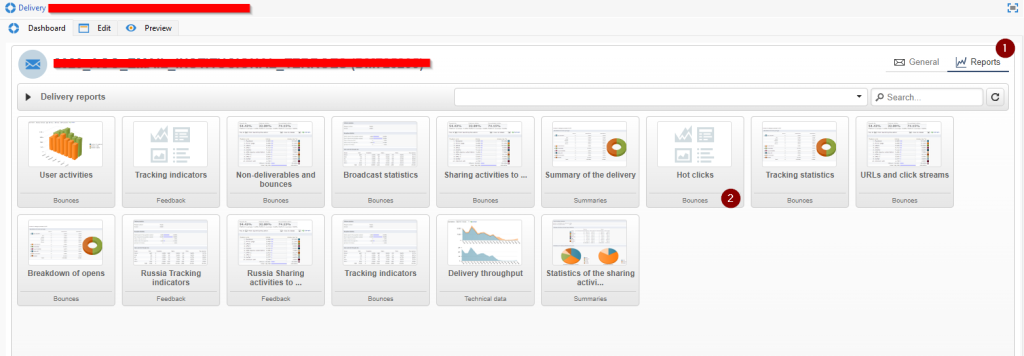
- Open any delivery and navigate to the Reports tab
- Select Hot clicks
Many times, data analysts require this report to be automatically exported as raw data. To accomplish this, we will create a workflow that exports click counts for every delivery within a specific time span.

Scheduler– scheduler to set as needed.JS - init– Simply calculating start and end date of tracking logs to extractQuery– tracking logs- Extract – extract tracking log aggregates to the SFTP (Alternatively you can ZIP and send it over email)
JavaScript activity
In our case I am getting entire year worth of aggregated hot clicks report. But you can also export only daily deltas similarly and then connect them in the external analytical tool.
//var d = new Date(); // for if daily extract is needed
//d.setDate(d.getDate() - 1);
//vars.dateStart = formatDate(d, "%4Y-%2M-%2D 00:00:00");
//vars.dateEnd = formatDate(d, "%4Y-%2M-%2D 23:59:59");
var d = new Date('2023-01-01');
vars.dateStart = formatDate(d, "%4Y-%2M-%2D 00:00:00");
vars.dateEnd = formatDate(new Date(), "%4Y-%2M-%2D 00:00:00");
var d = new Date('2023-01-01');: This line creates a new JavaScriptDateobject,d, with the date set to January 1, 2023.vars.dateStart = formatDate(d, "%4Y-%2M-%2D 00:00:00");: Here, it uses theformatDatefunction to format the date stored ind. The formatted date is then assigned to the variablevars.dateStart.%4Yrepresents the year with 4 digits (e.g., 2023).%2Mrepresents the month with 2 digits (e.g., 01 for January).%2Drepresents the day of the month with 2 digits (e.g., 01 for the 1st day).00:00:00represents the time as midnight (00 hours, 00 minutes, 00 seconds).
vars.dateStartwill contain the formatted date “2023-01-01 00:00:00.”vars.dateEnd = formatDate(new Date(), "%4Y-%2M-%2D 00:00:00");: This line creates anotherDateobject using the current date and time (i.e.,new Date()), formats it in the same way as before, and assigns it to the variablevars.dateEnd. This will give you the current date and time in the format “YYYY-MM-DD 00:00:00.”
In summary, this code initializes two variables, dateStart and dateEnd, with formatted date values. dateStart is set to January 1, 2023, at midnight, and dateEnd is set to the current date and time at midnight, both in the “YYYY-MM-DD 00:00:00” format. These variables can be useful for various purposes, such as setting date ranges for queries or reports.
Query tracking logs
The main activity of this extract workflow is a query activity, where certain special settings have to be configured.
We select our targeting dimension Recipient tracking logs.
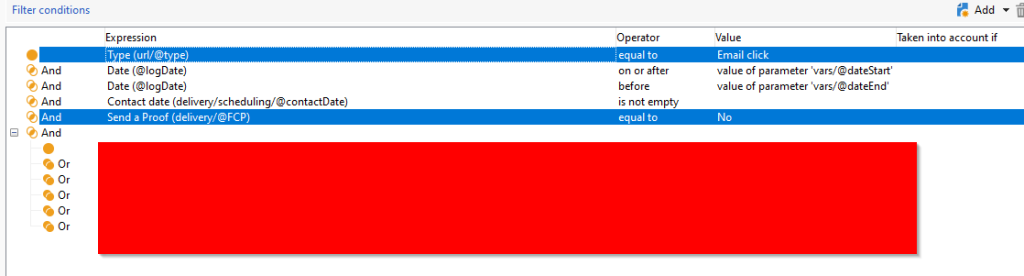
Create query conditions as needed:
[url/@type] = Email click[delivery/@FCP] = No– This means the delivery was not run in proof mode.[delivery/scheduling/@contactDate]: Remove unwanted deliveries, e.g., deliveries that were created during proofing in the delivery activity.
(Optionally, you can add a date range.)
Next we create our aggregating select by Add data…

We will select first option – Data linked to the filtering dimension and on second screen we select Data of the filtering dimension.
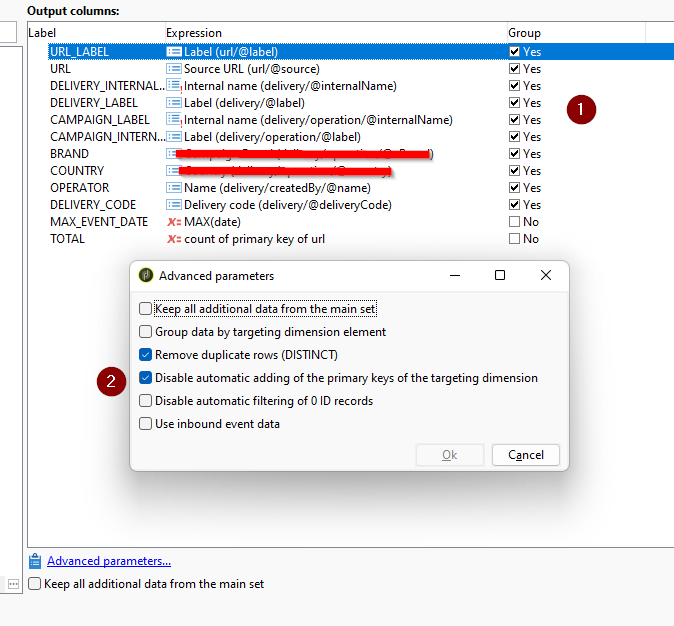
- Add data.. Data of filtering dimension. And add from left side any fields to the “Group by” clause especially [url/@Label] and counts by adding count(@id)
- Finish the wizard, when all fields are added
- Click on Edit additional data..
- VERY IMPORTANT: Disable automatic adding of the primary keys of the targeting dimension
- After aggregated data query activity, you can simply extract data to SFTP or anywhere.
NOTE: Step 2 and 3 is needed as while adding data the additional settings are not accessible they are only accessible when editing data.
Extract activity
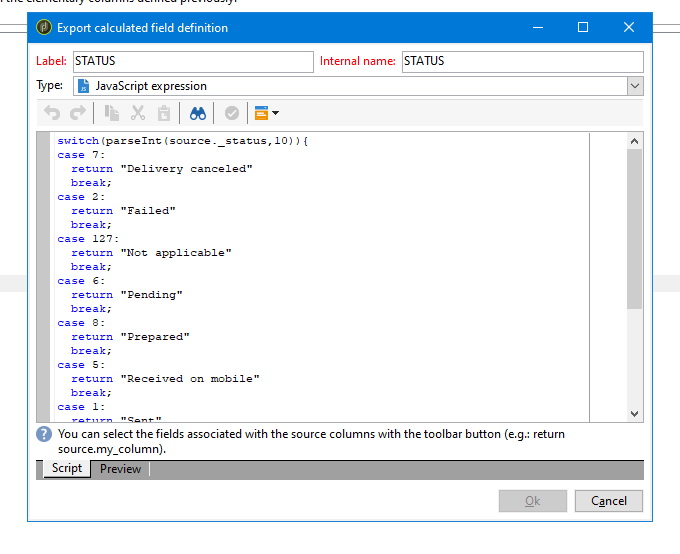
Set the fields to extract as needed, but remember to map your enumerations.
Share With Others
 Platinum